Dev Gualtieri
Electronic Design
By using a standard, low-cost PIC microcontroller with a short block of code that emulates a simple ramp-signal generator based on the venerable unijunction transistor (UJT), you can achieve smooth output and infinite resolution without the challenges of finding, using, and controlling a ramp-signal generator.
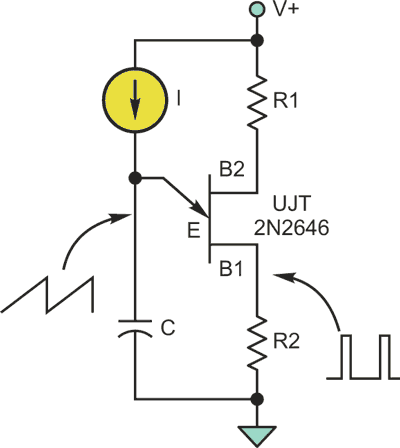
Unijunction transistors (UJTs) were common circuit elements several decades ago. A simple ramp generator could be built from a single UJT and a few other components (Fig. 1).
 |
|
| Figure 1. | In a simple UJT-based ramp generator, the current source linearly charges the capacitor to create a voltage ramp. A synchronizing output pulse is also available. |
The operating principle is simple. The base-emitter junction is initially in a high-impedance state, and the current source linearly charges the capacitor until a breakdown voltage is reached. At that point, the capacitor discharges through the UJT base until a lower threshold voltage is reached. Then, the base-emitter connection returns to a high-impedance state, and the capacitor can recharge.
This approach still has a few advantages over digital circuitry, as there are tradeoffs when using a digital-to-analog converter (DAC) to create a ramp. Inexpensive microcontrollers include high-resolution analog-to-digital converters (ADCs), but high-resolution DACs are expensive peripheral components. While such DACs have limited resolution, an analog ramp like one produced by a UJT has infinite resolution.
It’s possible to emulate the action of a UJT using just three I/O pins of a microcontroller and a few other components. Most microcontrollers allow their I/O pins to be dynamically reconfigured to function as either a high-impedance input or as an output. This feature is the basis for a simple UJT-emulated ramp generator.
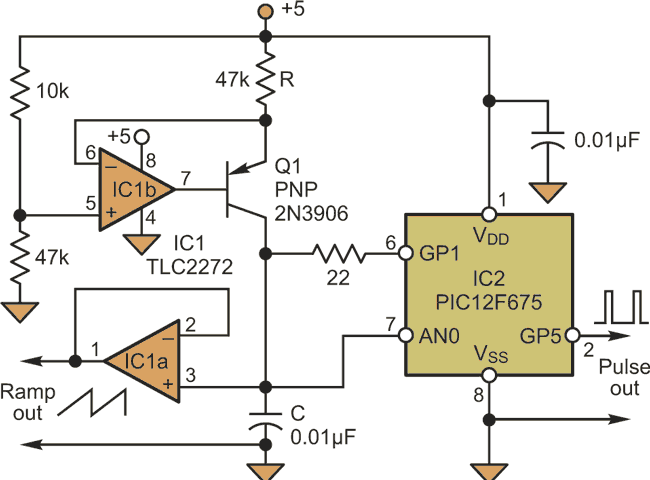
In the microcontroller emulation, the current source is implemented by the rail-to-rail operational amplifier IC1b of a dual device and Q1, while IC1a buffers the voltage on capacitor C and provides the ramp output (Fig. 2). This capacitor is connected to both analog/digital converter pin AN0 of the microcontroller (IC2) and to its I/O pin GP1, which is initially configured as an input. A 22-Ω current-limiting resistor allows high-value capacitors to be used without damage to the microcontroller.
 |
|
| Figure 2. | The microcontroller-based emulation of a UJT ramp generator switches the function of an I/O pin from a high-impedance input state to an output state to implement the ramp-generation function. |
The pseudocode listing for the microcontroller continually monitors the capacitor voltage (see the code).
Pseudo-code For The Microcontroller Emulation Of A UJT Ramp Generator
    main()
    {
    //set analog input pin, other I/O pin states
    initialize_microcontroller();
    discharge_pin = high-Z_digital_input;
    pulse_pin = 0; //optional pulse output
    while(l) //Infinite loop
    	{
    	v = analog_voltage(analog_pin);
    	if (v>v_upper)
    		{
    		pulse_pin = 1;
    		discharge_pin = low-Z_digitaI_output;
    		while (v>v_lower)
    			{
    			//loop until capacitor is discharged
    			v = analog_voltage(analog_pin);
    			}
    		pulse_pin = 0;
    		discharge_pin = high-Z_digital_input;
    		}
    	}
    }
 |
|
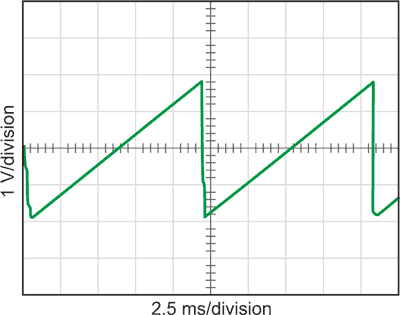
| Figure 3. | The ramp output repetition rate is about 85 Hz using the values shown. It can be changed via resistor R, which sets the charging current, and capacitor C. |
When it reaches a threshold value, it switches the I/O pin from its high-impedance input state to an output state at ground potential. When the capacitor voltage goes below another threshold value, the I/O pin is switched back to a high-impedance state, and the cycle repeats (Fig. 3). The circuit also provides a pulse synchronized with the ramp cycles, which can be used for timing and triggering.
