A Hunt
EDN
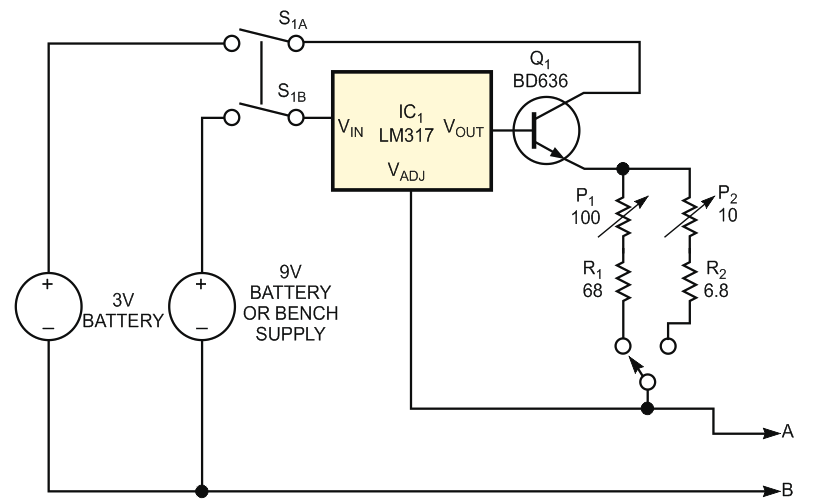
When I was recently debugging a design, I discovered that a short circuit existed from a ground plane to a power plane. I did not have access to a milliohmmeter or an equivalent tester for locating this type of short circuit. So, I logged onto the Internet to find an easily constructible milliohmmeter. I found the answer in a manufacturer's data sheet, which outlined the basic four-wire method of making low-resistance measurements. The method uses a voltage-reference IC as the input stage for a controlled constant-current source. A quick dig in the old component bucket revealed a supply of LM317 variable-voltage regulators. These ICs provide 1.25 V between their VOUT and VADJ terminals, a constant voltage to attack the constant-current problem. The other problem to attack was the output-voltage range of the constant-current source. The circuit I was working on used a 3.3 V supply, so I had to limit the voltage to 3.3 V. An LM317, configured as a constant-current source, delivers an output voltage equal to the input if the output resistance is too high. Because I wanted to use a bench supply or a 9 V battery, the voltage would fry any 3.3 V logic on the board. Ideally, I wanted voltage to be limited to 1.5 V. So, I came up with the configuration in Figure 1.
 |
|
| Figure 1. | Make your own milliohmmeter, using a voltage-regulator IC and some resistors. |
IC1 controls the base of the npn Darlington transistor, Q1. The IC regulates the voltage across the selected resistor to form the constant-current source. The current source delivers either 10 or 100 mA, depending on which emitter resistor is in the circuit. The purpose of S1 is to give longer battery life. You can calibrate the current source by strapping a resistive load between test points A and B and measuring the voltage across the resistor using a DVM (digital voltmeter). I used 5 and 10 Ω and set one S2 position for 10 mA and the other for 100 mA. To measure a small resistance, you attach test points A and B across the resistance. You set the DVM on a millivolt range. The DVM reads a voltage that is proportional to the resistance under test. If you calibrate the circuit as suggested, then the reading is 10 Ω/V on the 100-mA range and 100 Ω/V on the 10-mA range.
To track down pc-board short circuits, attach the unit with test points A and B across the suspected shorted signals. Attach one DVM probe to test point A and use the other to probe the circuit. Constant voltage along a trace indicates that no current is flowing and that the trace is not the source of the short circuit. Look for high readings on the trace with the low reading and low readings on the trace with the high reading, to locate the source of the short circuit.