Dave Prochnow
Never burn your mouth on a hot drink again
No matter your poison -- coffee, tea, hot chocolate, sake -- take a gulp too soon out of the pot and chances are good that you'll burn your mouth. But build this Smart Coaster and you'll always know when it's safe to sip.
According to my thermometer, common coffee brewers produce a cup of perfect coffee that is positively molten to the tongue, at 160ºF. Even as this marvelous beverage fills your room-temperature cup, temps can still reach a blistering 137.1ºF. Finally, after a couple of minutes cooling, your coffee is safe to drink, at a lukewarm 116.5ºF.
A simple circuit consisting of a thermistor, a special low-power operational amplifier (op amp) IC, an LED, and a couple of passive components will enable us to safely monitor the temperature of our coffee cup. Bundle this circuit inside a round metal container (metal helps conduct the cup's heat to the circuit) and you have a Smart Coaster.
TIME: 3 hours
COST: $ 8.61
DIFFICULTY: easy
PARTS
- LM324N (Mouser #512-LM324N; $0.36)
- Thermistor (I used an obsolete thermistor from Electronic Goldmine #G1929 for my circuit.) Try this one from SparkFun Electronics #SEN-00250; $1.95
- 1 K resistor (Mouser #660-CFS1/4C102J; $0.05)
- Red LED (I used a salvaged LED for my circuit.) Try this one from Mouser #696-SSLLX5093HD-5V; $0.27
- 10 K resistor (Mouser #660-CFS1/4CT52R103G; $0.08)
- 10 K potentiometer [I used a salvaged pot for my circuit.] Try this one from SparkFun Electronics #COM-00104; $0.95
- 3.7 V battery (SparkFun Electronics #PRT-08818; $4.95)
- Scrap wire
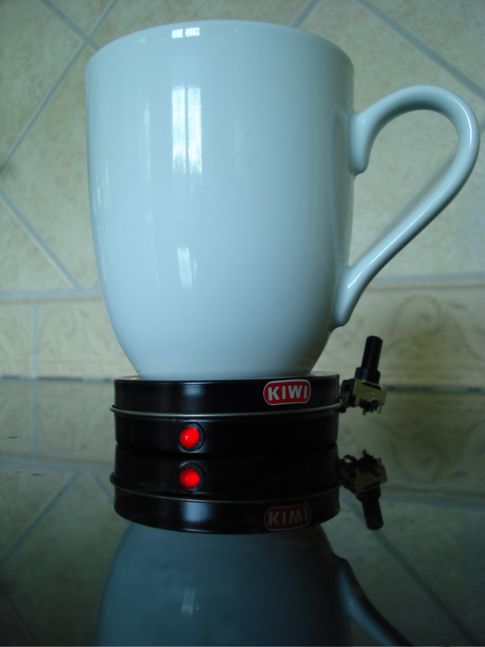
- Round flat-top metal container (I used a salvaged Kiwi Brands shoe polish container -- just to prove to some of you that I do know shinola.)
STEPS
1. Clip off the unnecessary legs from the LM324N IC: keep pins 1, 2, 3, 4, and 11.
2. Attach the thermistor to the inside of the metal container's lid with some tape. Be sure to insulate both of the thermistor leads.
3. Drill a hole in the side of your metal container for holding the red LED. Insulate the bottom of the metal container with some scrap paper or 2 mm hobby foam.

4. Follow our schematic for building the Smart Coaster circuit.
5. Fit the components inside the metal container, connect the 3.7 V battery, and close the metal lid. You can easily test your completed project by turning the potentiometer until the LED just turns off (this is roughly equal to room temperature). Now hold one of your hot little fingers on the lid of the Smart Coaster. Within about 5-10 seconds, the LED should turn on. If not, then open up your metal container and carefully reexamine your wiring. If this test result is OK, you are now ready to calibrate your Smart Coaster.

Place your cup of fresh brew on the Smart Coaster and use the 10 K potentiometer to adjust the sensitivity of the thermistor. Turn the potentiometer until the red LED glows and closely monitor the temperature of your beverage. When the cup's temps have fallen to your desired drinking level, turn the potentiometer until the LED goes out. Your Smart Coaster is now calibrated for monitoring your future drink temps. Remember, if you change cups or mugs you will have to recalibrate the Smart Coaster. Bottoms up.
