Monitors battery voltage
Three-LED Display
Circuit diagram:
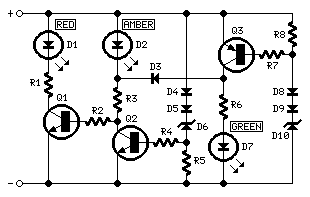
Parts:
|
R1,R3,R6 |
1K 1/4W Resistors |
|
R2 |
100K 1/4W Resistor |
|
R4,R5,R7,R8 |
3K3 1/4W Resistors |
|
D1 |
Red LED (Any dimension and shape) |
|
D2 |
Amber LED (Any dimension and shape) |
|
D3,D4,D5 |
1N4148 75V 150mA Diodes |
|
D6 |
BZX79C10 10V 500mW Zener Diode |
|
D7 |
Green LED (Any dimension and shape) |
|
D8,D9 |
1N4148 75V 150mA Diodes |
|
D10 |
BZX79C12 12V 500mW Zener Diode |
|
Q1,Q2 |
BC547 45V 100mA NPN Transistors |
|
Q3 |
BC557 45V 100mA PNP Transistor |
Comments:
Connecting this circuit to the battery of your vehicle, you will always know at a glance the approximate voltage available.
An indication of battery voltage is useful to the motorist for monitoring the battery's capacity to deliver current, and as a check on the efficiency of the dynamo or alternator.
Threshold voltages of the LEDs are set by means of two Zener Diodes (D6 & D10) plus two further Diodes wired in series (D4, D5 and D8, D9 respectively) adding a step of about 1.3V to the nominal Zener voltage.
LED indication:
- Red LED D1 is on when battery voltage is 11.5V or less. This indicates a low battery charge.
- Amber LED D2 is on when battery voltage is comprised in the 11.5 - 13.5V range. This indicates that the battery is good if the motor is off. When motor is running, this indicates no charge from dynamo or alternator.
- Green LED D7 is on when battery voltage is 13.5V or more. This indicates a normal condition when motor is running and dynamo or alternator are charging.
