With this post we wanted to compare the latest arrived boards in the world of hobbyists electronics with devices that were already on the market. We highlighted the pros and cons of the most prominent alternatives with the aim of helping our readers to choose the one better fitting with their requirements.
Here’s the list of platforms we took in consideration:
- Arduino Uno
- Arduino Due
- MBED
- Discovery
- Raspberry PI
- Android based Mini PCs based on MK802II/MK802III
As you may know there’s plenty of platforms for you to use: we decided to present a quick overview of some of the most accessible platforms.
 |
By far the better known among those analyzed in this post, the Arduino Uno – a simple 8 bits board – contributed to widespread among fans all over the world the culture of open hardware. Arduino allowed newbies in the world of electronics and microcontrollers, to obtain tangible results quickly, in a repeatable and customizable fashion, thanks to gradual, and relatively rapid learning, thanks to the large amount of documentation, tutorials, examples, books and tips available in forums and blogs like ours. |
The consequent push for a more capable hardware pushed the Arduino’s team to build Arduino Due, the first board of the family to use a powerful ARM Cortex-M3 microcontroller. This choice forced the team to make a new version of the IDE, the 1.5, containing an ARM compiler in addition to the AVR one.
|
A credible alternative to Arduino Due is the MBED, that is available both with a Cortex M0 or M3, by NXP. The model comparable to the Due uses a LPC1768. |
Apparently, by directly comparing costs, the Arduino Due seem cheaper but that’s not really true. If we look at the diagrams in detail, we immediately notice that the two boards both use a Cortex M3 chip equipped with an Ethernet MAC compliant with standard IEEE 802.3. Unlike the Due, the MBED has been designed so as to allow the direct connection of the device to LANs in a simple manner. For this purpose, the pcb contains also a small integrated circuit, the DP83848J by National Semiconductor (now TI), responsible for ensuring physical access to the network(OSI/ISO Layer 1).
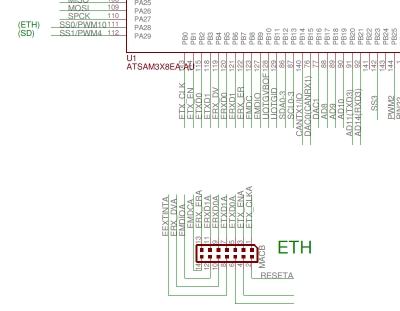
By looking at the official Eaglecad files of the Arduino Due, you can notice that the team took into account this extended connectivity opportunity: you can see the connections to an “ETH” connector which is headed as seen in the Ethernet MAC from SAM3X. The connector is also clearly visible on the right side of the PCB, outside of the printed circuit board...
 |
|
| Figure 1. |
At the EagleCAD files for Arduino Due you can see the connections to an “ETH” connector which is headed as seen in the Ethernet MAC from SAM3X. |
We can figure out that the development of the relative SW libraries would have required too much time and would have delayed further the the Due, whose distribution began fourteen months after its official announcement (also notice that it’s already at the third revision while having just entered the market.
Another important difference between MBED and the Due is that while both are powered at 3.3V the first is 5V tolerant, while the latter is not.
If we consider the need to use a level shifter to ensure full compatibility with the shields made for the Uno and the lack of an Ethernet interface… the cost of Due actually become higher than MBED. Also Due cannot still be considered very mature from the in terms of IDE and libraries. The will to keep the backward compatibility with the code and libraries written for the Uno, makes software development for the Due rather complex since the two cards are actually much more different.
 |
In the meanwhile also ST created several development boards for virtually every type of ARM microcontroller that it sells. In this post we consider the Discovery F0 with ST32 that uses a Cortex M0 microcontroller with performances that are comparable to those of the NXP LPC11U24 equipped MBED. |
An immediately evident peculiarity of this device is its really low price: about 8 euros. But why should we spend 65 euro for the MBED or 47 for the Due if we can have the power of a 32-bit F0 at a significantly lower price? Primarily there is no IDE for the Discovery as: ST only provides a list of recommended development toolchains for programming
- IAR Embedded Workbench for ARM (EWARM) available from www.iar.com
- RealView Microcontroller Development Kit (MDK-ARM) toolchain available from www.keil.com
- Atollic TrueSTUDIO STM32 available from www.atollic.com
- Altium TASKING VX-toolset for ARM Cortex-M available from www.tasking.com
This is a clear sign that the product wasn’t really developed with hobbyists in mind. The software tools listed here are not free: one must use the limited versions or purchase a license that can cost as much as several thousand euros.
By the way, let’s analyze further the hardware: size matters as the device developed by ST and is about three times bigger than an MBED. It’s then easy to understand that IDE and miniaturization come at a cost.
Let’s now consider just a simple code example – the acquisition and visualization of a temperature measured by a analog transducer as the MCP9700A might be. Using the libraries developed to make Arduino code compatible with the ST board. The code for the Discovery will be:
uint16_t G_ADCValue = 0;
  G_ReadVal float = 0;
  G_SendBuff char [64]; void setup (void)
  {uint16_ti = 0;
  char L_readChar;
  Serial.begin (115200);}
  void loop () {
  delay (2000);
  while (1)
  {delay(2000);
  G_ADCValue = analogRead (A2);
  G_ReadVal = (float) (* POWER_SUPPLY G_ADCValue) / 4095;
  sprintf (G_SendBuff, "% f Volts", G_ReadVal);
  Serial. print ("ADC read:");
  Serial.println (G_SendBuff)
  i + +
  if(i> 10) i = 0
  while(Serial.available ())
  {L_readCharSerial.read = ();
  Serial.write (L_readChar  );}
  Serial.println
  ("");}}
While, for Arduino:
# define TEMP 2
float val = 0.0,
T = float 0.0,
float VADC = 5;
STAMPA_T double = 0;
void setup ()
{Serial.begin(9600);}
void loop (){
STAMPA_T= (temp ());
Serial.print (STAMPA_T);
}
float temp (){
doublenread = 10.0,
double sum = 0.0 ;
for (int i = 0; i< nread; i + +){
val = analogRead (TEMP),
T = (((VADC/1024.0 * val) -0.5) * 100);
sum + =T; }
delay (100) ;
return (sum / nread);
}
As we can see the structure and controls are similar to those we are used to with Arduino but not exactly the same. To use code written for Arduino with Discovery you must apply some slight changes which, though small, are essential to ensure correct compilation and execution. Once again the ST card seems not suitable for the beginner, and you may face difficulties to compile your code in case of an error.
These days everybody talks about Raspberry PI: now enhanced with an increased 512MB Ram, with a great price point of 32 euros for model B, the more powerful of the two available.
 |
The “heart” of the board consists of a Broadcom BCM2835 SOC that contains a 700 MHz ARM 11 chip and a GPU capable of playing movies with BluRay quality. The CPU horsepower is comparable to those of an old Pentium III: consumption, however, is about 10 times lower (5W against 50W). On the board you have also a 3.5mm jack, an RCA connector for connecting analog televisions and also a modern HDMI interface for transferring digital audio and video. An RJ45 network connector is also available and a dual USB type A connector allows connection, for example, to mouses and keyboards. The OS used is LINUX, with several distributions already optimized to run on RaspberryPI: it boots via the SD card. While Arduino was conceived as a tool for which the code and is only a means to quickly and easily prototype your ideas in electronics, Raspberry PI mission is to give easy access to affordable computers. For this and other reasons, a true comparison of the two is unfair, but the attractiveness of the high computing power and the large number of interfaces on the Pi, combined with the versatility of Linux, gave a great boost to the creativity of the fans so that boards to bridging Arduino shields with Raspberry are available already. |
 |
Last but not least there’s another gem technology we wanted to present: the MK802II Android based mini PC designed to exploit the potential of the Allwinner A10 SOC, a Cortex A8 / 1 GHz chip with 1 GB of RAM and 4GB of flash: this boy is able to connect to WiFi (thanks to support for 802.11 b/g/n) as well as to wired networks via an USB/ethernet adapter. Thanks to a Video Processing Unit this board is able to play even HD movies smoothly. |
Android 4.0.4 (Ice Cream Sandwitch) is pre-installed and allows you to access to Google’s world of apps making the system very versatile and easy to use. For those who are not contented of Android and wanted to further exploit the potential of the hardware and are willing to experiment the MK802II can also boot LINUX using the microSD.
Tests with LINUX can be safely performed without going modifying the currently installed firmware; however in case of problems, you can always reinstall the preinstalled firmware on the MK802 using tools and instructions available on the official site by selecting the hardware version: http://www.rikomagic.com/download.asp.
From the tests we carried out, Fedora and seemed to be a little more stable, mature and complete: all distributions however wil likely be enhanced to cope with the great interest and the success of these devices and, in general, of ARM-based ones.
Rikomagic also built an advanced version, called MK802III, that provides even more power thanks to the new dual core Rockchip RK3066 Cortex A9 / 1.6 GHz processor, with 1 GB of RAM and 8 GB of flash memory.
Countless products might have been selected for this post as every week new devices are marketed. Consider this as episode one, reach out if you want us to add one more and please, let us know what boards you wanted to add to the comparison!