In the first part of this DI (Ref. 1), we saw how to gate an oscillator to generate well-behaved impulses. Now we find out how to extend that idea to producing well-behaved step functions, or nicely smoothed square waves.
The ideal here is the Heaviside or unit step function (Ref. 2), which has values of 0 or 1 with an infinitely sharp transition between them. Just as the Dirac delta impulse which we met in Part 1 is the extreme case of a normal distribution or bell curve, the Heaviside is the limit of the logistic function (which I gather logisticians use about as often as plumbers do bathtub curves, Ref. 3).
Square wave with smooth edges
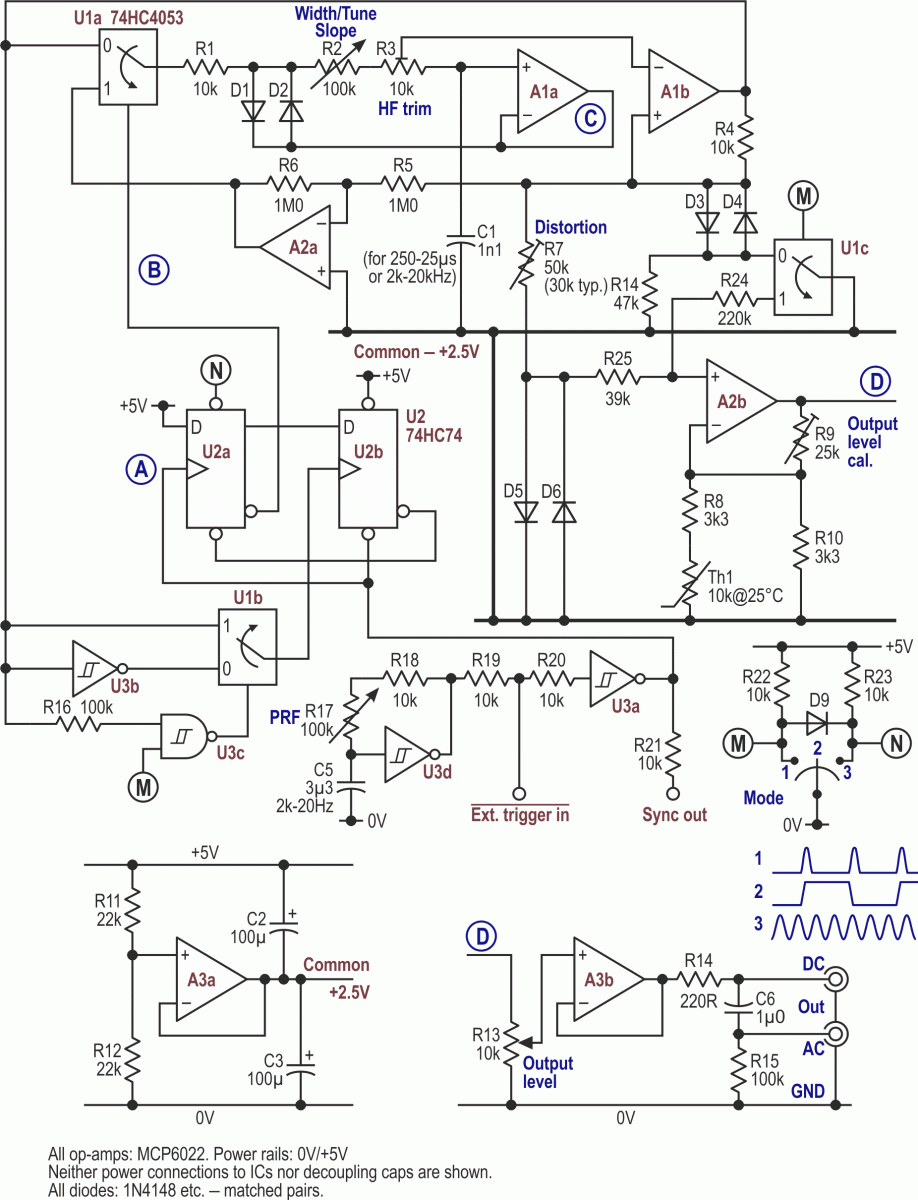
Anyone working with audio kit will have employed square-wave testing with that infinity tamed by an RC time-constant, which is good enough for everyday use, but another approach is to replace that still-sharp step with a portion of a cosine wave. Taking the circuit from Part 1 and adding some more gating means that instead of generating a full raised-cosine pulse for every trigger input, we get a half cycle at each transition, with alternating polarities. The result: a square wave at half the frequency of the trigger and with smooth edges. The revised circuit is in Figure 1.
 |
|
| Figure 1. | Extra logic added to the original circuit now gives half a cosine on each trigger pulse, with alternating polarities, generating a square wave with smoothed edges. |
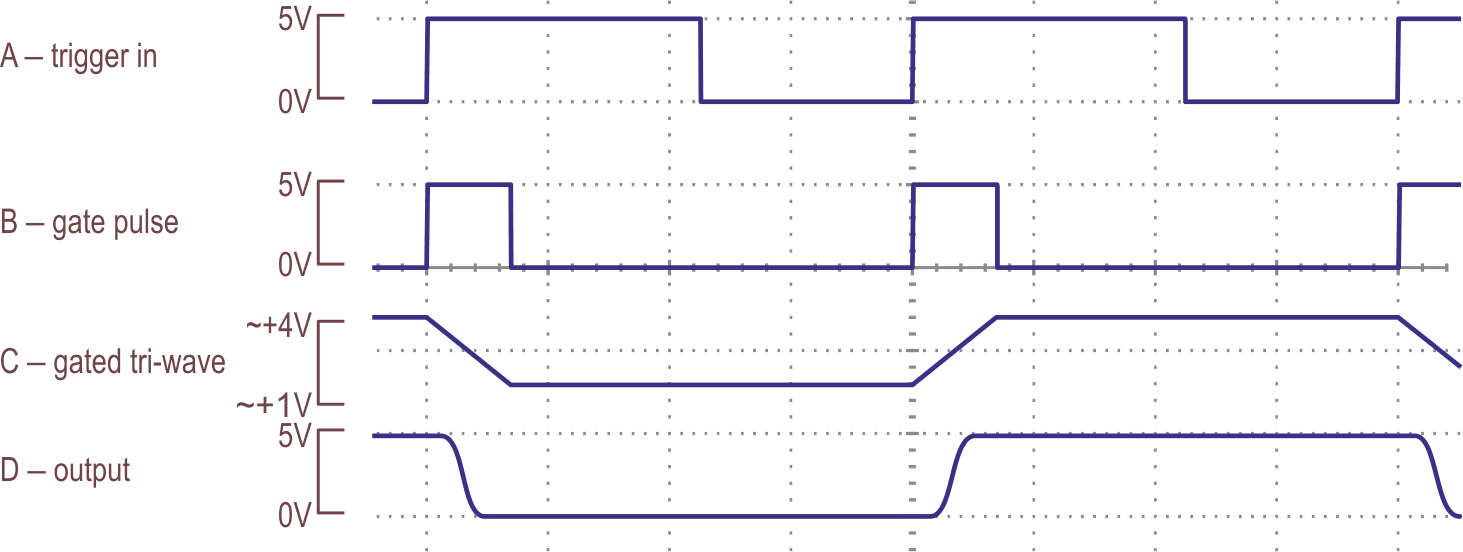
In pulse or oscillator modes, U1b delivers a reset to U2 whenever A1b’s output goes high, which gives a full cycle of the raised cosine. In the square wave mode, U2 is reset whenever A1b changes, irrespective of polarity, at the half-cycle point. U1b and U3b/c act as a gated EXOR with delays through one leg to generate the reset pulse. Some waveforms are shown in Figure 2; compare these with those in Figure 2 of Part 1. As before, A2 is jammed when the oscillator mode is selected, forcing continuous, sine-wave operation.
 |
|
| Figure 2. | Some waveforms from the circuit in Figure 1. |
A single, positive-going transition is shown in Figure 3, with our target curve for comparison. These are both theoretical plots, but the actual output is very close to the cosine.
 |
|
| Figure 3. | The target step-function is a logistic curve; a segment of a cosine is shown for comparison. |
In Part 1, we tried to get closer to a normal distribution curve by some extra squashing of our tri-wave. This worked up to a point but was clunkily over-elaborate, partly owing to the waveform’s lack of symmetry. We now have a symmetrical function to aim at, which should be easier to emulate.
Building our target curve
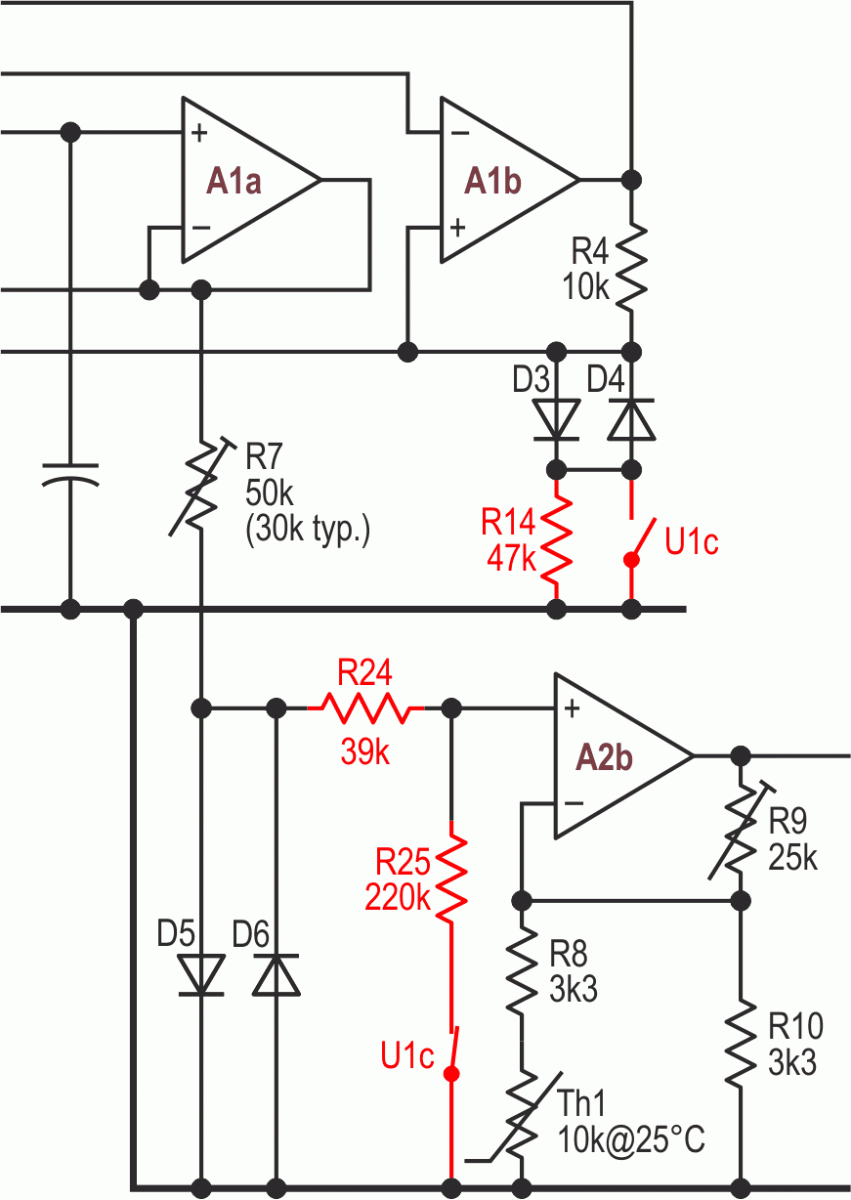
The spare section of mux U1 together with three new resistors offers a neat solution, and the circuit fragment in Figure 4 shows how.
 |
|
| Figure 4. | Adding the components in red gives a much better fit to our target curve. The tri-wave amplitude is increased and can now be squashed even more. |
Putting 47k (R14) in series with D3/4 increases the trip points’ levels, so that the tri-wave now spans ~4.3 V rather than ~1.1 V. The increased drive to D5/6 through R7 results in the diodes not so much squashing the triangle into a (co)sine as crushing it into something much squarer though with greater amplitude. R24 and R25, connected across D7/8, pot the voltage across the diodes down so that the peaks – which are now gentle curves – are cropped by A2b’s (rail-to-rail) output. (The resistive loading of D7/8 slightly softens their response, which also helps.)
U1c does two jobs. When pulses or a continuous sine wave are to be generated, it shorts out R14 and opens R24, giving our standard operating conditions, but in square-wave mode, R14 is left in circuit while R24 is grounded, as needed for the extra tri-wave amplitude and crushing.
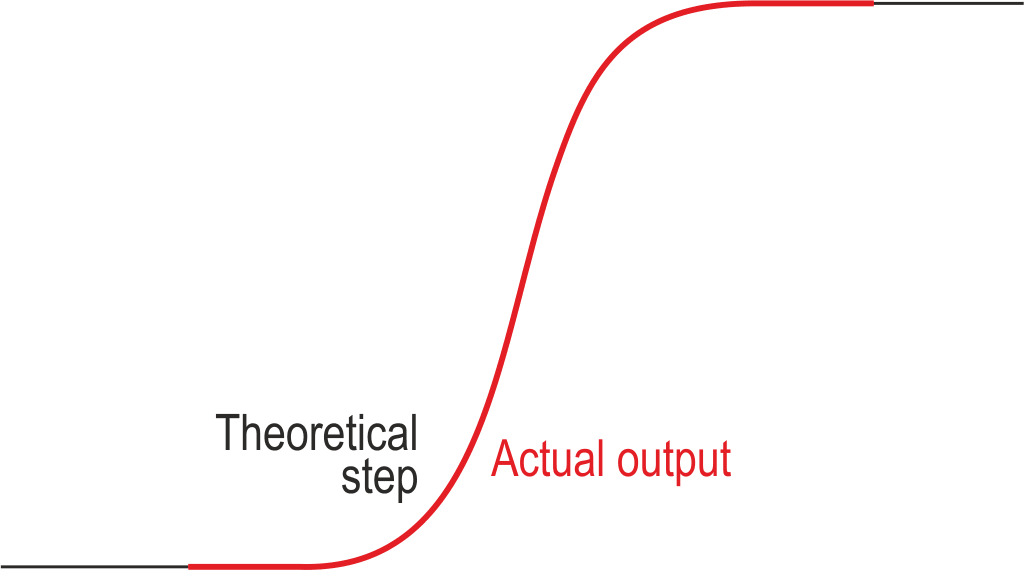
The waveforms now look like Figure 5 (note the change of scale for trace C) while a single, actual edge is shown in Figure 6 with a theoretical, ideal step for comparison – and the match is now very good.
 |
|
| Figure 5. | Waveforms after adding the mods shown in Figure 4. |
There is some fudging involved here, the two curves in Figure 6 having been adjusted for the same slope at the half-height point. Because R24/R25 reduce the amplitude of the signal across the diodes by nearly 12%, the slope will also be that much shallower than for the cosine version, which is not a practical problem.
 |
|
| Figure 6. | Comparison of the target curve with part of the trace D in Figure 5. |
The final circuit
To turn all this into a functional piece of kit ready for doing some audio testing, we need to add some extras:
- A rail-splitter to define the central, common rail
- Level-control pot with an output buffer
- Simple oscillator to produce the trigger pulses, with an input so that an external TTL signal can override the internal one
- A switch to select the mode.
Putting all these together, we reach the full and reasonably final circuit of Figure 7. Multiple ranges can easily be accommodated by adding the extras detailed in Part 1, Figure 5. The modified pulse-shaping circuit shown in Part 1, Figure 6 could also be added, but may be more fiddly than it is worth.
 |
|
| Figure 7. | The full circuit, which now produces square waves with well-shaped edges as well as pulses and continuous sine waves. |
The absence of pin numbers is deliberate, because their inclusion would imply an optimized layout. Be careful to keep the logic signals away from analog ones, especially at and around the earthy end of R24, which can pick up switching spikes when open-circuited. U1’s /E (pin 6) and VEE (pin 7) must be at 0 V.
While this approach to generating nicely-formed pulses is perhaps more interesting than accurate, it does show that crunching up triangles with diodes is not limited to generating sine(ish) waves, which was the starting-point for this idea. For anything more complex, an AWG is probably a better solution, if less fun.