Using Discharge Analyzer
All operation of the battery discharge analyzer is commanded with a console. The port setting of the terminal program is N81 38400bps.
Programming firmware
The firmware must be programmed into the microcontroller after the circuit board is built. Attach the battery discharge analyzer to the PC via an RS-232C null modem cable. Open the port with a terminal program and the power will on. Check that the Vcc voltage is within 5±0.1 volts. Attach the flash programmer to the ISP connector and write firmware and fuse value into the microcontroller. The programming can fail if the programmer consumes too high power from the target. In this case, an external power supply is required to the input of the regulator U4.
Calibration
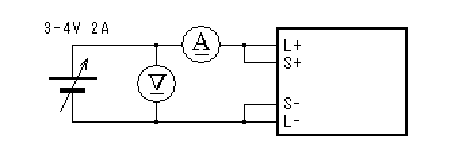
Next, calibrate the battery discharge analyzer. It does not have trimmer pot on the board and adjust the measured values with stored parameters. On the first power-on, a warning message that "Not calibrated" will be displayed. The calibration is done with the setup shown in right image. The 'c' command executes the calibration procedure and enter the values indicated in the meters.
>c
Voltage [mV]:3792
Current 1 [mA]:64
Current 2 [mA]:312
Current 3 [mA]:1505
>
Measuring discharge characteristics
Attach a battery to be measured to the battery discharge analyzer and enter a measurement command with required discharge condition. The command format is shown in below.
m  Load mode
 Load level Interval mode Output interval Ending voltage
Load mode
One of the followings:
'c': constant current,
'p': constant wattage or
'r': resistive.
Load level
Load level corresponds to the load mode in unit of mA, mW or mΩ.
Interval mode
't' or 'c'. First one specifies that outputs data at an interval of constant time and the other specifies the interval of constant coulomb.
Output interval
Output interval in unit of second or mAh.
Ending voltage
Specifies the ending voltage to stop the measurement in unit of millivolt. The voltage below 2750mV must not be specified for Li-Ion cells.
While a measurement, measured values are output to the console. It can be read by spreadsheet in CSV format when it is logged to a text file. The measurement is stopped on: Esc key, voltage drops below ending voltage and current control exceeds the limiting value (except for constant current mode). Following list shows an example to use the measurement command.
>m c 680 t 10 3000
Load current[mA] = 680
Ending voltage[mV] = 3000
Interval[sec] = 10
Time,mV,mA,mAh,mW,J
0:00:00,4147,680,0,2819,2
0:00:10,3988,680,2,2711,30
0:00:20,3968,680,3,2698,57
0:00:30,3953,680,5,2688,83
0:00:40,3943,680,7,2681,110
0:00:50,3934,680,9,2675,137
0:01:00,3924,680,11,2668,164
0:01:10,3914,680,13,2661,190
0:01:20,3909,680,15,2658,217
...
>m c 680 c 10 3000
Load current[mA] = 680
Ending voltage[mV] = 3000
Interval[mAh] = 10
mAh,mV,mW,J
0,4072,2768,2
10,3884,2641,140
20,3859,2624,280
30,3834,2607,418
...
Measureing series resistance
Use 'r' command to measure series resistance. It applies two different current and calculates series resistance with ΔV and ΔI.
>r 0 1000
Rs[mOhm] = 30
>