I needed a couple of AA batteries and found the display at the supermarket where they were all arrayed. Normally when I’m shopping in the supermarket, I tend to look at the price/kg or price/l when comparing similar products. In the case of the batteries, there was no such indicator. Fine, I thought, I’ll work it out myself. I grabbed a few different makes and scanned the packaging for some measure of their capacity. Nothing. Not a single one of the batteries had any indicator of how much energy they would provide. Instead, they all had terms like ‘PLUS’, ‘SUPER’, ‘ULTRA’ and of course had wildly differing prices. So, I decided that it was time for an experiment and bought one pack of every type I could find.
The Plan
My idea was really simple: I would make a circuit that would fully discharge each of the batteries while measuring how much energy it produced (displayed in Joules and in Watt-Hours. I had an Arduino with Atmel ATmega328 and an LCD panel left over from a different project so I thought I’d make a standalone unit.
As the design evolved, I let two additional features creep in:
- Add a temperature sensor DS18B20 to track ambient temperature during the test since that certainly affects battery capacity.
- Add a USB logging capability so that I could capture all the data to plot terminal voltage as the battery discharges.
Note: This was never intended to be a scientific instrument to measure how long a battery would power your circuit - it’s designed to provide a relative comparison of different batteries using a similar load.
The Design
 |
|
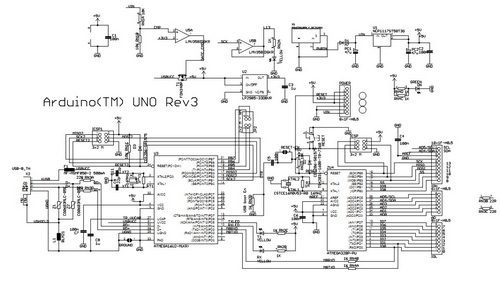
| Figure 1. | Arduino UNO Schematic Diagram |
The circuit works by measuring the voltage across a fixed load every second until the voltage drops to less than 0.2V. For simplicity, I used a resistive load (the original plan was to use a 4.7R resistor but I didn’t have any high power resistors to hand so I used 4 22R resistors in parallel instead giving me an effective load of 5.5R. Here’s the final circuit: This case from adafruit ended up being perfect because it already has cutouts and standoffs for the arduino and the LCD. All that was left was to add a little bit of stripboard to hold the extra components. Note that the whole circuit is powered from the USB connection (or the DC jack) - all the power from the battery is consumed by the load resistors.
 |
|
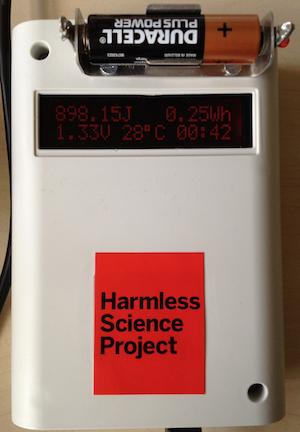
| Figure 2. | Measuring Battery Capacity With an Arduino UNO |
The Software
When the unit resets, it waits until a battery is connected before starting any measurements. Once it detects a battery, it measures the temperature and voltage once a second and displays the cumulative energy in Joules and Watt-Hours on the display.
 |
|
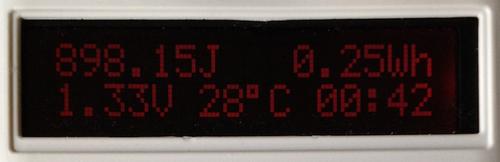
| Figure 3. | Battery tester measures the temperature and voltage once a second and displays the cumulative energy in Joules and Watt-Hours on the display. |
It also logs the readings to the USB port once per second. You can capture these to a text file with any terminal emulator but I found the easiest thing to do was to use screen:
$ screen -L /dev/tty.usbmodemfd131 9600
Once the voltage drops below 0.2V, it will stop measuring and display the total energy produced. If you’re using screen to capture the data, quit it with ^A ^K and rename the logfile to something more memorable:
$ mv screenlog.0 duracell-simply.csv
The CSV file has a line for every second of the test. For graphing, it’s easier to make a version of the file with an entry sampled every minute:
$ awk 'NR % 60 == 1' duracell-simply.csv > duracell-simply-mins.csv
The Results
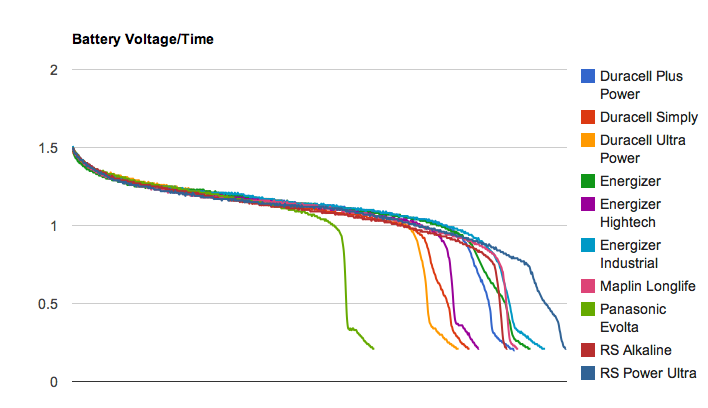
So far, I’ve captured the data from 10 brands of alkaline battery. In each case, I took 1 battery from the pack and measured its capacity. Obviously, it would be better to take a selection of each and average the results but I didn’t want to waste all my batteries on the test.
|
|
|
| Figure 4. | Batteries voltage and Time, using a similar load |
In most cases, I bought the batteries in packs of 4. It’s interesting to take the cost of each battery (pack cost / pack size) and combine that with the measured capacity:
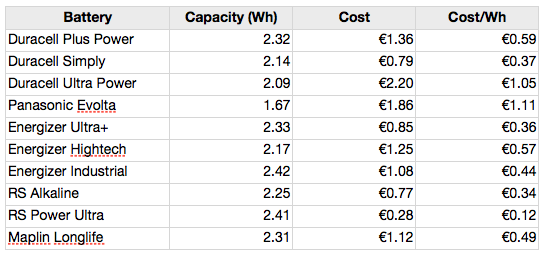
This lets us compare each of the batteries in terms of the cost per Watt-Hour (which is really all you should care about when buying them). Obviously, lower is better:
|
|
|
| Figure 5. | Compare each of the batteries in terms of the cost per Watt-Hour |
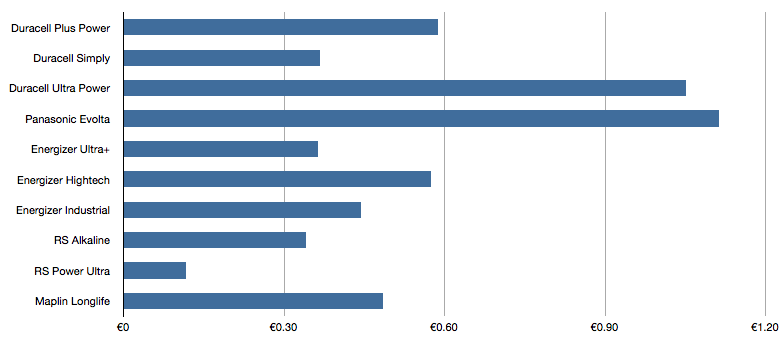
There’s a difference of over 9X between the best value (RS Power Ultra) and the worst value (Panasonic Evolta).
Downloads
Project files (source code, DipTrace 2.2 Schematic, results) - download
Arduino UNO Schematic (Eagle) - download