The diaphragm of a condenser microphone is the movable plate of a capacitor. With a polarized capacitor, the vibration of the diaphragm in relation to the back plate produces an ac audio-output voltage. The condenser capsule has a capacitance of 10 to 60 pF; thus, you should connect it to an impedance converter with extremely high input impedance for a flat frequency response.
The conventional impedance converter is a JFET source follower with an additional amplifying and power-decoupling circuit. You supply power to the impedance-converter circuitry using the same microphone-cable conductors that carry the audio signal. The balanced audio pair at the XLR connector’s pins 2 and 3 both carry the same positive dc voltage, or phantom power, relative to Pin 1’s ground. The amplifying/decoupling circuit contains an audio transformer or a couple of capacitors to separate the dc power from the audio signal.
High-value dc-blocking capacitors can generate measurable and audible distortion (Reference 1). Microphone circuits rarely use the highest-quality capacitors because of space limitations. You can design the impedance converter without dc-blocking capacitors.
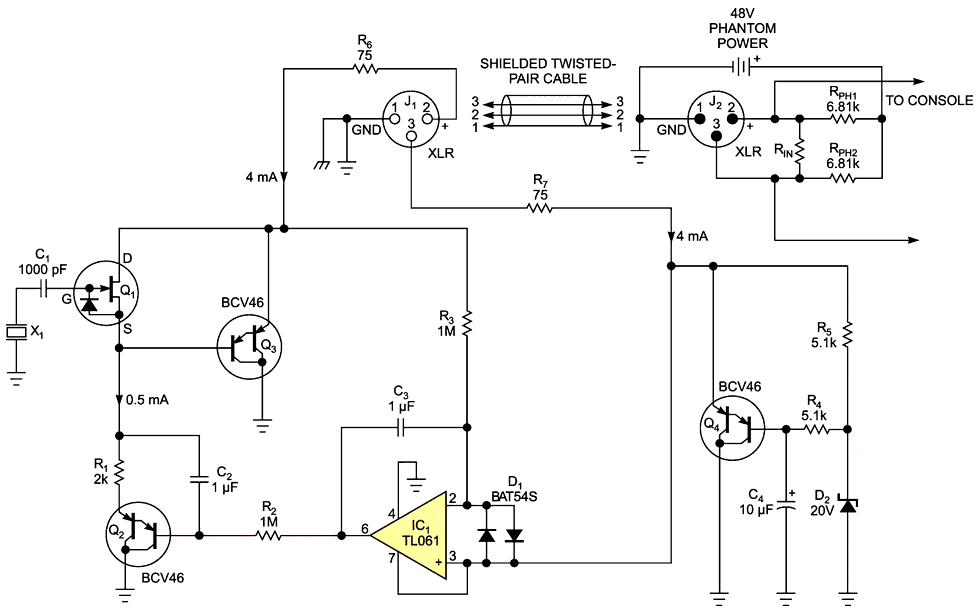
Figure 1 shows the self-balanced impedance converter. The self-polarized electret condenser-microphone capsule, X1, connects to the high-impedance gate of JFET Q1. Q2, an ac-current source, loads source follower Q1. Q2, thanks to C2, has high impedance but allows a fixed dc voltage on the Q1 source.
 |
|
| Figure 1. | A feedback loop balances the dc voltage on the paired cable conductors, which power high- to low-impedance converter Q1. |
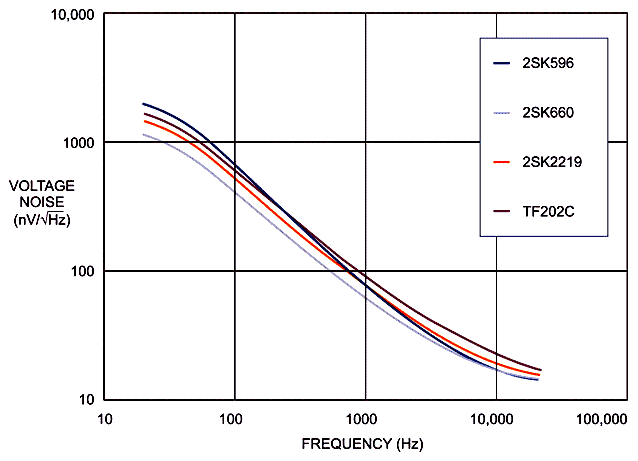
The circuit sources phantom power at 48V dc through RPH1 and RPH2 at the mixing-console end of the microphone cable. Q2’s emitter drives – and RPH1 loads – emitter follower Q3. The signal from Q3’s emitter bootstraps the drain of Q1, reducing the ac voltage across the gate-to-drain capacitance and resulting in lower input capacitance at the gate of Q1. RPH2 supplies current for shunt-regulator-voltage sources D2 and Q4. R4 and C4 attenuate zener-diode noise. Integrator IC1 compares the dc voltages on the XLR connector’s pins 2 and 3 and, through Q2 and Q3, maintains a difference equal to the op amp’s input offset voltage. Thus, if the microphone input at the mixer console is transformercoupled, both ends of its winding are at the same voltage. No dc will flow through the winding and saturate the core. IC1 should have a commonmode- input-voltage range equal to that of the positive-supply rail. You can accomplish this task using, for example, an op amp with a P-channel JFET input stage. Tables 1 and 2 and Figure 2 show typical performance parameters for the impedance converter in Figure 1.
Table 1. Performance Parameters
|
Mixing-console input
impedance RIN (kΩ) |
Peak input
clipping voltage (V) |
Input voltage at –80-dB
(0.01%) distortion |
|
1.2
|
3.1
|
140 mV rms
|
|
2.4
|
5.8
|
750 mV rms
|
|
10
|
13.6
|
3.1V rms
|
Table 2. Performance Parameters for JFETs
|
Q1 part
|
A-weighted noise
voltage (μV rms) |
|
2SK596
|
4
|
|
2SK660
|
3.6
|
|
2SK2219
|
4.1
|
|
TF202C
|
4.6
|
 |
|
| Figure 2. | The voltage-noise density versus frequency for the circuit of Figure 1 varies with different types of input JFET Q1. The source impedance of X1 is 10 pF. |
Reference
- Gaskell, Robert-Eric, “Capacitor ‘Sound’ in Microphone Preamplifier DC Blocking and HPF Applications: Comparing Measurements to Listening Tests,” Audio Engineering Society, Presentation 130, Paper 8350, May 2011, pg 1, http://bit.ly/zVcgtc.