Kyle Holland
EDN
Every junction diode exhibits some degree of photosensitivity when it receives light comprising an appropriate range of wavelengths. The spectral response of a junction diode depends on a variety of factors, including material chemistry, junction depth, and packaging. The packaging of most devices aims to inhibit sensitivity to radiant flux to maintain the intended function of the device. However, some devices' packaging and construction techniques allow convenient exposure to light. The most common light-sensitive devices, photodiodes and phototransistors, sense and measure light from a variety of sources. Other light-sensitive diodes, which don't usually come to mind for light-sensing applications, are LEDs. LEDs, packaged to emit radiant flux, can serve as narrowband photodetectors. The devices lend themselves to applications in which they serve as spectrally selective photodetectors or to applications in which they act as transducers. References 1 through 4 provide further information on optoelectronic devices.
 |
||
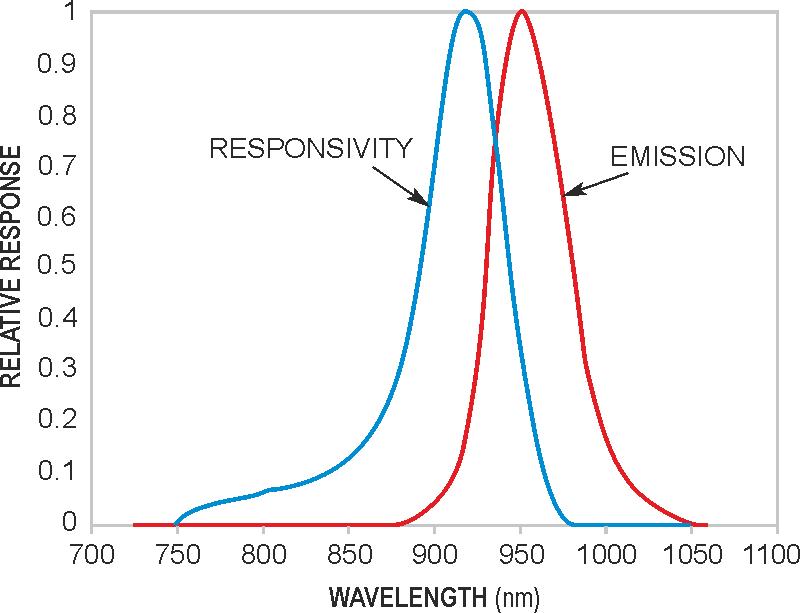
| Figure 1. | Enough overlap exists between the responsivity and emission curves to make a LED useful for both transmission and reception. |
|
An LED's sensitivity to light and particularly to its emission wavelength depends primarily on the device's bulk material absorption and junction depth. For LEDs that have low bulk absorption, photosensitivity at or near peak wavelength is low, and, as a result, the creation of hole-electron pairs is low. GaAs-based emitters with emission wavelengths of 940 nm have relatively good sensitivity at or near their peak emission wavelength, thanks to high bulk absorption. Figure 1 shows the relative responsivity and emission spectra for an Infineon SFH409 LED. This infrared GaAs LED has peak emission at 940 nm with a half-peak bandwidth of 50 nm. In detection mode, it peaks at 920 nm with a half-peak bandwidth of 55 nm. As Figure 1 shows, the wavelength of peak responsivity is shorter than the peak-emission wavelength, and a fair amount of overlap exists between the two curves. Thanks to this overlap, the LED is useful as a transducer. Figure 2 shows a half-duplex application that exploits the LED.
 |
||
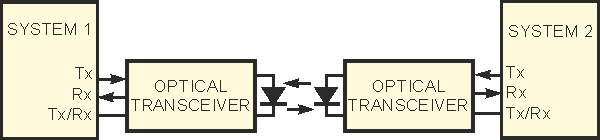
| Figure 2. | This half-duplex application uses a LED for both transmission and reception. | |
Here, the LED links two embedded systems via a fiber-optic cable or a short-distance, line-of-sight coupling path. Figure 3 shows the transceiver circuit used in Figure 2's application. The circuit can send half-duplex data between two embedded systems at rates as high as 250 kbps. The circuit comprises the LED driver, the preamplifier, and the output comparator. The Tx pin connects to transistor Q1 via base resistor R1. When the Tx pin is in the idle state (logic 1), the quiescent current of the LED driver is zero, because Q1 is off. Activating the Tx pin (logic 0) causes Q1 to turn on. Resistor R2 sets the LED's output-power level. You should set the power level to compensate for transmission losses through the communication medium and to minimize pulse-distortion phenomena in the communication link. R2 should be 50 to 220 Ω when the circuit operates from a 5 V supply.
 |
||
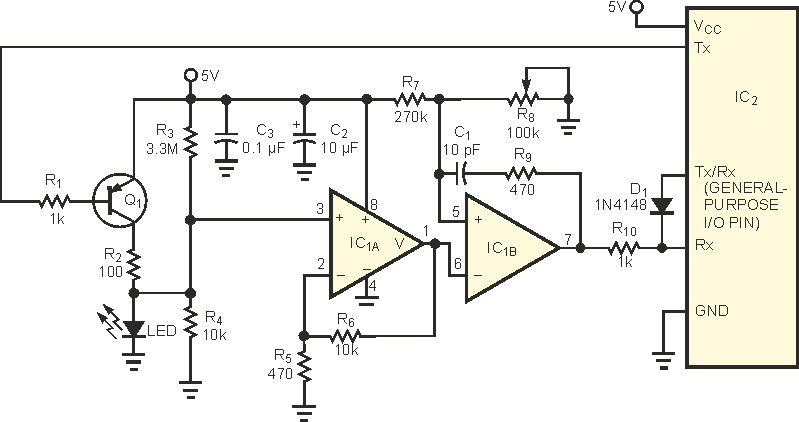
| Figure 3. | One dual op amp and a handful of components turn a LED into a dual-purpose device. | |
The preamplifier consists of resistor R4 acting as a shunt current-to-voltage converter and a high-speed, noninverting voltage amplifier (IC1A). Resistor R3 provides a slight bias of a few millivolts to R4 to keep IC1A in its linear region. The op amp in this design is the high-speed dual OPA2350 from Texas Instruments' Burr-Brown division. The device has rail-to-rail inputs and outputs and a gain-bandwidth product of 38 MHz, and it can operate from a single 2.7 to 5 V supply. The transconductance gain of the preamplifier is a function of the values of R4, R5, and R6. In the circuit of Figure 3, the resistor values produce a transconductance gain of approximately 220,000. The output comparator, IC1B, converts the preamplifier's output signals to logic-level voltages. You set the input threshold of the comparator by adjusting resistor R8. By properly adjusting the threshold, you can obtain good pulse symmetry for a variety of input-power conditions. The combination of R9 and C1 provides ac hysteresis and additional overdrive for improved comparator switching. Moreover, R9 limits the switching current on input Pin 5 of IC1B for logic one-to-zero transitions.
During data transmission, the transmitter circuitry drives the preamplifier and comparator. To prevent locally transmitted data from causing UART overrun errors, the Tx/Rx line should be at a logic-1 level. The combination of R10 and D1 blocks any transition occurring on the Rx line from activating the UART's receiver. When switching between transmitting and receiving modes, the software should include a time delay to allow for preamplifier recovery. The preamplifier-recovery delay is typically less than 10 to 20 µsec. Note that for 8051-class microcontrollers with depletion-mode pullup resistors on their I/O pins, you should replace D1 with a pnp transistor and an associated base resistor.
References
- "The Radiometry of Light Emitting Diodes," Technical Guide, Labsphere Inc, North Sutton, NH.
- "GE/RCA Optoelectronic Devices," GE/RCA Corp, 1987.
- Gage, S, D Evans, M Hodapp, and H Sorensen, Optoelectronics Applications Manual, McGraw-Hill, 1977.
- Sze, S, Semiconductor Devices—Physics and Technology, Wiley, 1985.