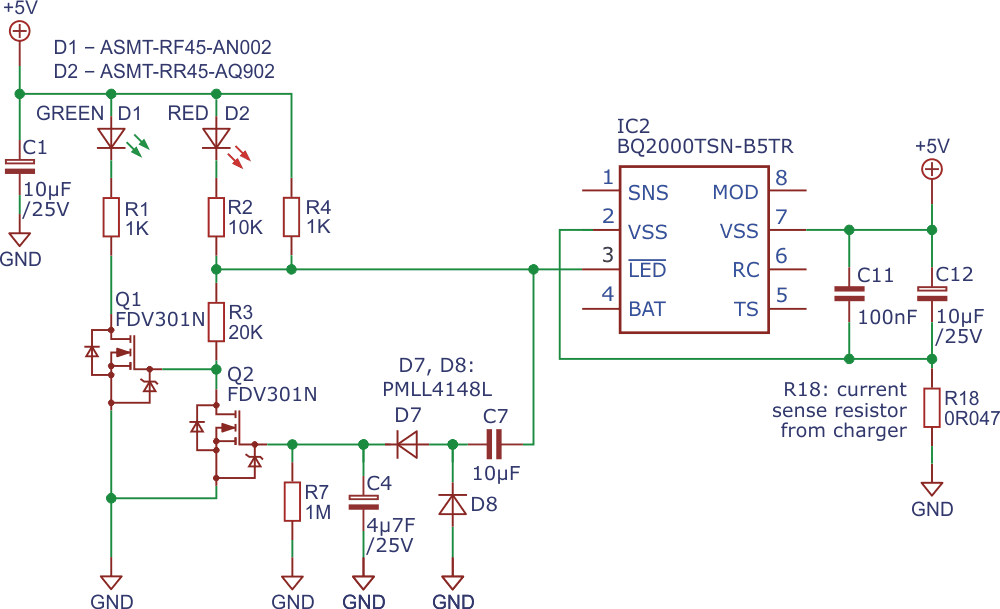
I recently got an assignment to design a battery charger. I decided to use the BQ2000TSN from Texas Instruments because of its versatility in battery chemistry. In my case the battery charger is used to charge a Lithium-ion battery pack.
The BQ2000 has an open drain N-Channel LED output on pin 3 which can be used with a LED as a charge status indicator. The different modes are in short:
- High impedance, fast charge cycle ended (internal FET not conducting)
- Low, fast charging (internal FET conduction)
- 1 Hz flash, fault condition for instance over temperature
I refer to the datasheet of the BQ2000 for a more detailed description.
The simplest way would be to connect one LED to pin 3 for status indication. But for me it would be more logical to have two LEDs: a green one, which indicates that the charging process has successfully ended; and a red LED, which indicates charging in progression and fault mode.
I needed a cheap circuit so I decided to build a discrete circuit that does the job. Figure 1 depicts the LED circuitry of the battery charger.
 |
|
| Figure 1. | The LED circuitry of the battery charger. |
The battery charger circuitry has been removed to make explanation easier. Each state of the circuit is described below:
State 1: LED pin output BQ2000 high impedance.
Q2 will not conduct because the gate input is pulled low via R7. +5 V will be applied via R4 to the cross section of R2 and R3 causing D2 to remain off since the voltage drop over D2 and R2 is too low. Q1 will conduct because +5 V will be available at the gate via R3 causing D1 to light up. C4 will not get charged because C7 functions as a DC blocking capacitor.
State 2: LED pin output BQ2000 low impedance.
R2 is pulled low via pin 3 of the BQ2000 causing D2 to light up. Q1 will not conduct anymore since the gate is pulled low via resistor R3 causing D1 to extinguish.
State 3: LED pin output BQ2000 1 Hz flash.
Figure 2 shows a screenshot of the 1 Hz signal at pin 3 of the BQ2000. C7 will conduct the block wave signal causing C4 to charge via diode D7. Q2 starts conducting as soon as the charge voltage of C4 reaches the gate source threshold voltage of Q2. This will cause the gate of Q1 to be pulled down via Q2. D1 will extinguish because Q1 is not conducting anymore.
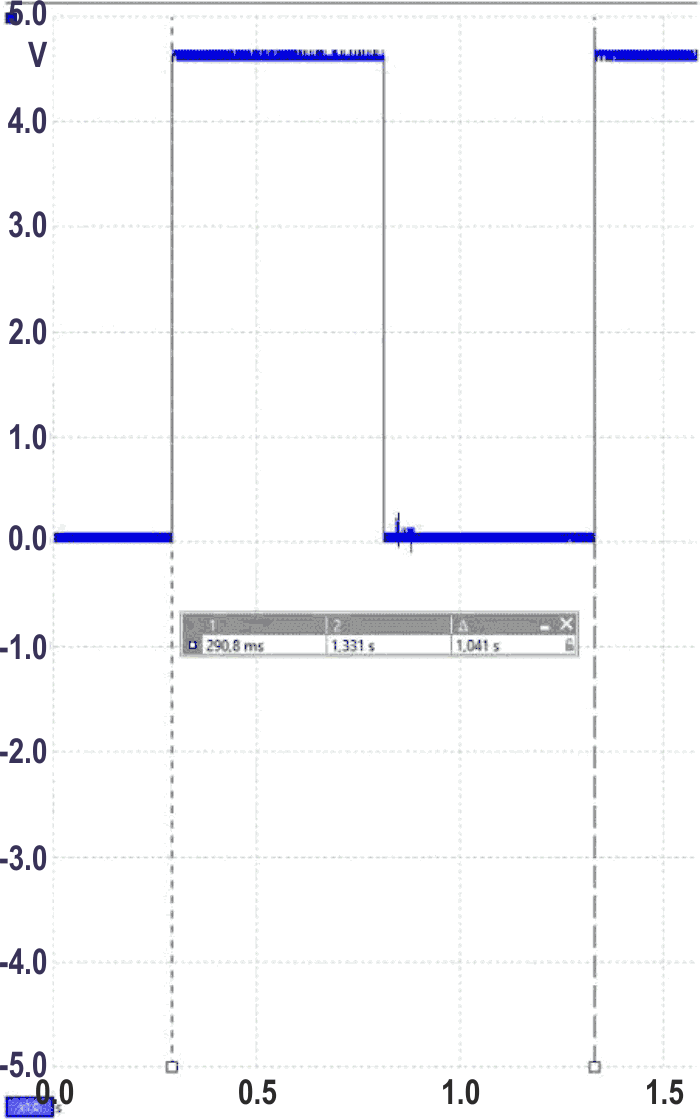 |
|
| Figure 2. | The 1 Hz signal at pin 3 of the BQ2000. |
C4 will charge at each low to high flank and then discharge. So it is important that the voltage over C4 will stay higher than the gate source threshold voltage of Q2. Else D1 will blink as well. This will be taken care of with the RC time t = RC of C4 and R7.
The block wave signal is also available at the cross point section of R2 and R3 causing D2 to blink at 1 Hz.
Note that R4 and R3 are configured as a voltage divider during high time of the 1 Hz signal, pin 3 high impedance:

In that case the voltage drop across D2 and R2 is 5 V – 4.76 V = 0.24 V which is not enough to light up D2.
D8 is needed to charge C7 when the 1 Hz signal is low. Without D8 the polarity of the 1 Hz signal will be transformed to a negative signal.
I noticed a fourth mode that shows up when no battery is connected to the charger. Figure 3 shows the signal measured at pin 3 of BQ2000.
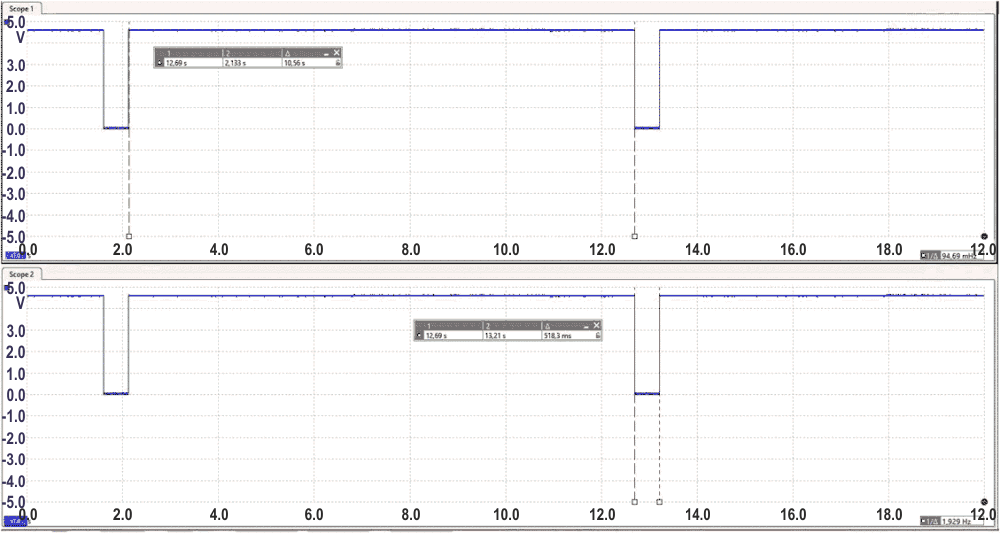 |
|
| Figure 3. | The signal measured at pin 3 of BQ2000. |
It is a pulsed signal that is 10.5 seconds high and 500 ms low. Perhaps I missed something but I could not find it back in the datasheet of the BQ2000. I decided to mention it for completeness. C4 and R7 are chosen in such a way that LED D2 will blink at this frequency as well so that the user can notice whether a battery is connected or not.