Solar panel regulators come in many flavors. The plainest flavor is the simple on-off type shunt regulator. It has the advantage of simplicity, extremely small power dissipation, low cost, high reliability, but in exchange for these advantages one has to accept that the voltage on the battery is always going slightly up and down, that the battery is switched between full charging current and no charging current, and that disconnection of the battery will result in high voltage output pulses from the regulator. Depending on the application, one has to choose the most appropriate type of regulator. In most solar installations I have used my linear solar regulator design, which has the advantages of smooth voltage regulation and undervoltage load dumping, at the cost of higher cost, larger size and high power dissipation. But when I was asked to build a solar regulator for a Yacht, which has just one 3.1 Ampere panel but a 300Ah battery bank, something small and simple was more appropriate than a linear regulator. So I designed and built this one, which you might find useful for similar applications: Generally those where a rather small solar generating capacity is combined with a relatively large battery, or those where low cost, simple construction and high reliability are more important than the smoothness of linear regulation.
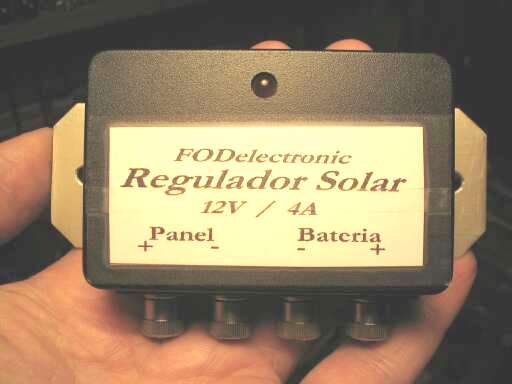
The regulator was built on a perfboard and mounted in a sealed plastic project box, which in turn got an aluminum mounting plate. The connection terminals are brass. It was solidly built to withstand the harsh maritime environment and a fair amount of abuse.
The circuit
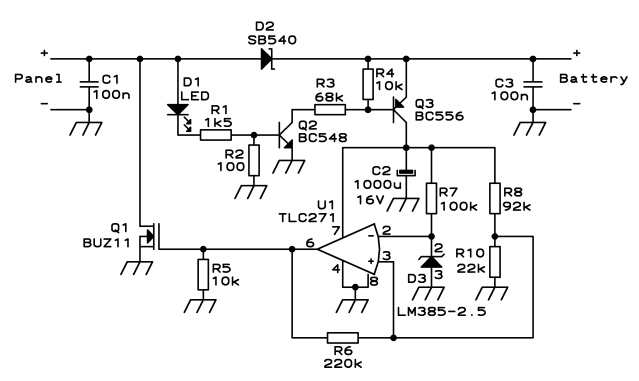
When the panel isn't generating, the entire circuit is off and there is absolutely no current drain from the battery. When the sun gets up and panel starts producing at least 10 Volt, the LED lights and the two smalltransistors switch on. This powers the regulator circuit. As long as the battery voltage stays below 14V, the operational amplifier (which is a very low power device) will keep the MOSFET off, so nothing special will happen and the panel current will go through the Schottky diode to the battery.
When the battery reaches the trigger voltage, which is nominally 14.0V, U1 switches on the MOSFET. This shorts out the solar panel (a condition that is perfectly safe), the battery no longer gets charging current, the LED goes off, the two small transistors go off, and C2 powers the regulator circuit while slowly discharging. After roughly 3 seconds, C2 has discharged enough to overcome the hysteresis of U1, which switches the MOSFET off again. Now the circuit will again charge the battery, until it again reaches the trigger voltage. In this way, the regulator works in cycles, with each OFF period being 3 seconds, and each ON period lasting for as long as necessary for the battery to reach 14.0V. The pulse length will vary according to the current demand of the battery and any load connected to it.
The minimal ON time is given by the time C2 takes to charge up with the current limited by Q3 to roughly 40mA. This time is quite short, so this regulator can work down to very short pulses.
Construction
Building this circuit is very simple. All components are widely available, and most can be easily replaced by other types if necessary. I would not advice to replace the TLC271 nor the LM385-2.5 by different ones, unless you know very well what you are doing. Both of them are low power devices, and their power consumption directly defines the OFF time of the regulator. If you use replacements that have a different power consumption, you will need to change the value of C2, adjust the biasing of Q3, and maybe even then you might run into unexpected trouble.
The MOSFET can easily be replaced by any type you like, as long as its RDSON is low enough so that its dissipation will remain acceptable at the maximum current delivered by your panel. For D2, basically any diode is acceptable as long as it can safely handle the total current produced by your panel. A Schottky diode like the one shown is an advantage because it will produce only half as much voltage drop as a standard silicon diode, and thus generate only half as much heat. But a standard diode is perfectly suitable if properly sized and mounted. With the components shown, the regulator comfortably handles a 4 Ampere panel. For larger panels, only the MOSFET and diode need to be replaced by larger ones. The rest of the circuit remains the same. No heat sink is required for the power level shown. The indicated MOSFET can handle a much larger panel if fitted with a modest heat sink.
R8 in this circuit is 92k, which is a nonstandard value. I suggest that you use an 82k resistor in series with a 10k one, which is simpler than trying to find a special resistor. R8, R10 and R6 define the cutoff voltage, so it's nice if they are reasonably accurate. I used 5% resistors, which usually are a lot better than the rated 5%, but if you want to be on the safe side, use 1% resistors here or pick the more precise 5% ones after measuring several with a digital meter. You could also include a trimpot in this circuit, so that you can adjust the voltage, but I would not suggest this if your application calls for high reliability in a corrosive environment, like mine did. Trimpots just do fail in these conditions.