Introduction

Heart rate measurement indicates the soundness of the human cardiovascular system. This project demonstrates a technique to measure the heart rate by sensing the change in blood volume in a finger artery while the heart is pumping the blood. It consists of an infrared LED that transmits an IR signal through the fingertip of the subject, a part of which is reflected by the blood cells. The reflected signal is detected by a photo diode sensor. The changing blood volume with heartbeat results in a train of pulses at the output of the photo diode, the magnitude of which is too small to be detected directly by a microcontroller. Therefore, a two-stage high gain, active low pass filter is designed using two Operational Amplifiers (OpAmps) to filter and amplify the signal to appropriate voltage level so that the pulses can be counted by a microcontroller. The heart rate is displayed on a 3 digit seven segment display. The microcontroller used in this project is PIC16F628A.
Theory
Heart rate is the number of heartbeats per unit of time and is usually expressed in beats per minute (bpm). In adults, a normal heart beats about 60 to 100 times a minute during resting condition. The resting heart rate is directly related to the health and fitness of a person and hence is important to know. You can measure heart rate at any spot on the body where you can feel a pulse with your fingers. The most common places are wrist and neck. You can count the number of pulses within a certain interval (say 15 sec), and easily determine the heart rate in bpm.

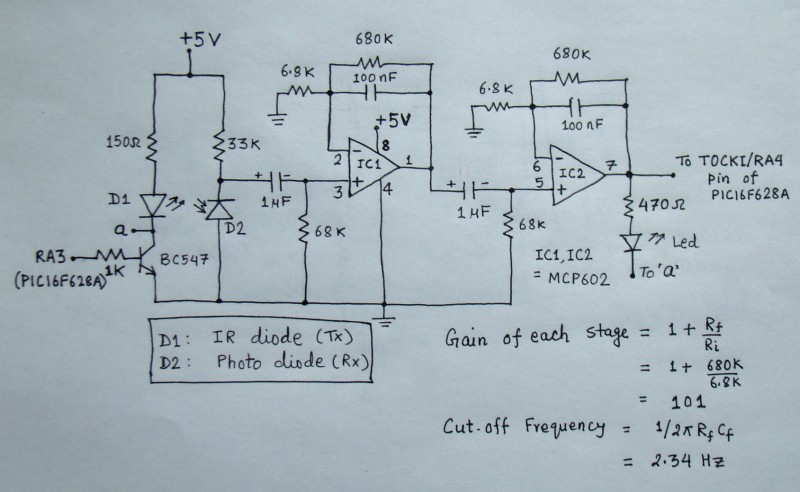
This project describes a microcontroller based heart rate measuement system that uses optical sensors to measure the alteration in blood volume at fingertip with each heart beat. The sensor unit consists of an infrared light-emitting-diode (IR LED) and a photodiode, placed side by side as shown below. The IR diode transmits an infrared light into the fingertip (placed over the sensor unit), and the photodiode senses the portion of the light that is reflected back. The intensity of reflected light depends upon the blood volume inside the fingertip. So, each heart beat slightly alters the amount of reflected infrared light that can be detected by the photodiode. With a proper signal conditioning, this little change in the amplitude of the reflected light can be converted into a pulse. The pulses can be later counted by the microcontroller to determine the heart rate.
Circuit Diagram
The signal conditioning circuit consists of two identical active low pass filters with a cut-off frequency of about 2.5 Hz. This means the maximum measurable heart rate is about 150 bpm. The operational amplifier IC used in this circuit is MCP602, a dual OpAmp chip from Microchip. It operates at a single power supply and provides rail-to-rail output swing. The filtering is necessary to block any higher frequency noises present in the signal. The gain of each filter stage is set to 101, giving the total amplification of about 10000. A 1 uF capacitor at the input of each stage is required to block the dc component in the signal. The equations for calculating gain and cut-off frequency of the active low pass filter are shown in the circuit diagram. The two stage amplifier/filter provides sufficient gain to boost the weak signal coming from the photo sensor unit and convert it into a pulse. An LED connected at the output blinks every time a heart beat is detected. The output from the signal conditioner goes to the T0CKI input of PIC16F628A.
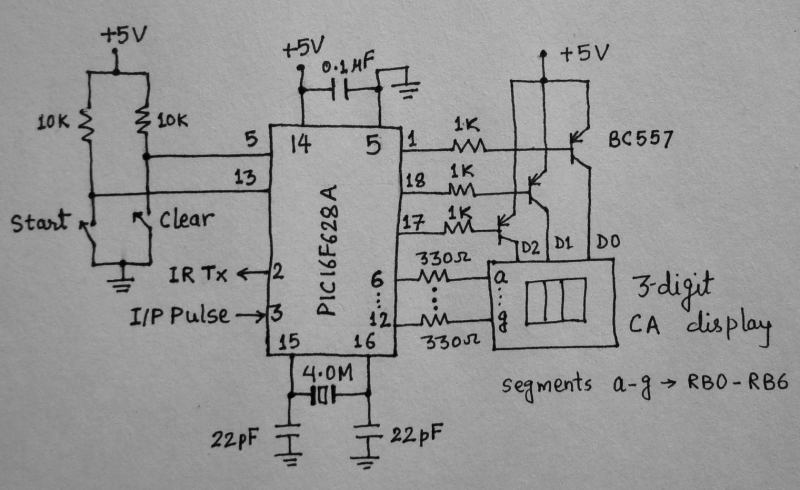
The control and display part of the circuit is shown below. The display unit comprises of a 3-digit, common anode, seven segment module that is driven using multiplexing technique. The segments a-g are driven through PORTB pins RB0-RB6, respectively. The unit’s, ten’s and hundred’s digits are multiplexed with RA2, RA1, and RA0 port pins. A tact switch input is connected to RB7 pin. This is to start the heart rate measurement. Once the start button is pressed, the microcontroller activates the IR transmission in the sensor unit for 15 sec. During this interval, the number of pulses arriving at the T0CKI input is counted. The actual heart rate would be 4 times the count value, and the resolution of measurement would be 4. You can see the IR transmission is controlled through RA3 pin of PIC16F628A. The microcontroller runs at 4.0 MHz using an external crystal. A regulated +5V power supply is derived from an external 9 V battery using an LM7805 regulator IC.