Introduction
We can use a PC for connecting the homemade data acquisition hardware and produce the GUI for user friendly graphical presentation easily. One of the project that uses Visual Basic is the Data Acquisition & Logging System using AT89C51 made by Abbas Raza. In this project we use a PC for GUI display and the homemade data converter board using the AVR microcontroller. The circuit is built with the Atmel ATmega8. The chip has the onchip 10-bit resolution A/D Converter. Temperature sensor are connected to the 6 channels ADC input. You can connect up to 8 sensors with the ATmega8 TQFP package. The analog inputs are captured by sending a command from PC. The readings will display graphically or text data. The data can also be recorded as the database.
Hardware
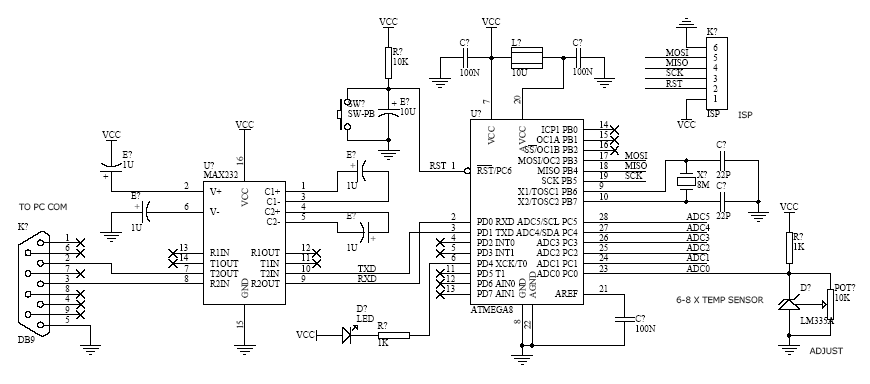
The complete hardware schematic for the ADC board is shown in Figure 1. The board consists of the ATmega8, the temperature sensor (LM335), and the serial interface. The on chip firmware controls reading the ADC converter, receives commands from PC and sends the reading to PC. The microcontroller is running with 8MHz crystal oscillator, if we use the internal RC oscillator, the external crystal may be omitted. The ATmega8 DIP version has 6 channels analog input. If you need up to 8 ADC input, you can use ATmega8 in TQFP package, or you can use another AVR microcontroller with the on-chip ADC.
We use LM335 temperature sensor. It can measure the temperature using two wires remotely. The chip produces an output signal that is proportional to the Celcius temperature scale. The trimmer POT is used to calibrate the correct output voltage at known temperature, for example 2.98V @ 25° C.
Figure 1. Temperature Logger hardware schematic.
Software
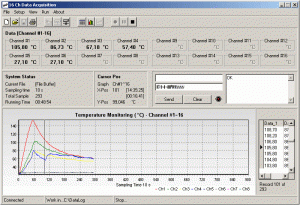
Features of the software are as follows.
- Adjustable sampling interval,
- Real time view in single graph or multiple graph,
- Record the data, save, and open the recorded database,
- Get statistically reading, print the record and graph (or export it as the metafile, JPG),
- Serial control window for monitoring and manually data transfer.
The full version PC software is designed for capturing up to 16 channels. In this version, the PC software will read 8 channels. For the ATmega8 in DIP version, it can display only 6 channels.
Figure 2. Main screen of Data Acquisition program

Data transfering between ADC board and PC uses the following protocol .
- For the first time connecting, after opening serial port, PC try to connect the ADC board. The PC send a character '>' (0x3E) and the board will echo it back.
- After the connection has been established, we can send the command to the ADC board. For command read, PC sends character 'r' (0x72), and the board responses with ADC reading as: ' D' + 2byte(ADC0) + 2byte(ADC1) + … + 2byte(ADC7), total 18 bytes length. The reading is 16-bit data, (10-bit resolution) with high byte send first followed with low byte.
Note :
For real time recording using fast sampling, for example 50ms or 100ms, better view in a single graph. The display performance depends on the PC speed.
I tested running with 700MHz CPU speed, 128MB RAM, it gives smooth view but for multiple view, it could not display fast enough.
Microcontroller Program
The AVR program was written in assembly language. The main code running waits the serial command from PC. The speed is set to19200 8n1 format. If the board receives character '>', the AVR must echo the character '>' to the PC. This step is used to check the hardware is connected or not. Another command is 'r' (read), the microcontroller reads 8 channel ADC and sends them to PC serially.
Figure 3. ATmega8 Assembly code.
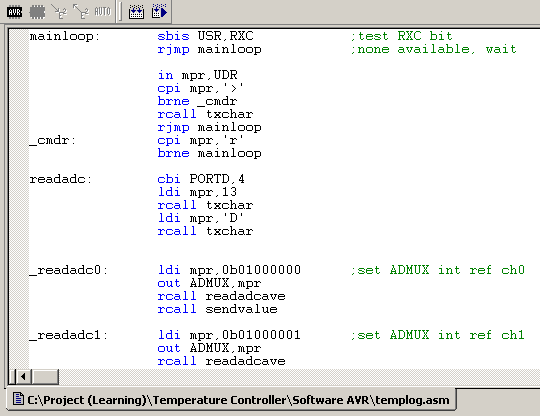
If you have only 6 channel, for last channel (ADC6 and ADC7), you can modify the source code so the microcontroller will send a dummy value. These values will be ignored by PC software. Or if you want to ignore another channel from PC logging, just fill ADC values with dummy into their field. The descriptions have been commented in the source code. You may modify the source code easily.
Download
Source code and hex for ATmega8 - download
Software for PC - download