Originally developed for the do-it-yourself (DIY) and hobbyist communities, the Arduino open-source electronics prototyping platform is based on flexible, easy-to-use hardware and software. While still wildly popular among artists, tinkerers, and other creative types, its low cost of entry, and a rapidly-growing ecosystem of royalty-free crowd-sourced IP are winning the loyalty of many commercial developers. In this brief survey, we will review the hardware and software behind Arduino, and some of the applications it is powering.
Original Arduino boards are based on Atmel AVR 8-bit microcontrollers that are limited in processing power and even more in Flash and SRAM . Additionally Arduino libraries are written to be easy usable with sacrifice of performance. If you tried to develop more time critical apps then you know that Arduino’s don’t shine in this position. You can work around by writing your own libraries or simply go non Arduino way – writing your own C code. But why loose ability to use libraries and rich community resoures only because hardware can’t ensure desired performance.
This is where chipKIT comes in. Thanks to Newark we are able to take a closer look at chipKIT Uno32 which promises Arduino like experience with higher performance.
ChipKIT is developed by Digilent which offers two types of boards – Uno32 and Max32. So lets see whats inside Uno32 board. It is based on Microchip PIC32MX320F128 microcontroller featuring 128K flash and 16K SRAM memory. It can be clocked at 80MHz giving up to 32-bit MIPS performance.
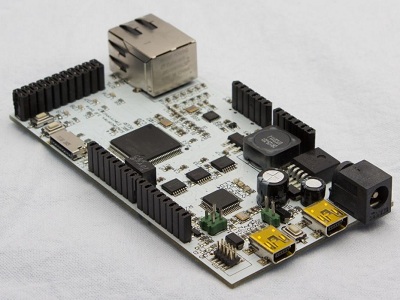
The Simplecortex is a microcontroller development board that is shield compatible with the Arduino (Figure 1). The Simplecortex has a fast microcontroller, the LPC1769 from NXP. This is a ARM Cortex M3 microcontroller with 512KB flash, 64KB RAM and it runs at 120Mhz. To make sure that the Simplecortex is easy to use we made tutorials for almost every peripheral on the chip and examples to get you started. There are tutorials for simple stuff like IO control up to more advanced tutorials for MicroSD cards. If you have ideas for a new tutorial or made a tutorial yourself, feel free to drop an email or post it in the forum. The Simplecortex also has an onboard debugger. It can also be used to program external devices like a self made PCB for your own project. No more microcontrollers with pre-programmed bootloader needed.
|
|
|
| Figure 1. | SimpleCortex Development Board |
We made the Simplecortex as a final year school project. At school we had to work with the Arduino, there was no debugger functionality. For bigger projects or when working with unknown sensors or devices a debugger is a very handy tool. Also a good programming environment can help a lot too, stuff like code-completion is very nice. The Simplecortex uses a Eclipse based IDE that has more options and functions but still is easy to use. The IDE is made by CooCox and is a free to use IDE. A part of their tools is also open source. The IDE is easy to install and use and is available for Windows XP, Windows 7 (x86 and x64).
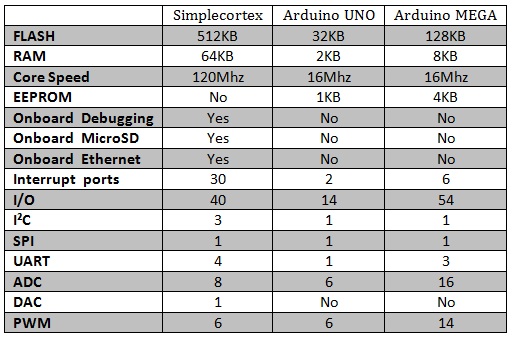
The specifications of the Simplecortex versus Arduino:
The microcontroller on the Simplecortex is a LPC1769 of NXP. In the datasheet you can find all the information about the hardware of the LPC1769; things like available packages, power consumption, pin-layouts. In the user-manual you can find all software related information like memory mappings, register addresses etc.
The NXP LPC1769 is an ARM 32-bit Cortex-M3 Microcontroller with MPU.
Features:
- CPU clock up to 120MHz, 512kB on-chip Flash ROM with enhanced Flash Memory Accelerator
- In-System Programming (ISP) and In-Application Programming (IAP)
- 64kB RAM, Nested Vectored Interrupt Controller
- Eight channel General purpose DMA controller
- AHB Matrix, APB
- Ethernet 10/100 MAC with RMII interface and dedicated DMA
- USB 2.0 full-speed Device controller and Host/OTG controller with DMA
- CAN 2.0B with two channels
- Four UARTs, one with full Modem interface
- Three I2C serial interfaces
- Three SPI/SSP serial interfaces
- I2S interface
- General purpose I/O pins
- 12-bit ADC with 8 channels
- 10-bit DAC
- Four 32-bit Timers with capture/compare
- Standard PWM Timer block, Motor control PWM for three-phase Motor control
- Quadrature Encoder
- Watchdog Timer, Real Time Clock with optional Battery backup
- System Tick Timer
- Repetitive Interrupt Timer
- Brown-out detect circuit
- Power-On Reset
- Power Management Unit
- Wakeup Interrupt Controller
- Crystal oscillator, 4MHz internal RC oscillator, PLL
- JTAG and Serial Wire Debug/Trace Port with ETM.
The Simplecortex board consists of a couple of parts:
- Power supply
- Debugger
- LPC1769 microcontroller
- Ethernet
The schematic and PCB are made in EAGLE from Cadsoft.
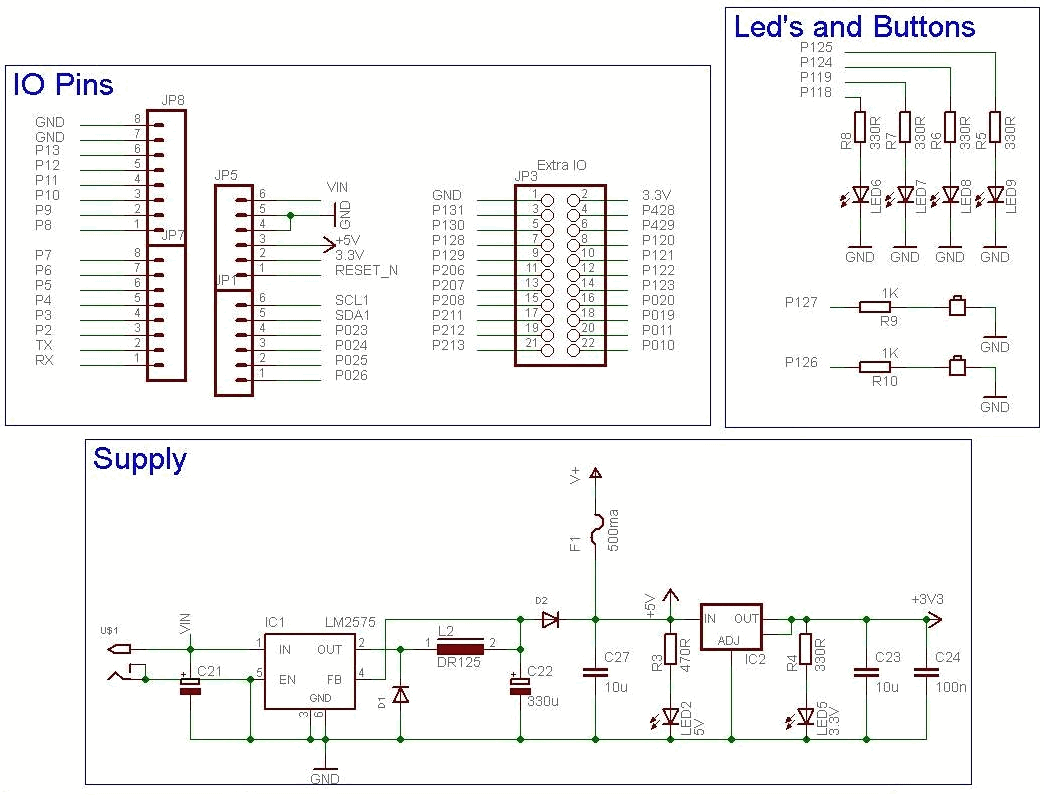
To keep the powersupply low-cost, NX1117 voltage regulators are used. The 3.3v supply is secured with a PTC (resettable fuse) of 500mA (Figure 2). The upper connector is the JTAG connector. It´s important to keep the pin-layout the same. This pin-layout is use by a lot of debuggers, for excample: J-link, U-link. Connectors JP1 – JP4 are exactly the same connected as the Simplecortex.
|
|
|
| Figure 2. | SimpleCortex Power Supply Schematic Diagram |
Programming external devices
With the JTAG header it is possible to program external devices. It is a cheaper to use a board with only microcontroller than using a complete Simplecortex in a project, once the project is finished no debugger is needed anymore (Figure 3, 4).
|
|
|
| Figure 3. | SimpleCortex: Programming external devices |
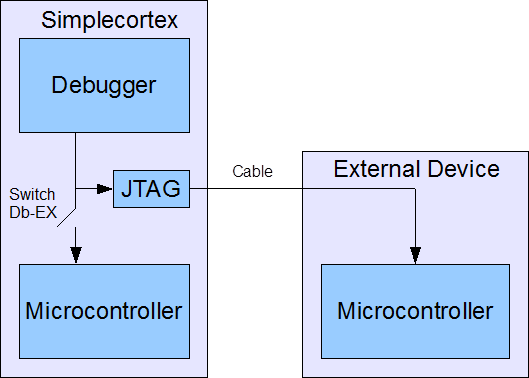
Before you can program an external device the microcontroller on the Simplecortex needs to switched off.On the Simplecortex there's the dip-switch B4 alias DB-EX (that is how it is called in the I/O list). Switch DB-EX (Debugger Extern) has a simple function, it only interrupts the supply of the microcontroller.
|
|
|
| Figure 4. | SimpleCortex Onboard debugger Schematic Diagram |

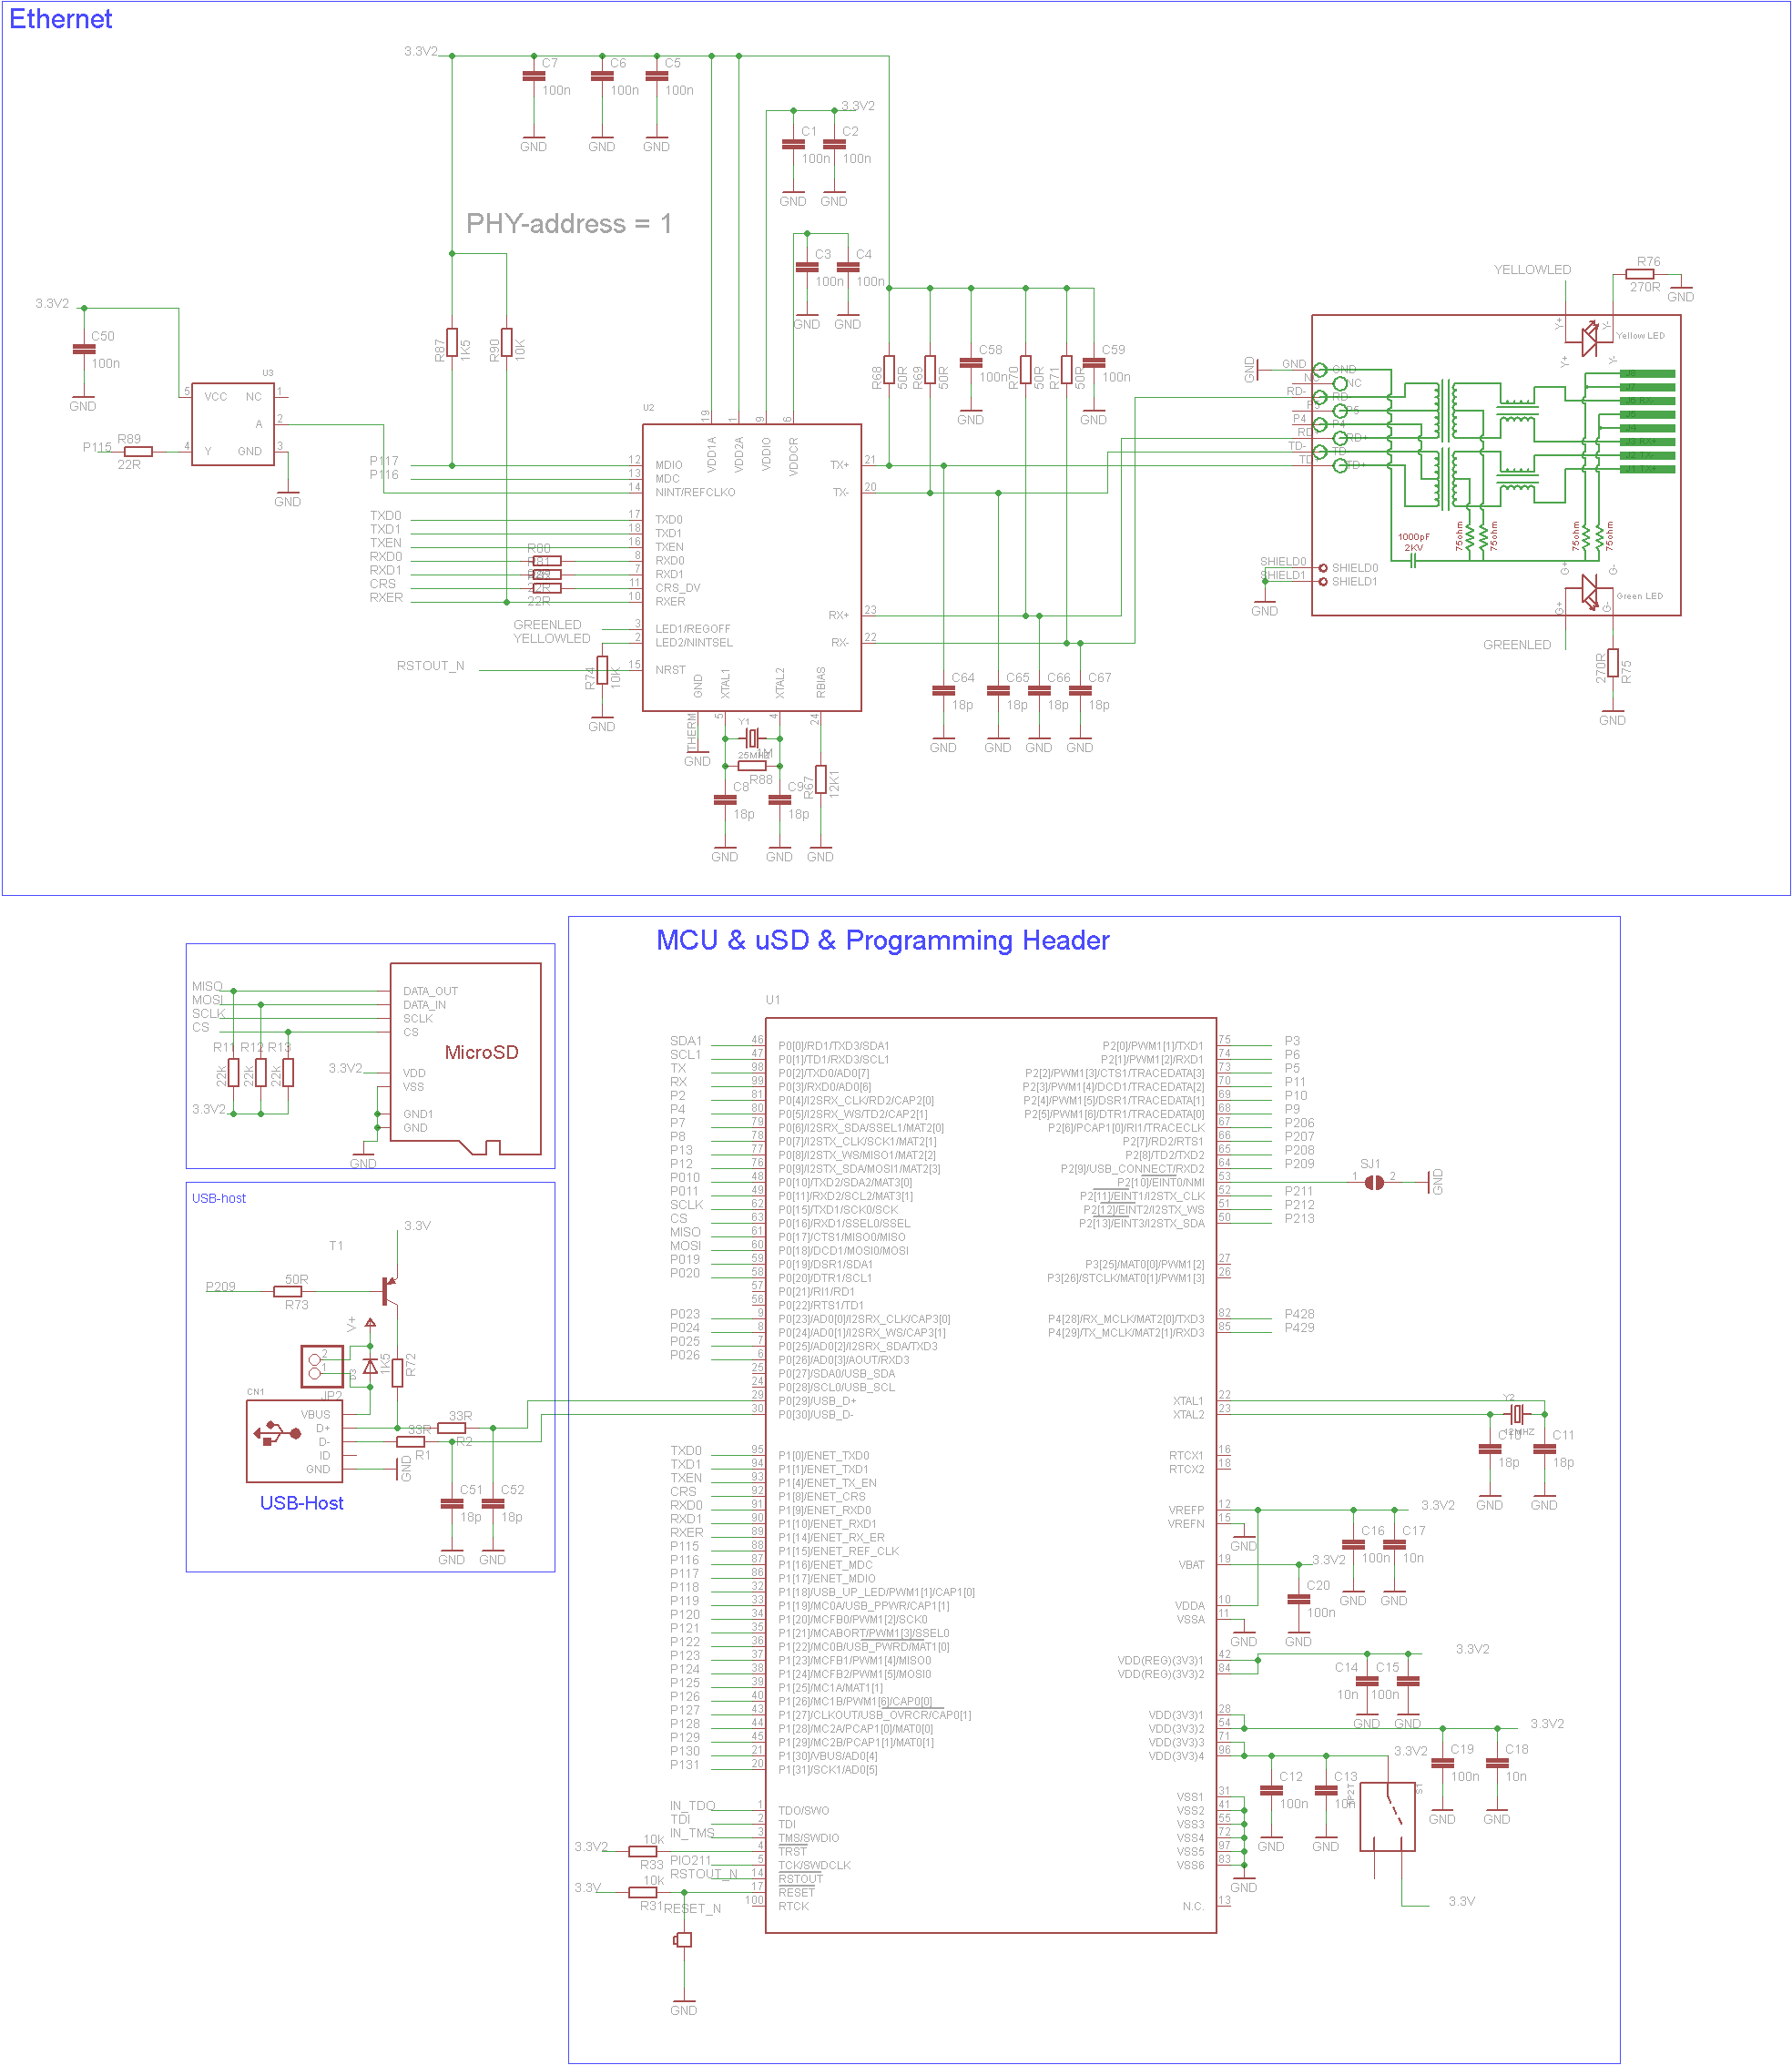
For this example we used a cheaper model of the LPC1769 (Figure 5). This microcontroller is also from the LPC17xx family but it has some limitations. To make your own project only the microcontroller, power supply and programming header are needed. All the unconnected I/O can be used although it is wise to check the datasheet first. Every pin with the discription Px[x] can be used as I/O. Most of the pins are internally connected to a periphcerals like I2C, SPE, etc. There are also 4 led’s and two buttons connected to the microcontroller. Obviously they can be removed but they are very handy for experimentation.
|
|
|
| Figure 5. | SimpleCortex Schematic Diagram: microcontroller, Ethernet, USB, microSD and User LED's and Buttons |
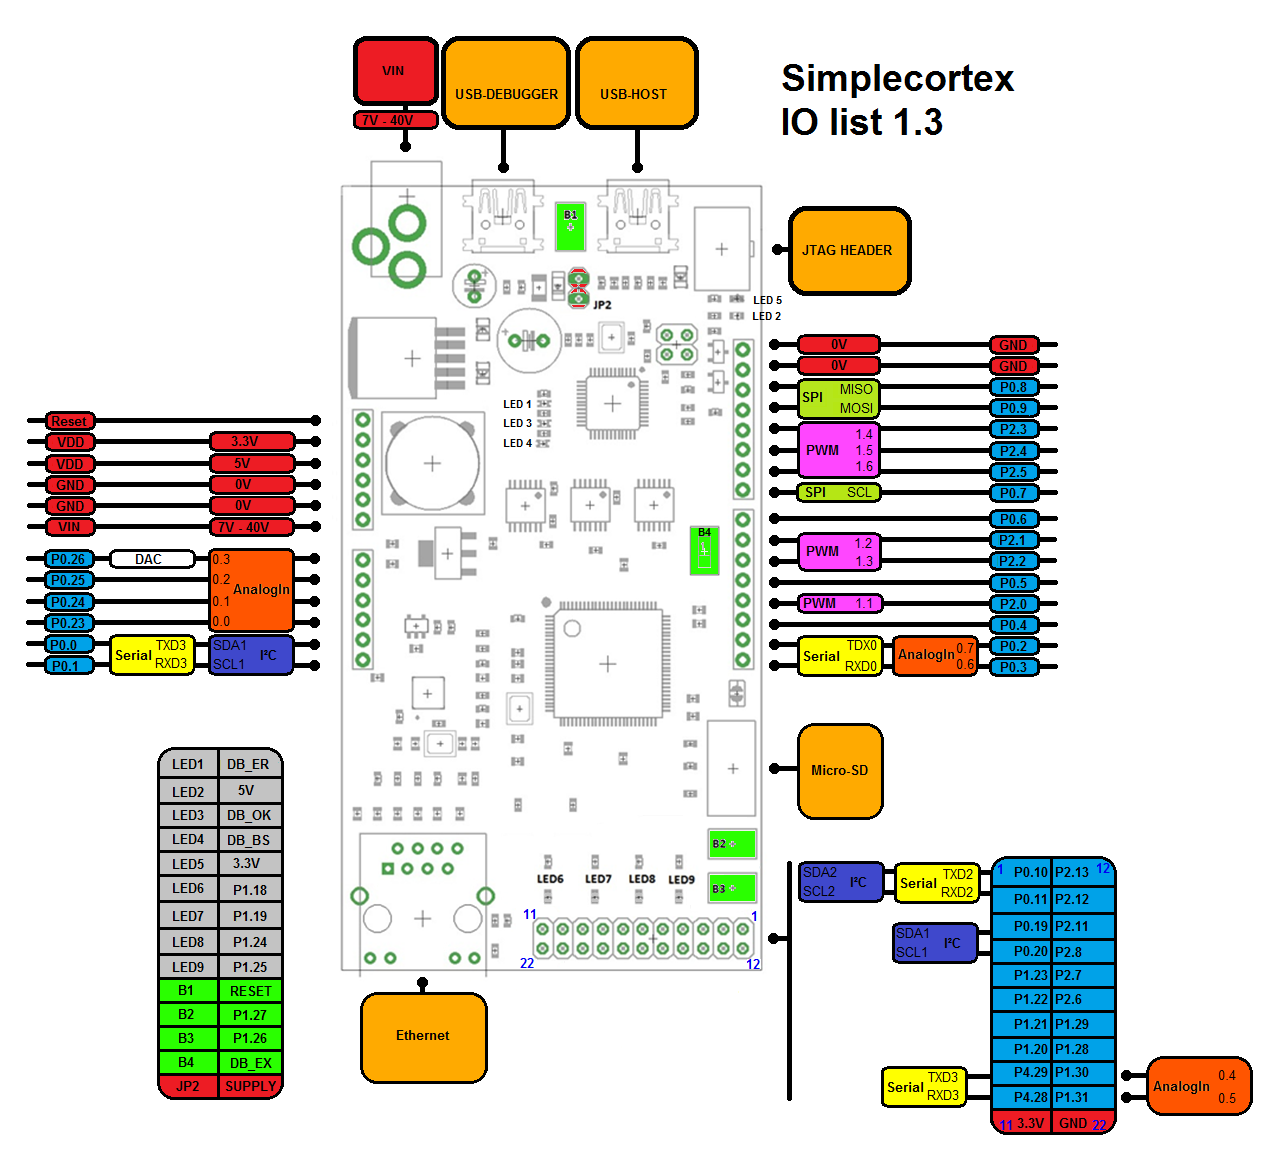
I/O List (Figure 6)
|
|
|
| Figure 6. | SimpleCortex I/O list |
Definitions
- HEADER JP2
The header JP2 is placed below the reset button and has an important function when using the USB-host port. If the USB port is used for serial communications, the USB will power the Simplecortex. If the USB port is used to read a USB which has no powersupply, place a jumper on JP2.
The Simplecortex has a diode for each USB ports to protect the pc from high voltages.
- DB_ER
This is the debugger error led (red color) .
- DB_OK
Debugger works correct and is connected with the pc.
- DB_BS
This blue led will shine when the debugger is busy.
- DB_EX
Debugging external devices. When the switch is turned off, the onboard microcontroller will not work. With this function it’s possible to program external devices via the JTAG header.
Downloads
Schematic Diagram and PCB Design of SimpleCortex - download
Part 2 - Getting Started