Yury Magda
A PC's serial port provides signal lines that you can use to read voltage levels of digital circuits. You can use the port to test digital TTL (transistor-to-transistor-logic)-level circuits. You just need to convert the TTL levels to RS-232 voltages, and you can add a multiplexer to increase the number of signals that the serial port can sense.
The circuit in Figure 1 uses a MAX232 IC from Maxim to convert RS-232 voltage levels to TTL levels (Reference 1). A 74HC4051 from Texas Instruments lets you select any of four digital inputs and route them to the serial port (Reference 2). Listing 1 lets you control the RTS (ready-to-send) and DTR (data-terminal-ready) pins in the serial port that selects the signal under test. The CTS (clear-to-send) pin then reads the signal under test into the PC.
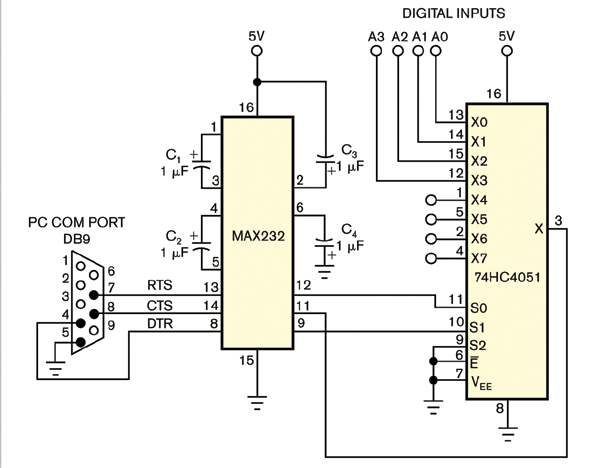
Figure 1. This circuit lets you pass up to four TTL-level signals to an RS-232 port to read their status.
|
The source code of this application is shown below:
				using System;
using System.Collections.Generic;

using System.ComponentModel;
 using System.Data;
 using System.Drawing;
 using System.Linq;
 using System.Text;
 using System.Windows.Forms;
 namespace Interfacing_74HC4051_to_the_Serial_Port
 {
     public partial class Form1 : Form
     {
         public bool OUT; // needs for checking the state of CTS signal
         public Form1()
         {
             InitializeComponent();
         }
         private void button1_Click(object sender, EventArgs e)
         {
             if (!serialPort1.IsOpen)
                 serialPort1.Open();

             textBox1.Text = " ";

             // CHANNEL X0 (RTS = 0, DTR = 0)
             serialPort1.RtsEnable = true; //RTS = 0
             serialPort1.DtrEnable = true ; // DTR = 0
             WriteStatus();
             // CHANNEL X1 (RTS = 1, DTR = 0)
             serialPort1.RtsEnable = false; //RTS = 1
             serialPort1.DtrEnable = true; // DTR = 0
            WriteStatus();
             // CHANNEL X2 (RTS = 0, DTR = 1)
             serialPort1.RtsEnable = true; //RTS = 0
             serialPort1.DtrEnable = false; // DTR = 1
             WriteStatus();
             // CHANNEL X3 (RTS = 1, DTR = 1)
             serialPort1.RtsEnable = false; //RTS = 1
             serialPort1.DtrEnable = false; // DTR = 1
WriteStatus(); serialPort1.Close(); } public void WriteStatus() { OUT = serialPort1.CtsHolding; if (!OUT) textBox1.Text = textBox1.Text + "1"; else textBox1.Text = textBox1.Text + "0"; } } } The source code is simple and straightforward. The main job is implemented inside the button1_Click event handler (this function is called when you have clicked the "Check status" button). You may easily improve the source code of this application. For instance, you may want to read A0-A3 inputs periodically. To do so you should place the Timer component on a form, set the appropriate time interval and place the source code of a WriteStatus function inside a timer event handler which you should define by yourself. |
The four digital-input signals, A0 through A3, from your device under test connect to the first four inputs, X0 through X3, of the multiplexer. Only one of those signals can pass through to the X output, Pin 3, at a time. By setting the appropriate binary code on the serial port's RTS and DTR lines, you can select the signal to pass through the multiplexer (Table 1).
Table 1. Input selection
|
Signal to X pin |
RTS bit |
DTR bit |
|
A0 |
0 |
0 |
|
A1 |
1 |
0 |
|
A2 |
0 |
1 |
|
A3 |
1 |
1 |
The PC software, running on Windows XP, sequentially sets those binary combinations on the port's RTS and DTR lines and reads the digital signal on the CTS line. The software then reads the status of the selected bit and displays it when you press the “check-status” button (Figure 2). The code is written in Microsoft C# 2008, but it will run on the 2005 version, as well.
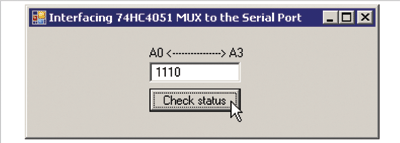 Figure 2. A main window of the running application shows that input lines A0-A2 have high logic levels and A3 has a low logic level.
To create the application, select the “Windows Form Application” from the templates in the project wizard. Place the text-box, label, and button components on the project's main form and assign titles for them. You should place the serial-port component on the design area of the project. Then, set the appropriate parameters for the serial-port component, including the port number, baud rate, data bits, parity, and stop bits.
When you build the circuit, follow all precautions concerning the MAX232 and 74HC4051 wiring according to the manufacturers' data sheets. Place bypass capacitors as close as possible to the IC's power and ground. You can replace the MAX232 with a MAX225 or MAX233.
References
- “MAX220-MAX249 +5V-Powered, Multichannel RS-232 Drivers/Receivers,” Maxim, January 2006.
- “CD54/74HC4051, CD54/74HCT4051, CD54/74HC4052, CD74HCT4052, CD54/74HC4053, CD74HCT4053 High-Speed CMOS Logic Analog Multiplexers/Demultiplexers,” Texas Instruments, 2004.