When I first built the Heart rate measurement through fingertip project, the infrared LED and photodiode used for finger photoplethysmography were actually from salvaged parts, and therefore, I could not provide specifications for them in the article. As a result of that it takes quite a bit of time to replicate that project with a different set of IR LED and photodiode as the values of the current limiting and biasing resistors may have to be changed for the new sensor to work properly. Today, I am going to talk about a revised version of the same project but with all the components specified this time. The new version uses the TCRT1000 reflective optical sensor for photoplethysmography. The use of TCRT100 simplifies the build process of the sensor part of the project as both the infrared light emitter diode and the detector are arranged side by side in a leaded package, thus blocking the surrounding ambient light, which could otherwise affect the sensor performance. I have also designed a printed circuit board for it, which carries both sensor and signal conditioning unit. I have named the board “Easy Pulse” and its output is a digital pulse which is synchronous with the heart beat. The output pulse can be fed to either an ADC channel or a digital input pin of a microcontroller for further processing and retrieving the heart rate in beats per minute (BPM).
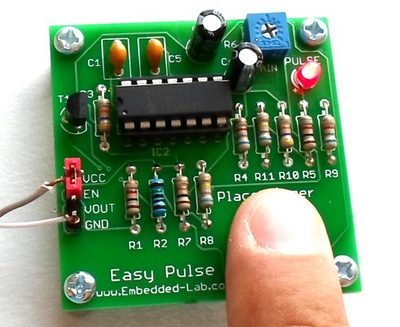
Easy Pulse sensor
Theory
This project is based on the principle of photoplethysmography (PPG) which is a non-invasive method of measuring the variation in blood volume in tissues using a light source and a detector. Since the change in blood volume is synchronous to the heart beat, this technique can be used to calculate the heart rate. Transmittance and reflectance are two basic types of photoplethysmography. For the transmittance PPG, a light source is emitted in to the tissue and a light detector is placed in the opposite side of the tissue to measure the resultant light. Because of the limited penetration depth of the light through organ tissue, the transmittance PPG is applicable to a restricted body part, such as the finger or the ear lobe. However, in the reflectance PPG, the light source and the light detector are both placed on the same side of a body part. The light is emitted into the tissue and the reflected light is measured by the detector. As the light doesn’t have to penetrate the body, the reflectance PPG can be applied to any parts of human body. In either case, the detected light reflected from or transmitted through the body part will fluctuate according to the pulsatile blood flow caused by the beating of the heart.
The following picture shows a basic reflectance PPG probe to extract the pulse signal from the fingertip. A subject’s finger is illuminated by an infrared light-emitting diode. More or less light is absorbed, depending on the tissue blood volume. Consequently, the reflected light intensity varies with the pulsing of the blood with heart beat. A plot for this variation against time is referred to be a photoplethysmographic or PPG signal.
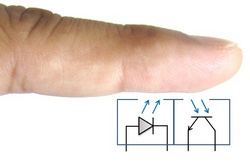
Finger photoplethysmography (reflectance approach)
The PPG signal has two components, frequently referred to as AC and DC. The AC component is mainly caused by pulsatile changes in arterial blood volume, which is synchronous with the heart beat. So, the AC component can be used as a source of heart rate information. This AC component is superimposed onto a large DC component that relates to the tissues and to the average blood volume. The DC component must be removed to measure the AC waveform with a high signal-to-noise ratio. Since the useful AC signal is only a very small portion of the whole signal, an effective amplification circuit is also required to extract desired information from it.
Circuit diagram
The sensor used in this project is TCRT1000, which is a reflective optical sensor with both the infrared light emitter and phototransistor placed side by side and are enclosed inside a leaded package so that there is minimum effect of surrounding visible light. The circuit diagram below shows the external biasing circuit for the TCRT1000 sensor. Pulling the Enable pin high will turn the IR emitter LED on and activate the sensor. A fingertip placed over the sensor will act as a reflector of the incident light. The amount of light reflected back from the fingertip is monitored by the phototransistor.
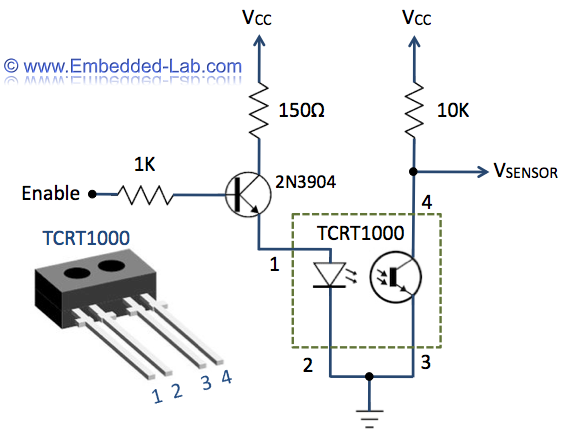
TCRT1000 used for sensing pulse from fingertip
The output (VSENSOR) from the sensor is a periodic physiological waveform attributed to small variations in the reflected IR light which is caused by the pulsatile tissue blood volume inside the finger. The waveform is, therefore, synchronous with the heart beat. The following circuit diagram describes the first stage of the signal conditioning which will suppress the large DC component and boost the weak pulsatile AC component, which carries the required information.
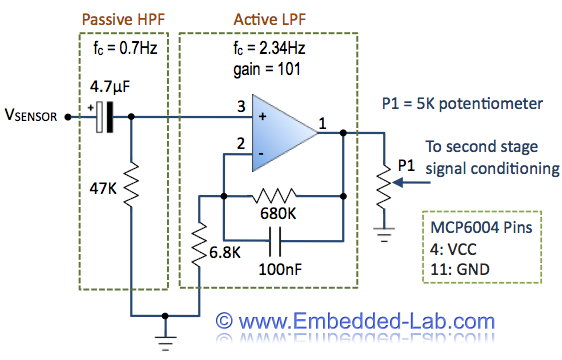
First stage of signal conditioning
In the circuit shown above, the sensor output is first passed through a RC high-pass filter (HPF) to get rid of the DC component. The cut-off frequency of the HPF is set to 0.7 Hz. Next stage is an active low-pass filter (LPF) that is made of an Op-Amp circuit. The gain and the cut-off frequency of the LPF are set to 101 and 2.34 Hz, respectively. Thus the combination of the HPF and LPF helps to remove unwanted DC signal and high frequency noise including 60 Hz (50 Hz in some countries) mains interference, while amplifying the low amplitude pulse signal (AC component) 101 times.
The output from the first signal conditioning stage goes to a similar HPF/LPF combination for further filtering and amplification (shown below). So, the total voltage gain achieved from the two cascaded stages is 101*101 = 10201. The two stages of filtering and amplification converts the input PPG signals to near TTL pulses and they are synchronous with the heart beat. The frequency (f) of these pulses is related to the heart rate (BPM) as,
Beats per minute (BPM) = 60×f
A 5K potentiometer is placed at the output of the first signal conditioning stage in case the total gain of the two stages is required to be less than 10201. An LED connected to the output of the second stage of signal conditioning will blink when a heart beat is detected. The final stage of the instrumentation constitutes a simple non-inverting buffer to lower the output impedance. This is helpful if an ADC channel of a microcontroller is used to read the amplified PPG signal.
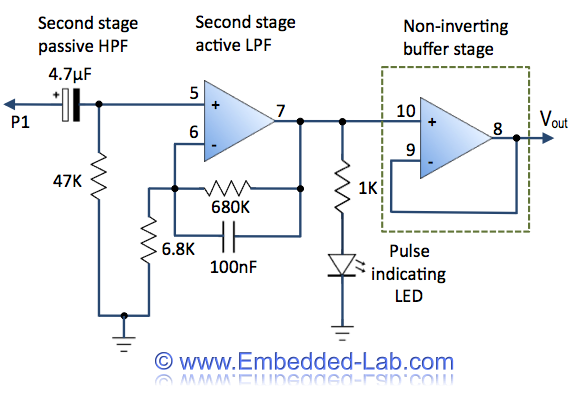
Second stage of signal conditioning
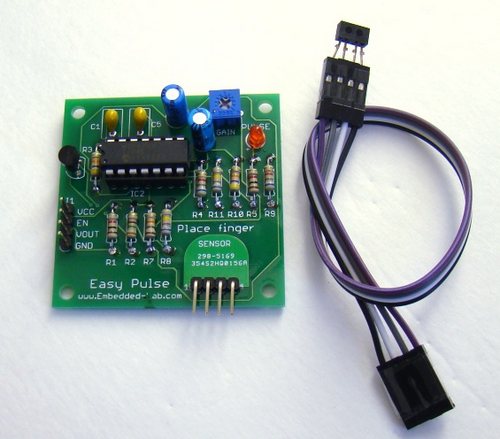
The operational amplifiers used in the instrumentation circuit described above are from the MCP6004 IC, which has got four general purpose Op-Amps offering rail-to-rail input and output over the 1.8 to 6V operating range. The picture below shows an assembled Easy Pulse board designed using the above circuit.
Instead of fixing on the board, the TCRT1000 sensor can also be wired to the board through header pins and jumpers. This way you have more flexibility in using the sensor. You can hold the sensor between two fingers or you can face it down on the skin on your palm, and so on.
Easy Pulse with sensor wire to the board through jumpers
The board operates from 3-5.5V and therefore, it can be used with both 3.3V and 5.0V microcontroller families.
Part 2 - Testing and measurements