Things to note in the source code:
- You can easily define how many frames of animation are in your animation loop by changing the total_frames variable to how ever many frames you have. The flying animation example has 178 frames. If you only have one steady picture or frame, simply put in the number 1.
- You can change the speed at which the animation runs by changing the frame_counter variable. (the higher the number, the more times each frame repeats itself therefor the SLOWER the animation speed.
- You can change the number of horizontal pixels by changing the pixel_counter variable. I set it to 85 because it is just about the perfect number for if we had an 8-bit address bus (which we sort of have with the microcontroller and with the help of the 74373’s we convert it to a 16-bit data bus.) So to draw each frame we need (1 byte of red x 85) + (1 byte of green x 85) + (1 byte of blue x 85) this comes to 255bytes which is basically the limit for an 8-bit address bus. So i use the lower 8-bit address lines as my frame data, and then the upper 8-bit address lines as my frame counter. this gives me a total of upto 255 frames of animation.
I have uploaded a Youtube video showing you how to use this excel spreadsheet to draw your own pictures and animations. I hope it helps! you can view it here:
I had a friend do up an excel spreadsheet to make it easier to draw the pictures and animations to use on the display. You can download the spreadsheet file below, you will also need a hex editor program I thoroughly recommend HxD - it is free and is just so easy to use. You can download HxD here
If you wish to donate to HxD you can visit their page here
NOTE:
You will require microsoft excel or a compatible spreadsheet program to use the painter. You will also need to make sure that you have a couple of addins enabled or the spreadsheet will not work! Here's how to check that you have them installed:
Open Excel and click on the 'tools' menu item and then click on add-ins.
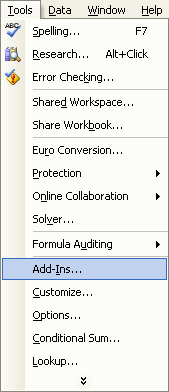
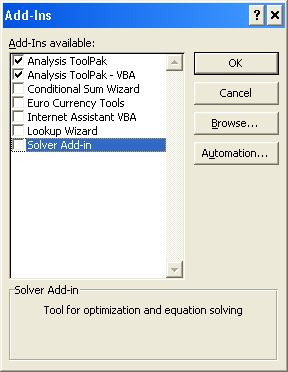
You will then be presented with this add-ins screen. You need to make sure that your computer matches the check boxes in this image:
From here, you have three sheets - INPUT - WORKING - OUTPUT. You have your eight colours at the top left of screen, to draw a picture you need to copy and paste whatever colour you want, from the pallette into the 8x85 working area of the screen. You don't have to paste one square at a time, but you can select multiple squares and paste at the one time. once your picture is drawn, you then click on the OUTPUT sheet, Then copy all of the hex numbers underneath "Copy and paste this next line into the hex editor" You then paste this data into you hex editor and then save it. Then open the file in your programmer software and write the hex file to you eeprom.
That is a really quick runthrough but i will upload a youtube video showing you exactly how to do it, including animations.
(if you have any problems you can always post in the forums)
Parts List:
- 8x Common Cathode RGB LEDS (5mm)
- 1x 16f648a or 16f628a microcontroller
- 5x 74373 tri-state buffers / latches
- 1x 27C512 / 27E512 EPROM / EEPROM
- 1x IR LED
- 1x Photo Diode
- 1x 2n2222 NPN Transistor
- 24x 100 ohm resistors
- 4x 10k resistors
- 1x DC motor