Introduction
We have been selling the PSP and Nintendo DS touchscreens for a while now and it is about time we do something cool that uses them. A LCD touchscreen project first comes to mind, but I really wanted to do something different.
Ryan, one of the other SparkFun engineers was working on the AVR Stick, which uses open source firmware available from Objective Development called V-USB to implement the USB 1.1 standard on an AVR. Basically, you can turn an AVR, like an ATMega168 into a HID (Human Interface Device), that when plugged into a USB port will act like a mouse or keyboard. A touchscreen mouse sounded oh too perfect.
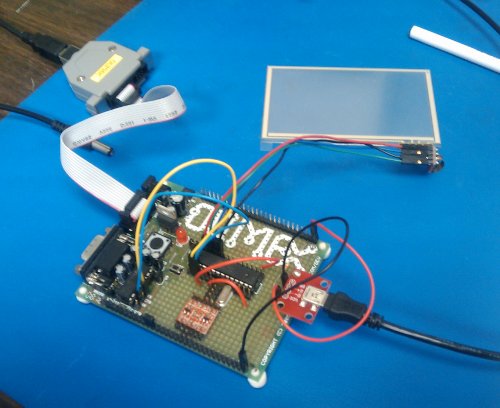
Here are the materials I used to implement the USB touchscreen mouse:
- ATMega168 running at 16MHz (you could also use a ATMega328 with no changes)
- 28 Pin AVR Development Board
- 16MHz Crystal
- AVR STK Parallel Port Programmer
- Breakout Board for miniB USB
- PSP Touch Screen
- PSP Touch Screen Connector Breakout
- 2 - 68Ohm and 1 - 1.5kOhm resistors
- Female to Female Jumper Wires
- And some Male Headers
Touchscreen
The PSP touchscreen is a 4 wire analog resistive touchscreen. This means by touching the screen at one point, a resistance between each edge is formed for both the x and y axises. As you move your finger or stylus across the screen the resistance changes between opposing sides of each axis. By applying a voltage across each axis, a changing resistance results in a changing voltage. Thus a simple ADC on a microcontroller can be used to find x and y positions. Here is a great document that explains it a little better.
The four pins control 4 buss bars located around the peripheral of the touchscreen. In order to read either an x or a y position, two opposing bars need to be powered and a third orthogonal bar is used to measure the divided voltage.
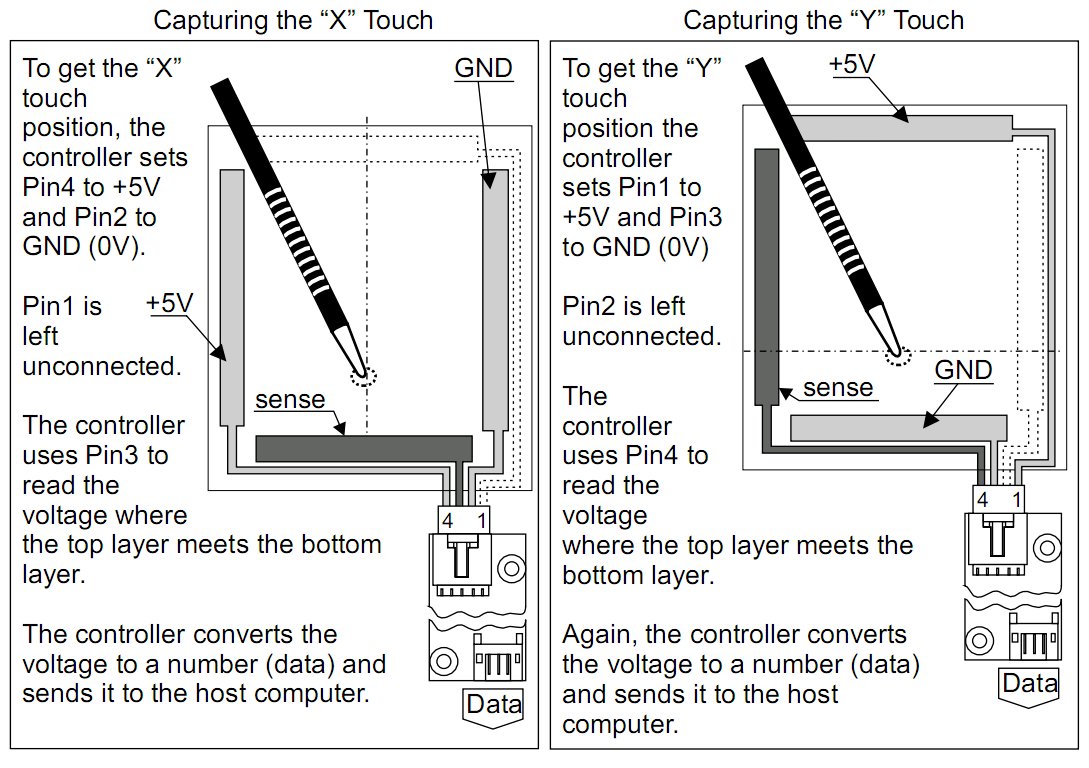
This configuration means that the voltage, ground, and sense bar need to be continually switched in order to quickly read x and y positions. Here is how I hooked up the touchscreen to my ATMega168:
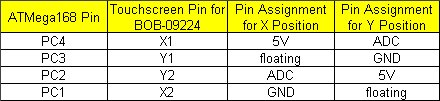
In my code I will need to switch between the x and y pin assignments in order to quickly read the x and y positions.
Hardware
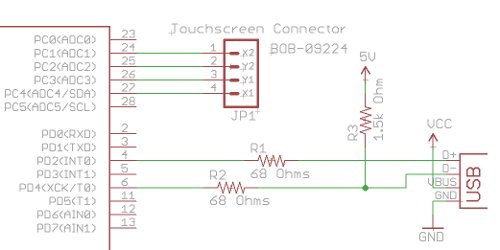
The hardware for the touchscreen was a simple direct connection to 4 IO pins, 2 of them needing to be ADCs. Power to the screen can be supplied by an output pin being pulled high to 5V and another output pin being pulled low to ground.
The hardware used to turn my ATMega168 into a HID device was simple. All I needed were a few resistors connected to two interrupt pins on the ATMega168. The only requirement is that the D+ pin needs to be connected to the INT0 pin.
More information is available from Objective Development.
Here is a piece of my schematic:
Code
The first thing I needed to do was to make sure I could get reliable x and y position from the touchscreen before messing with the USB stuff. Here is my project source code for just reading out the ADC values for the touchscreen.
Basically, I needed two ADC readings, one for x and one for y. However, I can't just set one pin permanently to one ADC, the pins will need to be constantly changing (refer to the chart above).
I made a function for each coordinate that changes the pin assignments and takes an ADC reading.
void read_x(void)
{
DDRC = 0b00010010; // Output on PC4(5V) and PC1(GND), Input on PC4(ADC)
sbi(PORTC, 4); //pull PC4 to 5V
cbi(PORTC, 1); //pull PC1 to GND
_delay_ms(1); //wait for screen to initialize
ADMUX = (1 << MUX1); //ADC2
ADCSRA = (1 << ADEN)|(1 << ADSC)|(1<<
while(ADCSRA & (1 << ADSC));
l = ADCL;
h = ADCH & 0x03;
h = h << 8;
h = h + l;
}
Now, I can just print the global variable h for the ADC value.
The delay after the port assignments is important. I found that without the delay, the ADC value was not consistent, there were aberrant values present. Since we are powering one of the bus bars on the touchscreen with 5V and then quickly switching it to an ADC input, I imagine that I wasn't waiting long enough for the capacitance in the screen to "charge". The 1 ms delay did the trick.
Now that I know the touchscreen hardware is working, I can now look into using these values to compute mouse movements using the USB libraries.
The USB libraries for AVRs can be found on Object Development's download page. What you get is all of the information you need to implement USB on an AVR: USB libraries, example circuits, example source code, and pretty good documentation.
Sure enough, there is some basic example code for a USB Mouse. The example is even configured for the same architecture that I was planning to use (target device, CPU clock, and fuse values), so I didn't need to change anything in the makefile. Although, I did want to use my Atmel mkII programmer with AVRstudio, but I wasn't about to go sifting through the makefile. The example uses avrdude and stkxxx compatible programmers and since SparkFun sells three of those programmers, why not just use one of them.
Note: If you happen to want to use a different AVR at a different speed, then you will need to adjust the makefile. However, not all clock speeds will work. Be sure to use a USB compatible speed for your clock and set the correct fuse bits. More info on what clock speeds are allowed can be found in the usbconfig.h header file.
After you have your USB hardware setup on your AVR, plug in your programmer, open a command prompt to your firmware directory, follow the make commands in the makefile (be sure to set your fuses!! Information on fuse settings can be found in the makefile), and presto, your AVR is now a USB Mouse.
The example code makes the mouse cursor move in a circle by computing the mouse movements internally in the main.c file. This is nice and fun, especially if you are wanting to play a trick on your co-worker. We had some fun and plugged the tiny AVR Stick with the USB Mouse example into an unsuspecting staff member's computer; ahh good times. :)
So how do I get the ADC values of the touchscreen into movements of the mouse? Here is my USB Mouse project code.
The main.c code uses member dx of the structure reportbuffer as a value for speed in the x direction (same for y). Basically, all I need to do is load a signed 8 bit value into reportbuffer.dx and that will move the mouse cursor at some speed.
To sum it up, all my code really does is:
- Enable a timer to read the ADCs at a set interval
- Fill a small buffer for the ADC values
- Takes the difference of consecutive ADC values to determine direction
- Executes comparisons and conditionals
- Calculates the speed by multiplying by a scale factor
- Load that value into reportbuffer.dx
There was a relatively large problem I ran into after step 3. The ADC value is an unsigned 10 bit number when I load it into the variables h and h1. When I do my comparisons, conditionals, and calculations to clean up the mouse movements, I have to use signed or unsigned 8 bit, 16 bit, or long values. This creates a huge problem since doing any operation between different sized binary values results in non-sense values. Overall, I needed to turn the unsigned 10 bit ADC into a unsigned 8 bit value. With some clever bit shifting I got the value I needed (I would think there is a better way to do this). Here is the shift:
char xshifted = ((XDIFF>>3)|((XDIFF&0x8000)>>8));
Another issue I came across was debugging. The printf interrupts conflicted with the USB interrupts, therefore I couldn't print values for integers I needed to debug (like the xshifted variable). What I did was debug using my serial code with out the USB libraries. This was really time consuming, but it did help a bit.