R O Ocaya
EDN
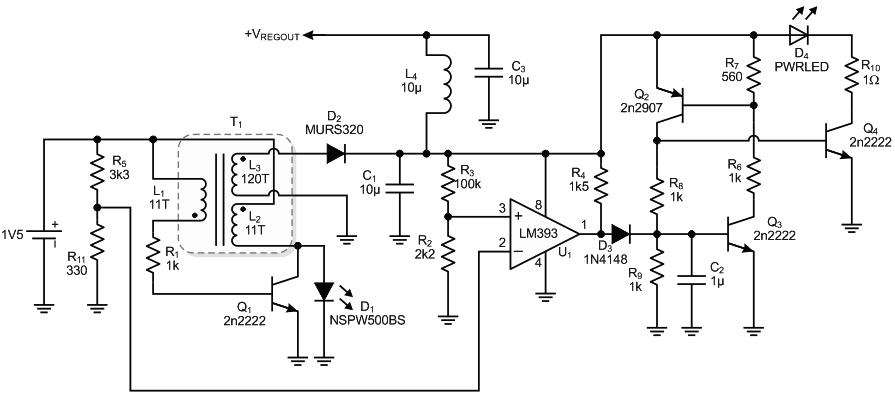
This Design Idea shows a way to drive low-power electronic circuits using a single 1.5 V cell. The design is based on a free-running oscillator that drives a flyback transformer to generate a controllable higher voltage. It can be used to power analog circuitry, microcontrollers, and any other light loads.
The power circuit was designed, simulated, and constructed. It was shown to operate reliably with a power draw of less than 50 mW, even when the supply drops to 1.1 V. The regulated outputs tested for the given circuit values were between 6 V and 24 V by the adjustment of a single resistor value. The output power is sufficient to drive a PIC microcontroller in low power mode (15 µA@32 kHz). With no modification, the circuit will work as a strobe, and flash a string of LEDs – or a power LED – at rates from 0.1 Hz to 20 Hz. It might seem a lot of circuitry for otherwise “simple” tasks, but it is worthwhile given the low supply voltage, and the fact that the output can be regulated or the flashing controlled.
 |
|
| Figure 1. | Circuit diagram of the 1.5 V inverter. Inductors L1 and L2 (10 turns, 22 AWG), and L3 (130 turns 32 AWG) are wound on a Fair-Rite Products Corporation core part number 5961001801. |
To use the circuit for a regulated output at +VREGOUT in Figure 1, for instance 20.7 V in the following discussion, resistor R2 was set to 680 Ω and R3 to 100 kΩ. The voltage across R11 is set by the R5/R11 potential divider to about 140 mV. The oscillator made up of Q1 runs continuously on application of power, and couples energy magnetically into L3 from L2. Once the voltage across C1 rises above 2 V, comparator U1 is effectively powered. Initially, the voltage across R2 rises gradually as the capacitor charges up, until it just exceeds the voltage across R11. The connection is such that it will be compared constantly with the 140 mV by the open-collector comparator U1. The thyristor comprised of Q2/Q3 are similarly unpowered and also untriggered by the output of U1. The capacitor continues to charge unhindered. Therefore, depending on the value of the R2-R3 combination, the output of U1 will go high when:
![]()
The core of T1 can be of different shapes and sizes. To duplicate the results above, a core having an inductance factor of around 80 nH and relative permeability (μ) around 80 is recommended. The ETD core from EPCOS, order number B66361G0100X1 and the toroidal core TN33/20/11-2P80 from Ferroxcube or similar are suitable.
For the component values in Figure 1 (with the exception of R2 = 680 Ω and R3 = 100 kΩ), the thyristor triggers when VC1=20.7 V. The output filter is made up of L4 & C3. C1 has a double role in the circuit: First, it is the charge storage “bucket”; second, it provides some loop stability together with R10. Resistor R4 is necessary to pull-up the open collector of U1, while D3 prevents upsetting the output bias of U1.
 |
|
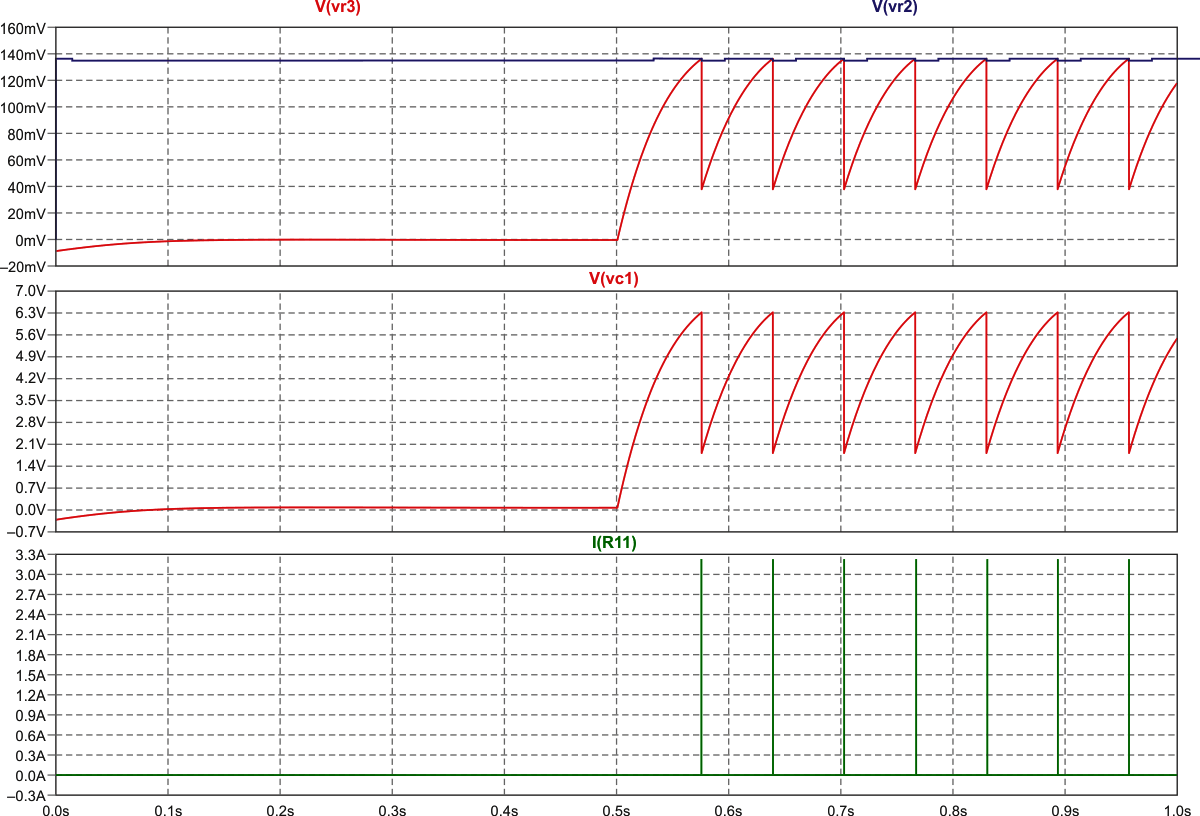
| Figure 2. | LTspice-simulated timing waveforms in the LED flasher/strobe. The current in R10 is measured under the assumption that power LED D4 is not connected. |
To use the circuit as a three-LED flasher/strobe, R10 should be 100 Ω. For the component values shown, the thyristor triggers when VC1 = 6.33 V. As soon as the thyristor has triggered, a pulse of about 2 V is applied to the base of Q4, turning it fully on. This causes a large Q4 collector current, which causes a quick discharge of C1. If this collector current occurs through a series of LEDs or a single power LED, it gradually brightens, until a brilliant flash is seen at the moment Q4’s base is driven hard. The discharge also turns off U1 (i.e., its supply voltage falls below 2 V). Therefore, VR2 reaches a minimum of about 43 mV before charging of C1 resumes and the process repeats. When flashing LEDs, a limiting resistance is required (R10) as LEDs will be destroyed without it. The simulation shows peak current pulses of 3.3 A with 50 µs duration measured at 50% (Figure 2). The rate of flashing can be adjusted by changing R2 or R11.
Download the simulation file (remove the dummy .txt extension before saving the link).