I never got a chance to properly test the unit before heading to Arizona. One windy day though, I did take the head outside and hold it high up in the air above my head into the wind just to see if the blades would spin it as well as I had hoped. Spin it they did. In a matter of a few seconds it spun up to a truly scary speed (no load on the generator), and I found myself holding onto a giant, spinning, whirligig of death, with no idea how to put it down without getting myself chopped to bits. Fortunately, I did eventually manage to turn it out of the wind and slow it down to a non-lethal speed. I won't make that mistake again.
Now That I had all the mechanical parts sorted out, it was time to turn toward the electronic end of the project. A wind power system consists of the wind turbine, one or more batteries to store power produced by the turbine, a blocking diode to prevent power from the batteries being wasted spinning the motor/generator, a secondary load to dump power from the turbine into when the batteries are fully charged, and a charge controller to run everything.
There are lots of controllers for solar and wind power systems. Anyplace that sells alternative energy stuff will have them. There are also always lots of them for sale on Ebay . I decided to try building my own though. So it was back to Googling for information on wind turbine charge controllers. I found a lot of information, including some complete schematics, which was quite nice, and made building my own unit very easy. I based my unit on the schematic of the one found on this web site:
http://www.fieldlines.com/story/2004/9/20/0406/27488
That web site goes into a lot of detail about the controller, so I'm only going to talk about it in fairly general terms here. Again, while I followed their general recipe, I did do some things differently. Being an avid electronics tinkerer from an early age, I have a huge stock of electronic components already on hand, so I had to buy very little to complete the controller. I substituted different components for some parts and reworked the circuit a little just so I could use parts I already had on hand. That way I had to buy almost nothing to build the controller. The only part I had to buy was the relay.
Whether you build your own, or buy one, you will need some sort of controller for your wind turbine. The general principal behind the controller is that it monitors the voltage of the battery(s) in your system and either sends power from the turbine into the batteries to recharge them, or dumps the power from the turbine into a secondary load if the batteries are fully charged (to prevent over-charging and destroying the batteries). The schematic and write-up on the above web page does a good job of explaining it.
This is a picture of the controller I built.
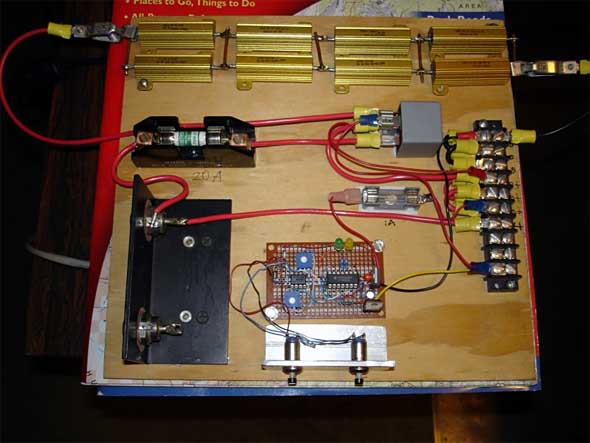
I just bolted everything to a piece of plywood for testing purposes. Eventually I will mount it in a weather-proof enclosure.
The little perf-board in the lower center with the ICs and other bits on it is the actual controller circuit. The silver bracket below it holds two buttons that allow me to manually toggle the unit between charging batteries and dumping power to a secondary load. The big, black heat sink on the lower left has two 40 Amp blocking diodes bolted into it. I am only using one right now, but I could easily add a second wind turbine or even a photovoltaic solar panel to the system using the second one. The double row of gold rectangles across the top is a dummy load made up of high-Wattage resistors. It has taps at 2 Ohm intervals. I use it as a secondary load to dump power from the turbine into when the battery is fully charged. I also use it for testing purposes to load test the turbine. Eventually excess power from the turbine will be dumped to something more useful like a water heater or a second battery bank. Below and to the left of the dummy load is the main fuse for the wind turbine. The small gray cube is a 40 Amp SPDT automotive relay (the only part I had to purchase) which sends the turbine power either to the batteries or to the dummy load. Along the right side is the terminal block which allows me to connect everything together.
To be continued