I have modified several commercial solar garden lights over the years. I switch out the LED, solar panel, battery pack and control circuit. The result is a much better overall light. One of my disappointments in using store-bought garden light assemblies is their construction. They are built so cheaply that over time, water and insects get inside, killing the light operation. For emergencies, it would be nice to have an LED light which could be put outside in the sunlight to collect energy during the day and then bring the light indoors to provide some illumination at night for a full 12 hours.
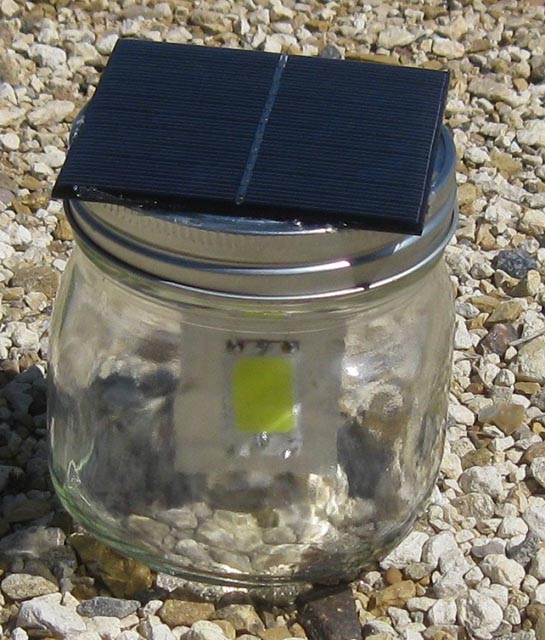
If I were going to start from scratch to build such a portable light, I might choose a glass mason jar (Figure 1). These jars are available everywhere. Some even have a glass handle so the light could be carried around like a candle holder. The tight seal of the jar lid would keep the internal components clean and clear. All the parts, including the LED light, could be mounted inside.
The classic 24 ounce jar shown in Figure 1 on the left would work great. The one with a handle would be even nicer. I suggest to use a jar with the “wide mouth” opening and matching lid. To keep moisture from fogging the inside, I also suggest placing a packet of silica gel inside.
|
|||
| Figure 1. | 24 oz mason jar. | ||


The wide mouth jar has an opening of about 2.95 inches. To house the battery and control board, I selected a 2 inch PVC pipe fitting from a home improvement store. I cut off a 1 inch section of that fitting (Figure 2). I used a large drill bit as a router and formed four circular moon shaped cuttings into the inside of the fitting. This produced enough room to lay 3 AA size NiMH cells, side by side. I drilled a 1/8 inch hole in the jar lid.
 |
|
| Figure 2. | Cut ring from PVC pipe fitting. |
I soldered two wires onto the underside of a 5 volt 160 mA 10 cell 3” × 3” solar panel (Figure 3), then fed them through the hole before gluing the solar panel to the jar lid. I found that clear “E6000” glue worked the best. Once the solar panel was glued in place, I glued the PVC pipe fitting to underside of the jar lid (Figure 4). I soldered the three AA NiMH cells in series and soldered wires onto the positive and negative end of the 3 cell battery pack. I then glued the three batteries inside the PVC fitting (Figure 5). Finally, I glued the control board on top of the battery pack, with an added plastic spacer between the battery pack and the control board. Two stiff wires from the board were then soldered to the LED.
 |
|
| Figure 3. | 10 cell 5 V 160 mA solar panel. |
 |
|
| Figure 4. | PVC ring glued to jar lid. |
 |
|
| Figure 5. | 3 AA NiMH cells inside ring. |
 |
|
| Figure 6. | 12 LED chip-on-board (COB). |
I found that a 12 LED chip-on-board (COB) (Figure 6) assembly produced a nice broad light pattern. The light emitted is enough to read or cook by.
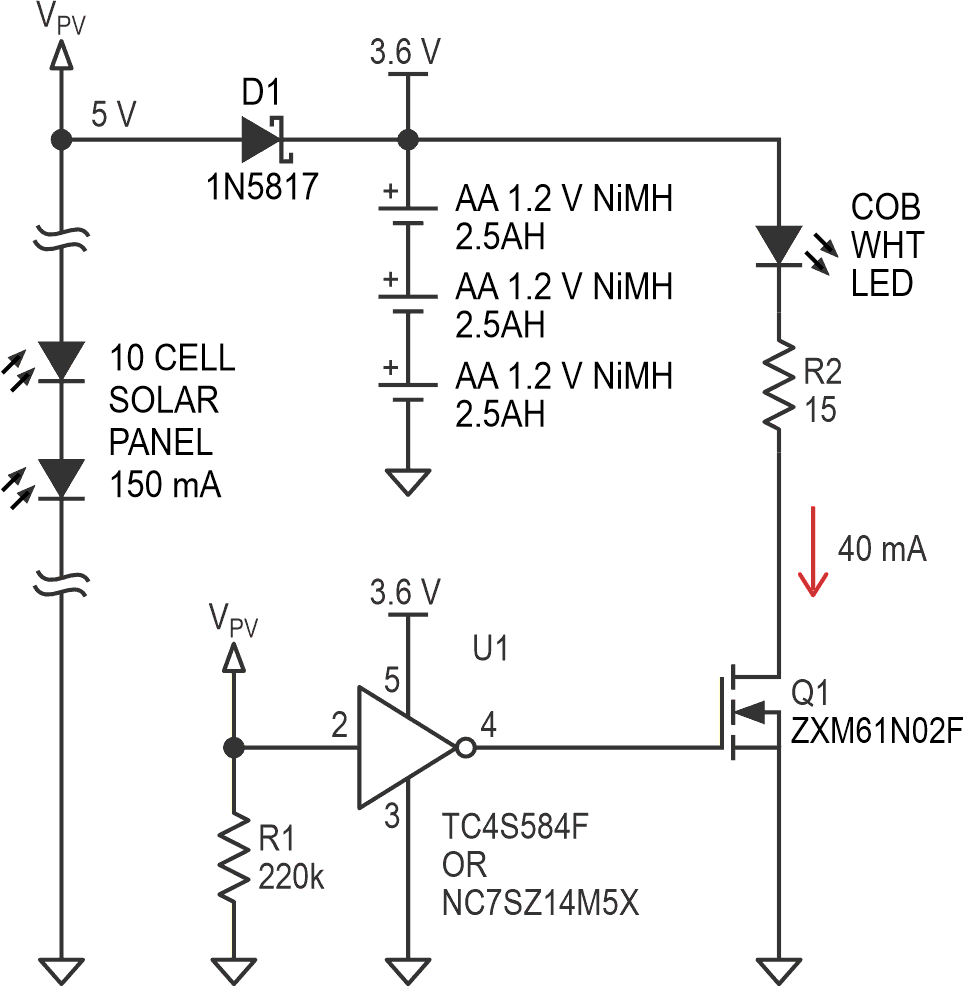
The control circuit I used is shown in Figure 7. A 1N5817 Schottky diode is wired between the solar panel and the battery pack. The diode prevents current from leaking back into the panel at night. A Schmitt trigger IC monitors the voltage across the solar panel and turns on the LED at night. A 15 ohm resistor limits the LED current to about 50 mA. I used a 10 cell, 5 V solar panel, rated at 160 mA.
 |
|
| Figure 7. | The control circuit. |
If you want to increase the light intensity of the jar light, you could install a much larger 10 cell 5 V solar panel, rated at 600 mA. Using this light, you can use 6 NiMH cells, wired in a series/parallel pack, forming a 3.6 V pack with a rating of 5 amp-hours. You could then increase the LED current to about 200 mA with a 3.3 Ohm series resistor. The result a very bright light indeed, enough to light a whole room. However, at the higher current level, I suggest mounting the LED to a section of aluminum plate to act as heat sink.