Vardan Antonyan
EDN
Few microcontrollers include a DAC. Although you can easily find an inexpensive DAC to control from your microcontroller, you can use unused peripherals instead of adding parts. Fortunately, you can convert a microcontroller's ADC channel along with a GPIO (general-purpose input/output) pin into a DAC. You can make a DAC by charging a capacitor to an analog level by driving it high. You can also discharge the capacitor by driving it low, or you can hold its voltage by tristating it (Figure 1).
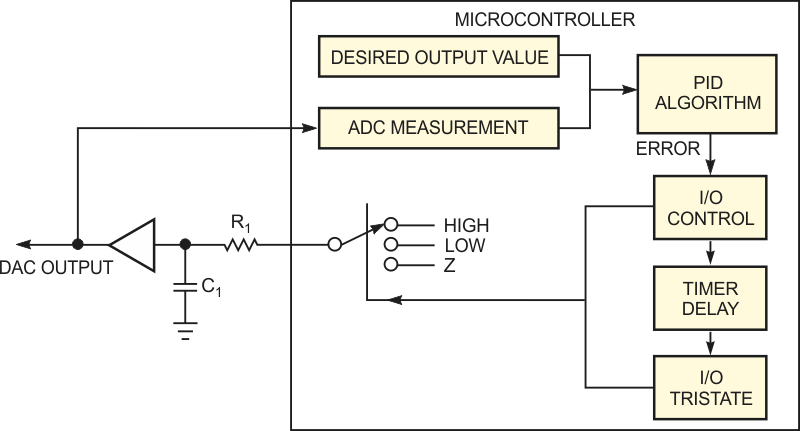 |
||
| Figure 1. | You can develop a PID algorithm to control pulse width and time, thus creating a DAC from a general-purpose I/O pin. Use the ADC as part of the feedback loop. |
|
At first glance, this approach seems like a crude way to make a DAC. The technique becomes more plausible, however, when you use a PID (proportional-integral-derivative) algorithm and monitor the voltage with the microcontroller's ADC.
You can use the PID algorithm to compare the output voltage with the desired value and calculate the error. If the error value is zero, then the I/O control block tristates the GPIO pin. If the error signal is positive or negative, then the I/O control block turns the I/O pin to a high state to charge the capacitor or to a low state to discharge it. Your microcontroller code should load the error value into a timer to generate a timed pulse. The error-value sign determines the charge/discharge cycle, and its magnitude determines the duration of the pulse. Once the cycle is complete, you can set the I/O pin to a tristate mode, which holds the value. The algorithm can run as a software loop. You can call it based on another timer interrupt. To minimize the response time, make sure that this algorithm runs at the desired output value slightly longer than 2.2RC. You need the extra time to completely charge or discharge the capacitor through resistor R1.
The DAC's resolution depends on several factors, the foremost of which is ADC resolution. The DAC's resolution never exceeds that of the ADC. Variable selection and timer resolution also affect DAC resolution. To implement a 10-bit DAC, you need a 16-bit timer and 16-bit variables for the PID algorithm. You can use a lower-resolution timer, but you must more frequently call the algorithm. That action results in longer settling times and higher CPU usage.
By adjusting the algorithm's PID variables, you can achieve surprisingly good output settling times with little change to the DAC's output after settling. The stability of the ADC's voltage reference limits temperature stability. Neither the temperature stability of R1 and C1 nor the leakage of C1 has an adverse effect on the DAC's stability. The selection of R1 and C1 depends on the application, and you should select them based on settling time. For relatively slow-acting DACs, you can increase the update rate by running the algorithm faster than the 2.2RC period and using an 8-bit timer. To buffer the DAC output, use an op amp as a voltage follower or use a common emitter follower. You can use a noninverting amplifier to amplify the output and feed just a portion of it to the ADC through a voltage divider.