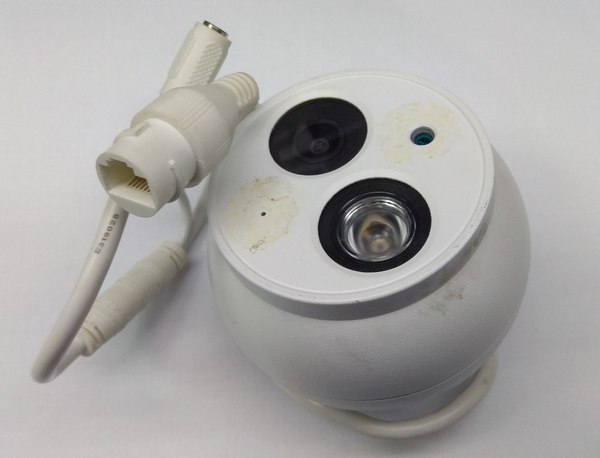
In this article, I want to talk about the method of software repair or firmware recovery of the Dahua DH-IPC-HDW4421E IP-camera (Figure 1). In general, this instruction is suitable for all Dahua IP-cameras IPC-HX4X2X series and is used if the camera does not start, its web interface is not available and the firmware update process does not start automatically via a TFTP server. In the article, we will consider exactly a software failure and a way to eliminate it, because the reason why the camera does not work may be hardware, for example, a malfunction of the built-in PoE module or the power supply circuits of the processor and peripherals.
 |
||
| Figure 1. | Dahua DH-IPC-HDW4421E IP-camera. | |
You can check that the Dahua IP camera has a software failure using the UART debug interface (we will also use it to troubleshoot firmware problems), the signals of which are available on the contact pads of the processor board. In addition, a faulty Dahua IP-camera is not detected in the ConfigTool utility (software from the manufacturer), and the web interface of the camera at the previously set IP address is not available. To access the debug interface, the IP camera needs to be disassembled, processor board removed from case, and removed the heatsinks (Figures 2, 3).
 |
||
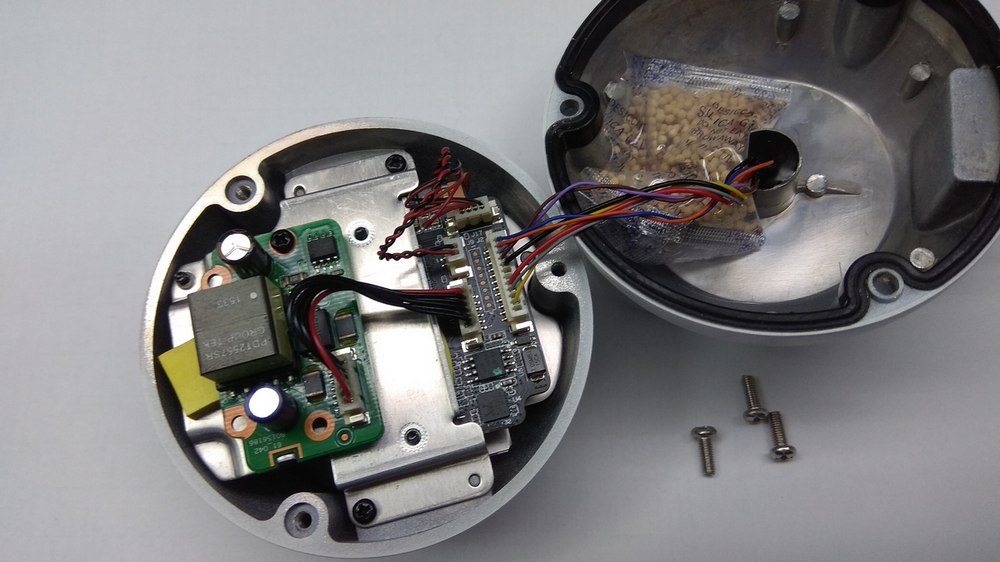
| Figure 2. | Dahua DH-IPC-HDW4421E IP-camera with the housing cover removed. | |
 |
||
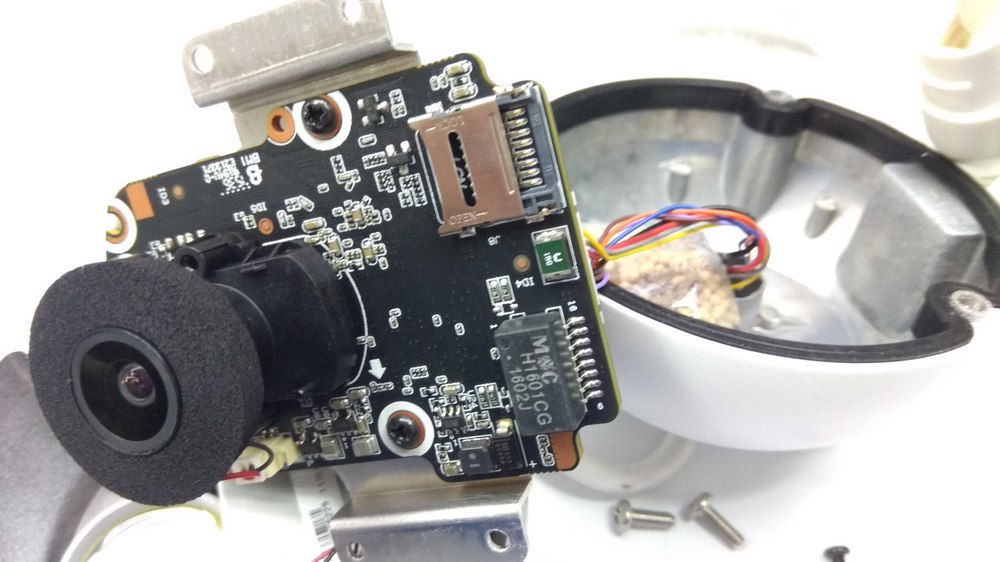
| Figure 3. | View of the processor board of the Dahua DH-IPC-HDW4421E IP-camera from the lens side. | |
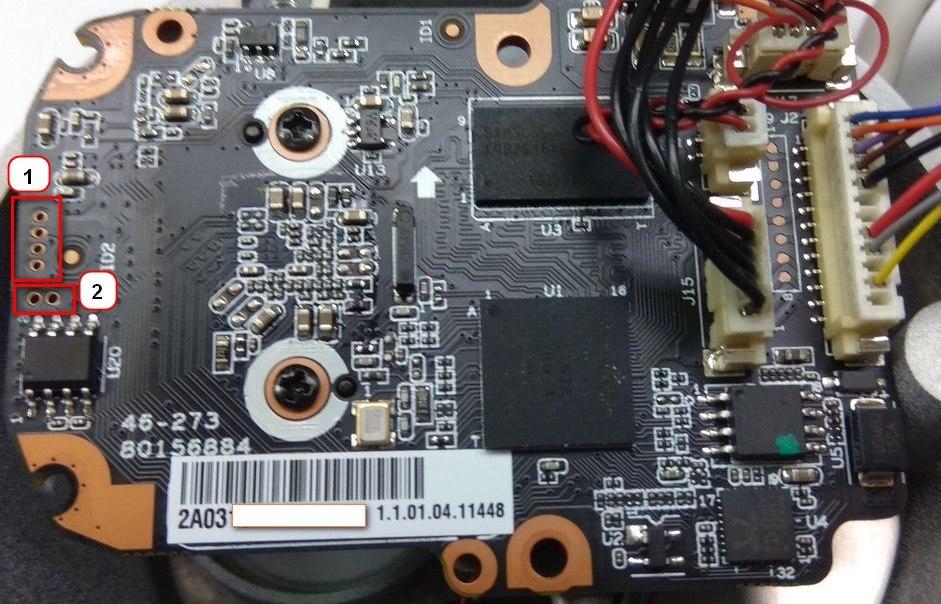
In Figure 2, the IP camera is open and the PoE (Power over Ethernet) module is visible in the foreground. Part of the processor board and the Flash memory chip in the SO-8 package are visible under the heatsink. We dismantle the PoE module (I did not disconnect it from the processor board), unscrew the screws securing the processor board to the camera body, and then remove the heatsink. Removing the heatsink gives us access to the debug interface pins as well as the reset button pins (Figure 4). On this side of the processor board there is also a sticker with the serial number (ID, identifier) of the camera, this number is also registered in the IP-camera firmware.
 |
||
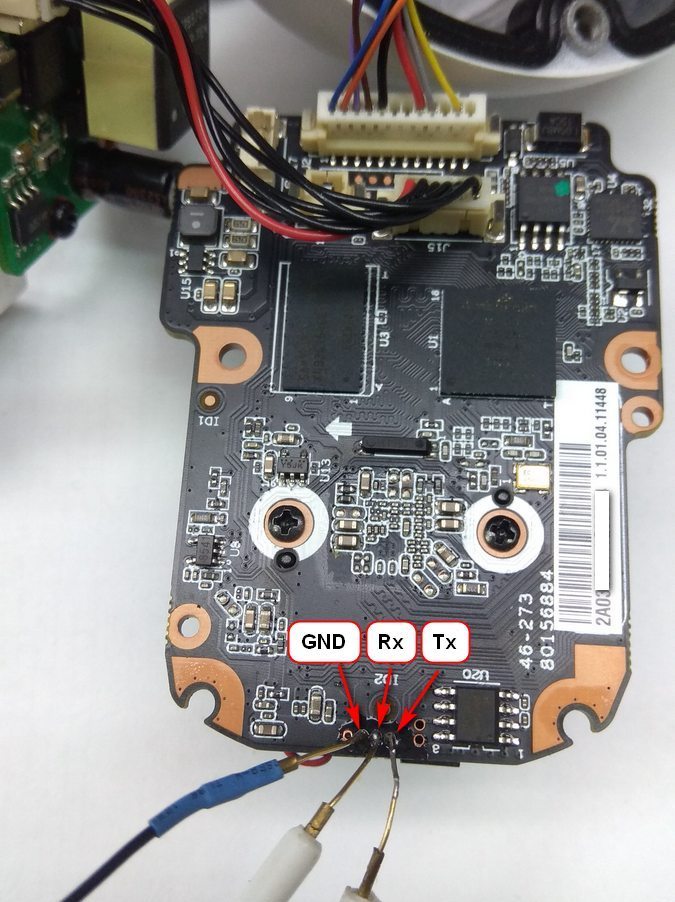
| Figure 4. | Location of contact pads on the processor board of the IP-camera Dahua DH-IPC-HDW4421E: 1 - UART debug interface, 2 - Reset button. |
|
The location of the signals of the UART debug interface +3.3 V, GND, Rx, Tx is shown in Figure 4. To connect the debug interface to the terminal program on the PC, I used a USB-UART adapter on the PL2303 IC. In other IP cameras of this series, the location of the contact pads and signals may differ, so if you do not see the output of debug information in the terminal program when the IP camera is powered on, then simply swap the Rx and Tx signals (Figure 5).
 |
||
| Figure 5. | Connecting the USB-UART adapter to the pins of the IP-camera debug interface. |
|
We connect the USB-UART adapter to the computer. Next, download and install the terminal program; I am using PuTTY. In the program settings, select the serial port (Serial), specify the port number (Serial Line) corresponding to the USB-UART adapter, specify the exchange rate (Speed) 115200 and press the "Open" button.
After opening the terminal program window, we supply power to the camera (external 12 V power supply or via PoE, if there is a PoE injector) and, if everything is done correctly and the processor is working properly, then in the window we will see the output of debug information about the boot progress (Figure 6). Otherwise, it is necessary to check the port parameters and the connection of the Rx / Tx signal lines of the USB-UART adapter to the debug interface (swap them).
 |
||
| Figure 6. | Dahua DH-IPC-HDW4421E IP-camera Operation system (Linux) loading process. |
|
Debug information is output before the kernel is started (after starting the kernel, only critical errors can be displayed). However, even this information was enough to reveal software problems. In addition, the IP-camera reboots a few minutes after the start, the boot process is repeated (the U-Boot loader works again).
On the screenshot of the boot log you can see basic moments:
- the message "* * * Warning - bad CRC, using default environment" indicates a checksum error (CRC);
- when the network interface of the IP camera is initialized, the Ethernet MAC address is reported: Net: Detected MACID: 00: 12: 34: 56: 78: 9A. This MAC address value (sequence 0-A) is invalid, not to mention the match for this IP camera;
- Also, the "unknown core, use back" message after starting the kernel indicates a software problem.
To check the rest of the camera parameters (it will be more correct - the parameters of the bootloader environment), you need to stop the execution of the U-Boot loader and check the parameters and their current values. To stop autoboot of IP-camera (U-Boot), immediately after powering on the IP camera in the terminal program, send the symbol "*" (or their sequence) until the message "Hit any key to stop autoboot" appears, then press any button on the keyboard - an invitation to work ">" will appear.
In the command line, enter the printenv command, observe the list of parameters and values (Figure 6). The parameter list displays the network interface parameters (MAC, current IP of the IP-camera, TFTP server address for firmware update, default gateway address, subnet mask), commands for updating firmware sections with addresses of Flash memory areas, UART debug interface parameters, debug level, etc. . Again in the list we see the incorrect value of the MAC address of the network interface (the ethaddr parameter), the incorrect identifier (serial number) ID, in the value of which all 0.
Also in this list for some reason is missing another important parameter named HWID, which defines the hardware platform of the IP-camera. In other words, it is clearly a software failure, the cause of which is unknown (possibly after an unsuccessful update).
In addition, the BSN parameter, which seems to be the identifier (serial number) of the IP camera's processor board, and the devalias parameter are missing. A BSN ID label is affixed to the processor board. As I have seen, the presence or absence of BSN and devalias parameters does not affect the camera's operation.
 |
||
| Figure 7. | Result of "printenv" command: list of environment parameters in U-Boot. | |
In general, the list of parameters for a working IP-camera of this series should be as shown in Figure 8.
 |
||
| Figure 8. | List of environment parameters in U-Boot for a working DH-IPC-HDW4421E IP-camera. |
|
The serial number (ID) of the IP camera is usually found on a sticker on the processor board (15 characters long), it may also be on the packaging or in the warranty card. The hardware platform identifier (HWID) can be taken from an identical camera (this also requires a connection to the debug interface) or found by the camera model in the check.img file, which is included in the software package for updating the firmware of this series of IP cameras. To do this, you need to download the official firmware for this model, unpack it and find the check.img file; open the file in the text view mode and by the camera model find the value of the HWID parameter, which should look like this: IPC-HDW4421E-AS: 01: 02: 05: 23: 19: 00: 01: 0E: 01: 00: 04: 258: 00: 00: 00: 00: 00: 00: 00: 00: 100.
The MAC address is more complicated, presumably, it can also be indicated on the packaging or warranty card; perhaps there was a sticker on the camera body at one time, for example, as on the DH-IPC-HFW4421DP model IP video camera. In my case, I could not find the MAC address of this camera, so I had to pick it up by analogy with another camera of the same model. It should be noted here that in the case of complex video surveillance systems, network administrators require the uniqueness of the MAC addresses of network devices.
Looking ahead, I will say that by connecting to the debug interface, you can update the IP camera firmware from the command line at this stage, however, due to incorrect values of the above identifiers, the camera will not start. In particular, due to the absence of the HWID, after flashing, we will again receive the error message "unknown core, use back". Therefore, we first restore the values of these parameters.
To set the MAC address of the network interface of an IP camera, you need to run a command like this in the command line:
setenv ethaddr XX: XX: XX: XX: XX
where XX: XX: XX: XX: XX is the MAC address of the IP camera (network interface).
Next, we will write the ID using the command:
setenv ID XXXXXXXXXXXXXXX
where XXXXXXXXXXXXXXX is the serial number of the IP camera.
Now let's indicate the hardware platform identifier of the IP camera (for this model):
setenv HWID IPC-HDW4421E-AS: 01: 02: 05: 23: 19: 00: 01: 0E: 01: 00: 04: 258: 00: 00: 00: 00: 00: 00: 00: 00: 100
To save the entered parameters in Flash memory, enter the command at the command line:
saveenv
You can run the printenv command to verify that the data has been entered correctly. The parameters and values that we changed and saved will be at the end of the list (Figure 9).
 |
||
| Figure 9. | Changing the identifiers (MAC, ID, HWID) of the Dahua DH-IPC-HDW4421E IP camera in the debug interface. |
|
Now you can restart the camera with the reset or boot command, or by hardware - turn off and then turn on the power. In almost all cases, after adjusting the MAC, ID and HWID, the IP cameras are launched with the previous user settings, are defined in the ConfigTool program and work stably. In some cases, it was noticed that user settings were reset, and it was necessary to initialize the IP camera (specify a new administrator password, e-mail for password recovery).
While the debug UART interface is connected, you can update the camera firmware via TFTP (of course, if an updated official firmware version is available). To do this, stop the bootloader again and look at the network interface settings:
- current IP address of the camera (ipaddr = 192.168.1.108);
- TFTP server address (serverip = 192.168.1.1)
- gateway address (gatewayip = 192.168.1.1)
If the camera is connected to the local network via a router, then it is necessary to configure the corresponding IP address of the camera, server, gateway. I connect the camera directly to the PC via Ethernet, so I change the settings of the network card (Figure 10), assigning the IP address 192.168.1.1 to the PC (a TFTP server with the same address will be launched on the same PC).
 |
||
| Figure 10. | Configuring a network card when directly connecting the IP camera to a PC for firmware upgrade via TFTP. |
|
On the PC, run the TFTPD program, select the server address (192.168.1.1) and specify the folder into which the firmware files for the IP camera are unpacked. Now, in the command line of the debug interface, launch the firmware update with the run up command and wait for the files to download and Flash memory to be written. You can update in manual mode section by section using the appropriate commands. The list of commands/scripts is given in the list of parameters of the boot loader environment (Figure 11). For example, to update the section of the camera's web interface, run the run dw command.
 |
||
| Figure 11. | List of scripts for updating IP camera firmware in U-Boot environment parameters. |
|
With the run up command, we update all sections of the firmware in automatic mode (Figure 12).
 |
||
| Figure 12. | IP-camera firmware upgrade with TFTP and "run up" command. | |
After the update, we restart the IP camera and check its functionality.
References
- PuTTY Software
- TFTPD Software
- Dahua Software and utilities
- Dahua DH-IPC-HDW4421E