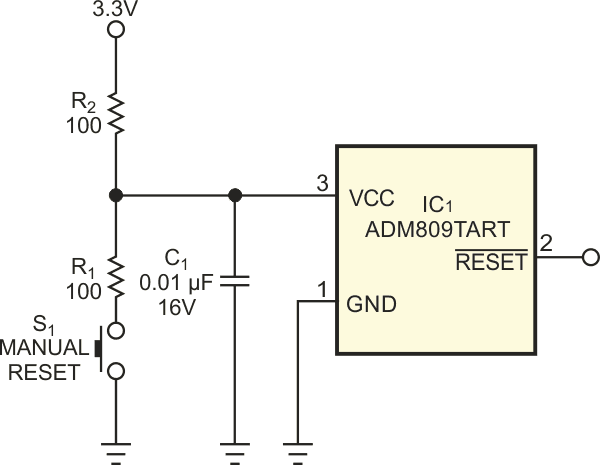
Adding a manual reset to a design usually involves designing in a new part with a manual-reset input. But, by adding a couple of low-value resistors, a standard three-pin-reset supervisor can work in most applications. The circuit in Figure 1 ensures a clean signal during and after you have pressed the manual-reset button. When you activate the manual-reset button, the supply voltage drops below the reset supervisor’s minimum reset threshold because of the R1/R2 voltage divider formed when S1 is active. This action causes the reset supervisor to activate its output. When you release S1, the supply voltage returns to above the reset-supervisor maximum-reset threshold, and remains active for the time-out period of the reset supervisor.
 |
|
| Figure 1. | A pair of low-value resistors, a capacitor, and a pushbutton add a manual-reset function to a standard three-pin-reset supervisor. |
When you do not press S1, R2 has a voltage drop arising from the reset supervisor’s supply current and output loading. For most reset supervisors, the maximum supply current is 50 µA. For most designs, the output goes to one or more CMOS inputs that require about 10 µA each.
With two CMOS devices connected to, the total current through R2 would be

The voltage drop across R2 due to the current flow effectively adds

to the reset supervisor’s reset-threshold voltage.
You should consider several trade-offs for the selection of values for R1, R2, and C1. The value of the local bypass capacitor, C1, for the reset supervisor should be low enough to allow the reset supervisor to detect transient supply-voltage drops. The time constant of R2 and C1 determines this factor; in this example, the time constant is

This figure is typically much higher than the decay rate of a regulated power supply that has lost power.
When you activate S1, current flows through R1 and R2. In the circuit in Figure 1, the current flow when you activate S1 is
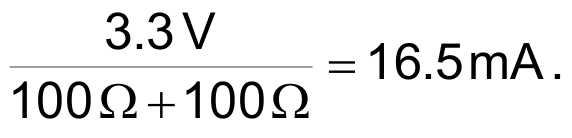
This amount of current would be OK for a line-powered system but may not be OK for a battery-powered system. You can reduce the current by increasing the value of R1 and ensuring that the reset supervisor’s supply voltage drops below the minimum reset threshold. You can also increase the value of R2, along with that of R1, but doing so will cause increased voltage drop and slower response to transients. Note that the increased current of the manual reset occurs only while the manual reset is active, and typical system current drops while is active.