Garima Gupta and Joshan Abraham
Electronic Design
Designers now can take their existing accessory designs and make them Android Open Accessory (AOA) Protocol-compliant
The use of Android-based mobile Internet devices (MIDs), tablets, and other products has been growing tremendously since 2008, with Android devices occupying 70% of the mobile market today. Similarly, there has been a rise in the number and type of USB-based devices that connect to Android devices, ranging from simple audio docks to more complex medical equipment. Designers with an eye on this growing market should ensure that their accessory designs comply with the Android Open Accessory (AOA) Protocol.
USB And Android
USB interactions between an Android device and the USB peripheral or accessory have to follow the USB specification. USB is a host-centric protocol, meaning that the host initiates all transactions and that there can be only one host on the bus. A USB host, then, must be present among the connected devices. Thus, an Android device can interface with a USB-based device in two different ways: in USB host mode(the connected USB device is called a USB peripheral) and USB accessory mode (the connected USB device is called an Android USB accessory).
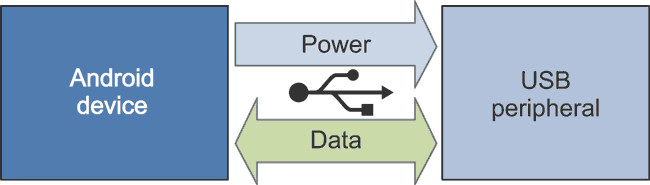
In USB host mode, the Android device acts as the USB host, powers the USB bus, and enumerates the USB peripherals connected to it. The Android device typically connects to peripherals like keyboards, mice, and game controllers in USB host mode (Fig. 1).
 |
|
| Figure 1. | An Android device operates in USB host mode when connecting to a peripheral. |
Running Android devices in USB host mode while providing a current of up to 500 mA to power the USB peripheral can drain the device’s battery, especially if the USB peripheral is power-heavy. Power-heavy peripherals include medical and diagnostic equipment, exercise equipment, docking stations, portable point of sale (POS) devices, and car panels with Android connectivity, among many others.
In addition, some Android devices do not have the USB host hardware needed to support communications in USB host mode. The Android device generally has a specific list of USB devices it can support called the target peripheral list (TPL). In such cases, devices that aren’t on the TPL need to communicate in an alternate way.
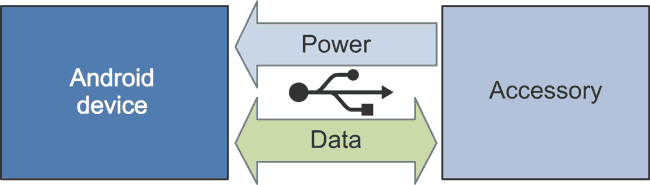
USB accessory mode overcomes the limitations of USB host mode by having the external USB accessory act as the USB host. The accessory powers the USB bus and communicates with the Android device (Fig. 2).
 |
|
| Figure 2. | An Android device can also operate in USB accessory mode. |
Android devices that can’t act as a USB host then can interact with the USB accessory. Such accessories generally have large batteries or a wired power connection.
These Android devices and accessories should adhere to the AOA Protocol, which defines how an accessory detects and sets up communication with an Android device. The accessory is expected to follow four steps, as defined in the AOA specification:
- Wait for and detect connected devices
- Determine the device’s accessory mode support
- Attempt to start the device in accessory mode if needed
- Establish communication with the device if it supports the Android accessory protocol
AOA support is available in Android 3.1 and higher, but it has also been back-ported to Android 2.3.4 through an add-on library. Even human interface devices (HIDs) like keyboard and mice, which you would typically associate with the USB host mode, can be used in the USB accessory mode using AOA 2.0.
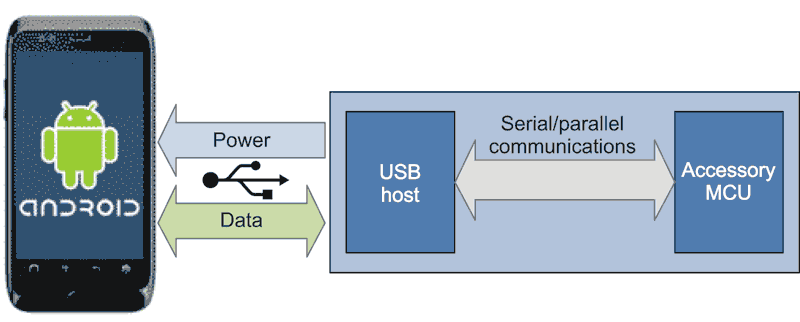
The various considerations and steps involved in adding AOA capabilities to an existing accessory design are discussed below. The same considerations and steps can be used to develop a new accessory design. A typical implementation while expanding to Android support would require us to add a USB host to the existing accessory and establish a communication interface between it and the accessory MCU (Fig. 3).
 |
|
| Figure 3. | A typical implementation while expanding to Android support would require us to add a USB host to the existing accessory and establish a communication interface between it and the accessory MCU. |
The first step would be to evaluate the resources available in the accessory MCU. The two things that primarily need to be accounted for are memory and the communication block. Sufficient memory, either RAM or flash, is required to implement code to interface and control the host IC and to implement the AOA Protocol stack. The communication block can include SPI/UART/I2C or I/O pins.
A communication protocol like SPI/UART/I2C is required to establish communication with the USB host IC. For this, the system needs either an available hardware communication block, or, if unavailable, the communication protocol stack must be implemented in software; i.e., also known as “bit-banging” mode. The I/O pins chosen should be compatible with the protocol required to communicate with the host IC.
For instance, if one intends to implement a software SPI master on the peripheral microcontroller, then it should be possible that the I/O pin chosen as the SPI_Clock can be driven at the required clock rate, as determined by the throughput requirement. Similarly, an available hardware SPI master on the accessory MCU will give us the flexibility of interfacing a SPI slave (USB host controller) on the topology. In this case, one extra general-purpose I/O (GPIO) might be needed for interrupt requests from the host IC and one GPIO for Slave_Select of the SPI slave. If there are other SPI slaves in the system, the same master out slave in (MOSI), SPI_Clock, and master in slave out (MISO) can be used.
The next step is to choose the right USB host IC to match the MCU resources to ensure optimal accessory performance. There are three primary considerations: the type of IC (programmable or fixed function), the communication interface of the host IC, and the desired throughput.
The most basic type of USB host ICs are the serial interface engine (SIE) ICs, which give the accessory MCU complete control over the USB communication. The MCU controls every packet data on the USB bus. Such an implementation consumes more code memory on the accessory MCU, which is not advisable when there is a constraint on MCU memory resources.
Other host ICs with in-built MCUs can be programmed to function as desired while controlling USB packet data. Such host controllers ease the load on the accessory MCU, saving both RAM and offloading processing from the MCU. Host ICs will implement the whole host firmware stack within the host, leaving the accessory MCU to simply perform data exchanges and send custom control commands to communicate with the Android device.
For example, one can program the host IC to send a Get_Descriptor request on receiving a specific code from the accessory MCU over SPI. Such host ICs can send data to the accessory MCU as any other slave on the SPI bus. One can also use such host ICs in standalone mode for a new design of accessory, i.e., without an external MCU to control it.
Both kinds of host controllers provide a range of communication interfaces, such as SPI, I2C, UART, High Speed Serial Interface (HSS), and parallel interfaces (like External Memory Interface or Processor Interface). The MCU can have complete control over the USB host’s functioning over any of these communication interfaces. The interfaces might also allow for firmware upgrades of the USB host IC.
The availability of such interfaces provides the flexibility to achieve any data transfer rate. One can interface using three lines (3-wire SPI communication) to n lines (for parallel interfaces) as available and needed. Based on the hardware resources available in the accessory MCU, we can choose the best communication interface. Even if no hardware resources are free in the accessory MCU, we can use four GPIO pins and implement the SPI stack in firmware.
Another factor while choosing a host IC will be whether it should be a full-speed or a high-speed host. Full speed (USB 1.1) supports a signaling rate of 12 Mbits/s. High-speed host ICs support up to 480 Mbits/s and generally have a parallel interface for communication and control logic to achieve the high throughput required. A few high-speed hosts also have SPI, I2C, or other communication interfaces. Some even have a programmable parallel interface that can be programmed to cater to any specific needs of the interfacing accessory MCU while still meeting the desired throughput of the high-speed USB.
For accessories with very limited resources available, a full-speed programmable USB host controller integrating a high-speed serial interface with configurable baud rate, SPI (master/slave), and parallel interface simplify communication. An external memory interface and interface to an I2C EEPROM also enable program code to be stored externally, further facilitating the addition of AOA support to an existing design. Alternatively, a host controller might have just a direct data port and microprocessor interface to a standard MCU or MPU.
After choosing the communication protocol and the interfacing host controller, the next step is to implement the interfacing and controlling logic. As discussed earlier, there are two kinds of ICs: fixed function and programmable. When using simple fixed-function ICs, the microcontroller will have to manage every event occurring on the USB bus. Even events like connecting a USB device on the bus will be reported on an interrupt or must be polled for by reading status registers. For using a basic SIEfunction IC, the code in the accessory controller will need some of the following functions:
- Elementary functions: reading a register, writing to a register, writing multiple bytes of data to a location (like writing to a FIFO), and reading bytes of data from a location (like reading from a FIFO)
- Functions using the elementary functions for controlling the functionality of the host IC: initialize the host IC, detect a device connect, detect a device disconnect, reset the IC, print errors if there are any, USB suspend command, USB resume command, control read transfer (setup, data, acknowledgement phase), control write transfer without data phase, control write transfer with data phase, bulk data IN transfer (IN token, data received, acknowledgement), and similarly bulk data OUT transfer (AOA Protocol communicates only over bulk endpoints)
- Functions using these functions to implement protocol level functionality: detect PID_VID, set interface, get interface, send data (over bulk endpoint), receive data, etc.
For programmable host ICs, the controlling functions in an accessory MCU can be simple custom commands sent over the communication interface.
The final step is to implement the AOA Protocol on the accessory. This primarily consists of four major steps as defined in the AOA specification referred to earlier: wait for and detect connected devices, determine the device’s accessory mode support, attempt to start the device in accessory mode if needed, and establish communication with the device if it supports the Android accessory protocol.
Wait For And Detect Connected Devices
First, the accessory should wait for a device (such as an Android phone) connection event. A device connect is marked by pull-up of the D+/D– USB data lines. D+ is pulled high when a full-speed or high-speed device is connected, and D– is pulled high in case of low speed. In other words, you can poll and wait for a J or K state on the bus.
Second, provide a 100-ms delay. As stated in the USB specification: “This is a debounce interval with a minimum duration of 100 ms that is provided by the USB System Software. It ensures that the electrical and mechanical connection is stable before software attempts to reset the attached device. The interval starts when the USB System Software is notified of a connection detection. The interval restarts if there is a disconnect. The debounce interval ensures that power is stable at the device for at least 100 ms before any requests will be sent to the device.”
Third, the accessory USB host IC then issues a reset to the Android device. The “reset” condition means to issue the SE0 condition on the bus. During this time, a high-speed host IC has to take care to issue a chirp sequence to detect a high-speed Android device connection if a pull-up is detected on the D+ line. If a full-speed host is used, it would not issue the chirp sequence, and a high-speed device communicates over full speed. Host ICs generally take care of the USB housekeeping work.
Fourth, after reset, give the connected device a minimum reset recovery time of 10 ms.
Determine The Device’s Accessory Mode Support
Fifth, send a “Get Device Descriptor” request to address “0” and then a “Set Address” command to set the address of the device to any value you desire.
Sixth, send all subsequent USB requests to this new address to see if the device is responding to the new address. Send the “Get Device Descriptor” and “Get Configuration” requests. This is not a mandatory step.
Seventh, check if the PID_VID of the attached device matches with the Google PID_VID. After sending the “Get Device Descriptor” request, fetch the PID_VID details of the device from the descriptor received. The product ID (PID) and vendor ID (VID) of the device will typically be the device manufacturer’s IDs.
If the device supports and is active in AOA mode, it will respond with Google’s VID (VID==0x18D1) and PID (PID==0x2D00||PID==0x2D01) instead of the device manufacturer’s IDs. If the device is detected with the Google ID, the accessory can conclude that the found Android device supports AOA and it can establish communication with the device. In this case, skip steps eight through 11 and move on to step 12. Note that both PIDs have different meanings. If the device enumerates with the manufacturer’s ID, continue to step five.
Eighth, check if the attached device supports AOA mode. Use a control request with the values in Table 1 to check if the device is AOA capable.
| Table 1. | Values to Check for AOA Capability. | ||||||||||
|
|||||||||||
This request returns a non-zero number if the AOA protocol is supported, with the exact value representing the version of the protocol that the device supports (AOA 1 or AOA 2). If zero is returned, the device is not AOA compliant and the accessory should wait for the next device to be connected. Attempt to start the device in accessory mode if needed.
Attempt To Start The Device In Accessory Mode If Needed
Ninth, send identifying string information to the device. This information allows the device to figure out an appropriate application (installed on the device) for the accessory or present the user with a uniform resource identifier (URI) if an appropriate application does not exist. These requests are control requests on endpoint 0 to the device (for each string ID) with the characteristics listed in Table 2.
| Table 2. | Characteristics for Control Requests. | ||||||||||
|
|||||||||||
The following string IDs are supported, with a maximum size of 256 bytes for each string:
- String ID “0” means that the following data is for “manufacturer name.”
- String ID “1” means it is for “model name.”
- String ID “2” means it is for “description.”
- String ID “3” means it is for “version.”
- String ID “4” means it is for “URI.”
- String ID “5” means it is for “serial number.”
Tenth, request the device to start up in accessory mode. This request is a control vendor request on endpoint 0 to the Android device with the characteristics listed in Table 3.
| Table 3. | Characteristics of a Control Vendor Request on Endpoint 0 to the Android Device. |
||||||||||
|
|||||||||||
Eleventh, send the “Get Device Descriptor” request again and see if the device enumerates appropriately with the proper PID_VID or simply loop back to step seven, where you find a device is connected and ask for the descriptor. (The address of the device in this case won’t be 0, but will be as you had set earlier in step five.) If at any point these steps fail, the device is not AOA compliant and the accessory should wait for the next device to be connected.
Establish Communication With The Device If It Supports The Android Accessory Protocol
Twelfth, get the endpoint configuration using the “Get Configuration” request. The AOA Protocol communicates over 1 Bulk In and 1 Bulk Out endpoint only. An Android device that has a PID of 0x2D00 has one interface with two bulk endpoints for input and output communication. The PID of 0x2D01 provides an extra interface for ADB (Android Debug Bridge) communication. For devices with either PID, configuration 1 should be active, and communication can happen over the first Bulk In and first Bulk Out endpoint.
Finally, start your application on the accessory to communicate with the Android device as the USB slave. This concludes the process.
You can follow these guidelines and steps to convert your existing accessory design into an AOA-compliant accessory in a straightforward manner or use them to create a wholly new design.