Brian King, Texas Instruments
EDN
In isolated power supplies, optocouplers pass the feedback signal across the isolation boundary. Optocouplers contain both a light-emitting diode (LED) and a photo detector. Current flowing through the LED results in a proportional current flowing in the photo detector. The current transfer ratio (CTR) is the current gain from the LED to the photo detector, and typically has a very wide tolerance. When you are designing an isolated feedback network, you must consider the tolerance of the optocoupler and all other components that determine the large signal gain. Neglecting this task could easily result in returns after your product goes to production.
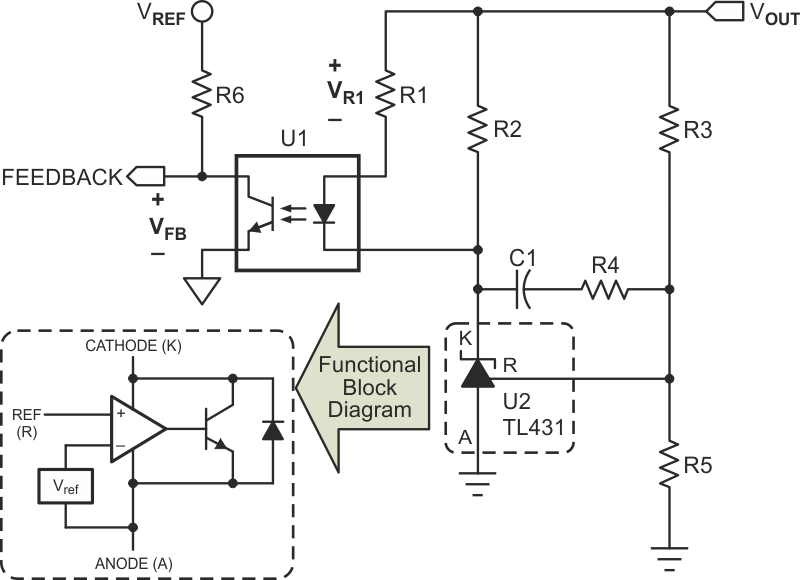
The schematic for an isolated feedback network, shown in Figure 1, is the most common implementation. TI’s TL431 contains both an error amplifier and reference. The resistor divider of R3 and R5 and the internal reference of the TL431 set the output voltage. The feedback network controls the power delivered to the power-supply output by varying the voltage on the feedback pin of the pulse-width modulation (PWM) controller. When VOUT drifts higher, the TL431 cathode pulls more current through the optocoupler, which pulls the feedback pin lower. When VOUT drifts lower, the TL431 cathode commands less current from the optocoupler, allowing the feedback pin to float higher.
 |
||
| Figure 1. | This circuit commonly generates the feedback signal in isolated power supplies. |
|
A proper design must ensure that this circuit is capable of driving the feedback pin of the controller over its entire dynamic operating range while considering worst-case tolerances of all major variables.
The first step is to determine the dynamic operating range of the feedback pin in the controller. All controllers are different, so this task requires some investigation of the datasheet. As an example, let’s assume that you are using an UCC2897A to control a 12 V output active clamp-forward converter. Reading the “Detailed Pin Descriptions” in the UCC2897A datasheet reveals that a voltage of 2.5 V on the feedback pin results in a zero duty cycle, while a feedback voltage of 4.5 V results in a maximum duty cycle. The UCC2897A also provides a 5 V reference, which you can use to bias the photo detector of the optocoupler through R6 in Figure 1. This reference has a minimum value of 4.75 V and a maximum value of 5.25 V. Equations 1 and 2 calculate the required current range through the optocoupler photo detector, assuming that you use a 1 kΩ resistor with a 1% tolerance for R6:
 |
(1) |
 |
(2) |
Your circuit must be able to drive the R6 current over a range of 0.25 mA to 2.78 mA. By providing resistor R2, the cathode of the TL431 is able to raise to a high-enough voltage, eliminating current flow in the optocoupler’s LED. Thus, the circuit design guarantees the minimum R6 current, and you only need to worry about providing the maximum R6 current.
 |
||
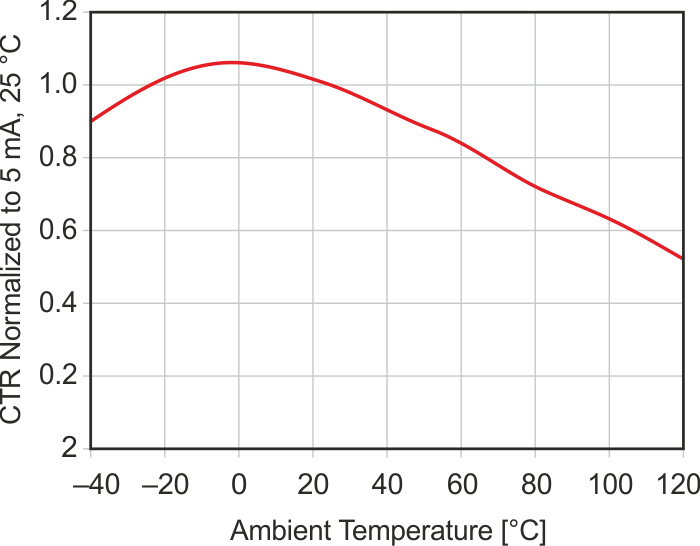
| Figure 2. | Optocoupler CTR varies with temperature. | |
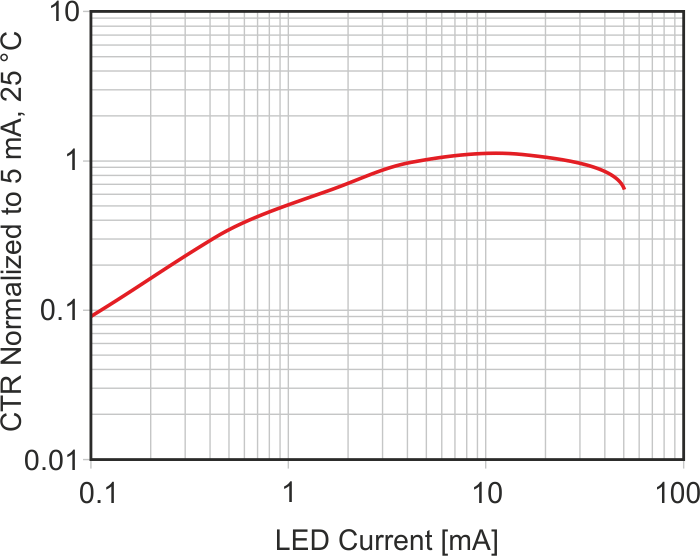
The second step is to calculate the worst-case CTR of the optocoupler. Optocouplers with “817” in the part number are offered from numerous manufacturers which are pin-for-pin compatible with each other; each uses a different prefix in the part number. Table 1 shows examples of 817 devices with different CTR ranges, denoted by a single-letter suffix in the part number. This CTR range does not include the effects of temperature and bias current. Charts from the optocoupler datasheet, recreated in Figures 2 and 3, summarize the effects of temperature and bias current.
 |
||
| Figure 3. | Optocoupler CTR varies with bias current. | |
Assume that you expect your supply to operate in a –40 °C to 85 °C environment. From Figure 2, you know that you need to multiply the minimum CTR by a factor of about 0.7 at 85 °C. If you select the “A” version of the 817, your minimum CRT can now be as low as 56%. Dividing the result of Equation 1 by 0.56 tells you that you may require at least 4.96 mA of LED current, not including the effects of bias current. From Figure 3, you can see that the bias-current effects at 4.96 mA are negligible.
| Table 1. | Optocouplers are available with various CTR ranges | ||||||||||||||||||
|
|||||||||||||||||||
The third and final step is to set the value of R1 to ensure that the TL431 can sufficiently drive the optocoupler over all conditions. The minimum cathode voltage of the TL431 is 2.5 V, and the forward drop of the optocoupler’s LED can be as high as 1.0 V. Equation 3 calculates the maximum value of R1 to guarantee regulation:
 |
(3) |
Using an R1 value greater than 1.7 kΩ in this power supply may prevent the TL431 from driving enough current in the LED to maintain regulation. If the optocoupler is current-starved, the output voltage will keep rising until the proper amount of LED current conducts through the optocoupler. This results in overvoltage conditions on the output, and is more likely to occur at higher temperatures.
Tolerance issues such as this often slip through during the design phase. A pre-production run of power supplies could easily pass all tests, with the problem only showing up later as customer returns. Following the simple design procedure here can save your company money and keep your customers happy.