What you’ll learn
- What is the Raspberry Pi 400?
- What the Raspberry Pi 400 is not.
- Why you may want one.
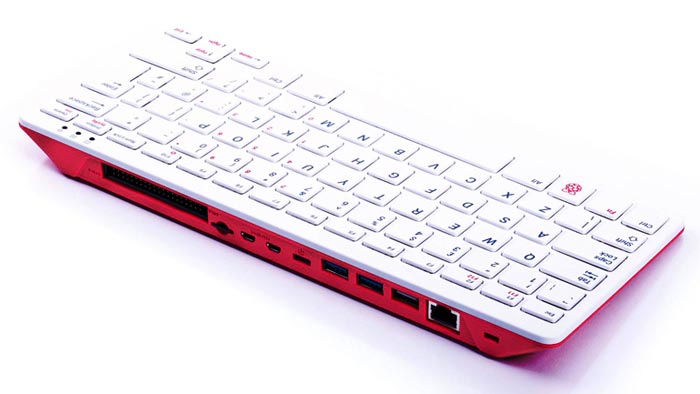
The Raspberry Pi 400 is a Raspberry Pi 4 inside a keyboard (Fig. 1). That’s it. We’re done.
 |
||
| Figure 1. | The Raspberry Pi 400 exposes the ports on the rear, including a 40-pin header that matches the functionality found on the Raspberry Pi 4. |
|
Actually I have a bit more to say about this $70 platform or $100 with the mouse and manual that I received from Newark. As noted, it’s essentially the Raspberry Pi 4 in a different form factor. Like the Raspberry Pi 4, it has a 1.8-GHz Broadcom BCM2711 quad-core 64-bit Cortex-A72 SoC. That puts it on par with many smartphones, tablets and Chromebooks.
The 400 has a Gigabit Ethernet port for wired connectivity and a dual-band IEEE 802.11b/g/n/ac wireless connection. Bluetooth can be use for things like a mouse, but obviously a wireless keyboard isn’t needed. A Raspberry Pi USB mouse is part of the package, so the only thing you need to add is a monitor.
On the back of the keyboard are two USB 2.0 ports and a pair of USB 3.0 ports. Two micro HDMI ports allow the unit to drive two 4Kp60 displays. I tried it with a single 4K display and it worked quite well. Power is provided by a USB Type-C connector via a power brick. The length of the cord is one of my minor gripes. An extension cord may be needed as it was in my case. The Type-C connector is only used for power, not for a USB interface.
A microSD slot holds a card with the operating system. The kit comes with a 16-GB card and an SD card adapter. The system has 4 GB of DRAM on-board. It’s not possible to expand the amount of RAM, but additional storage can be had via a USB drive.
The 40-pin connector on the back is compatible with the header of the Raspberry Pi family. A cable and adapter board will usually be required to accommodate additional peripherals. Whether that’s ever needed depends on what your intentions are for the system. I happen to have cables and headers, so it was easy to test out some Raspberry Pi HATs (hardware attached on top).
The system has sufficient power and storage to do development, and the ability to directly manage the peripherals can be an advantage. Of course, the same could be done with a standard Raspberry Pi module connected to a USB keyboard, mouse, and monitor.
Two connectors that aren’t found on the 400 but on the Raspberry Pi 4 are the CSI and DSI connectors for camera input and display output. Given the dual HDMI, the DSI isn’t really needed and the CSI is for cameras that would work in an embedded application. A USB camera makes more sense for using the system as a video-conferencing platform, which is how I set up the system.
The other item that’s missing is the audio output jack. However, this isn’t an issue if you’re using an HDMI display with built-in speakers or a speaker output on the display. Other alternatives are USB-based speakers or Bluetooth speakers. Forewarned is forearmed.
Overall, the system is compact and the keyboard reasonably responsive. The color-coordinated mouse is worth the extra investment if you’re going to be using it primarily as a desktop unit, although any USB or Bluetooth mouse fills the bill.
One thing I did want to mention about this fanless platform is its internal heat spreader. The Raspberry Pi 4 can run without a heatsink, but only by keeping the clock rate down. The 400 can run full speed because of the internal metal heatsink.
 |
||
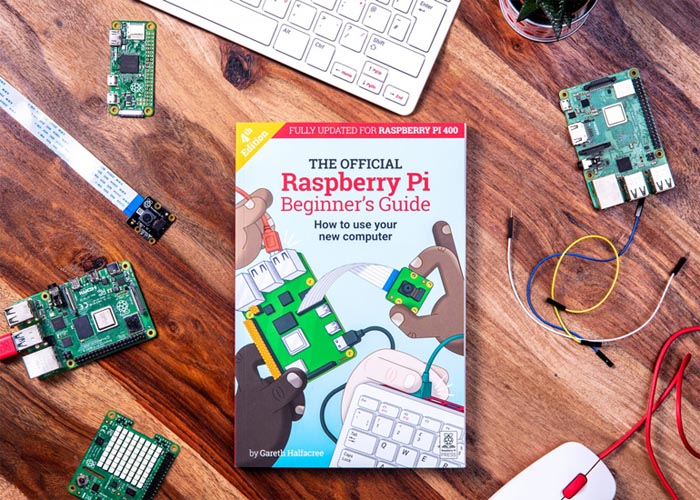
| Figure 2. | The Raspberry Pi 400 comes with the Raspberry Pi Beginner’s Guide. | |
The bundle that includes the Raspberry Pi 400 mouse also includes a copy of “The Official Raspberry Pi Beginner’s Guide,” which addresses the Raspberry Pi family (Fig. 2). It gets into the Scratch programming language and even basic electronics.
Raspberry Pi 400 Software
The Raspberry Pi 400 runs the Raspberry Pi OS that’s a 32-bit Linux distribution. The default installation includes Python and even the Thonny Python IDE, but not much else other than the Chromium browser. On the plus side, it leaves about 11 GB free on the standard 16-GB microSD card. Even after I added LibreOffice and the GIMP editor, there was plenty of room left. Still, I tend to use LAN-based storage, so only tools need to be installed on the PC.
The package repository is large, and most users can get along by simply downloading additional packages that they might need, such as LibreOffice. It’s possible to configure the Chromium browser to handle DRM-based video, but sites like YouTube work just fine. The MythTV and Kodi clients were able to access my MythTV server, which is how I record most of my cable-based video via a SiliconDust HDHomeRun.
The standard Linux distribution fits my needs, including development tools like Eclipse, which is also in the standard repository. Of course, 11 GB tends to nibble away quickly as you start adding tools, so keeping files on external storage is desirable. As noted, I tend to use a network server, but a USB flash drive or hard/solid-state disk (HDD/SDD) works just as well. A USB 3 drive is probably faster than the microSD card, although I haven’t done any benchmarks.
The platform works well with third-party hardware and software. I pulled out my BitScope Micro, a USB-based logic analyzer and oscilloscope that I reviewed on an earlier Raspberry Pi platform.
System boot-up and shutdown are quick. The Fn + F10 key combination handles power on/off versus a dedicated power button.
My Recommendation
While the matching mouse is nice, the cord is a bit short for my tastes. Likewise, the extra documentation will be useful to some, but not necessarily for someone who is already familiar with Linux and the Raspberry Pi. In this case, going with your own mouse and the base $70 unit makes the most sense.
Overall, I can recommend the Raspberry Pi 400 as a useful system that will pay dividends as a basic desktop unit and as a platform for working with or developing applications targeting the Raspberry Pi. I find it more useful that the Raspberry Pi 4 is in a case, although coupling the two makes for an interesting cross-development solution. It’s not always a great idea to go tinkering with a device that’s attached to a ribbon cable to your host PC.