Up front: some background. The air-temperature sensor attached to my (home-brew) rain gauge became flaky. Short-term solution: fix it (done). Longer-term goal: improve it (read on).
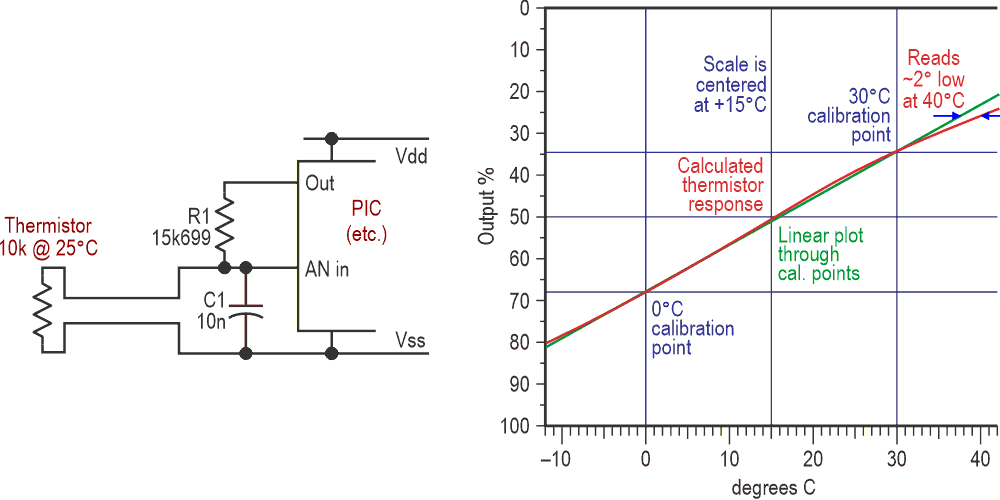
That sensor is a standard Vishay NTC (negative temperature coefficient) thermistor: 10k at 25 °C and with a beta value of 3977. In conjunction with a load resistor, it feeds a PIC microcontroller (MCU), which samples the resulting voltage (8 bits) for radio-linking back to base for processing and display. Figure 1 shows the utterly conventional circuit together with its response to temperature.
 |
|
| Figure 1. | A basic thermistor circuit, together with its calculated response. |
The load resistor’s value of 15699 Ω may seem strange, but that is the thermistor’s resistance at 15 °C, the mid-point of the desired –9 to +40 °C measuring range. Around every 30 seconds, the PIC strobes it for just long enough for the reading to settle.
The plot shows the calculated response together with a straight line running through the two actual calibration points of 0 °C (melting, crushed ice) and 30 °C (comparison with a known-good thermometer). That response was calculated using the extended Steinhart-Hart equations rather than the less accurate exponential approximation. Steinhart and Hart (S-H) are to NTC thermistors as Callender and Van Dusen are to platinum resistance temperature detectors (PRTDs), modifying the exponential curve just as Callender-Van Dusen (CVD) tweaks an otherwise straight line.
The relevant Wikipedia article [1] is, of course, informative. Still, a brief and useful guide to the S-H equations, complete with all the necessary constants, can be found on page 4 of Vishay’s relevant datasheet. Curiously, their tables of resistance versus temperature show truncated rather than rounded values, so they quote our device’s R6 as 15698 ohms rather than 15699. The S-H figure is 15698.76639545805…, give or take a few pico-ohms.
You’ll notice that Figure 1’s plot is upside down! That is deliberate, so a higher temperature shows a higher output, though the voltage actually falls. I think that’s more intuitive; you may disagree.
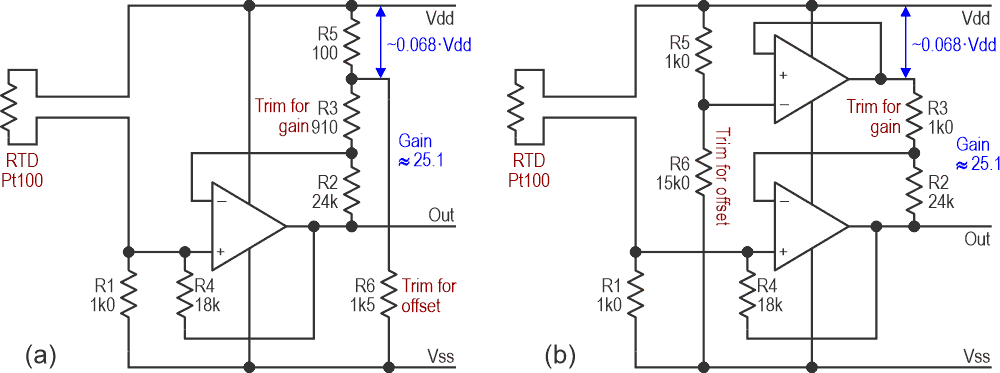
Matching an PRTD to an NTC
That straight line, derived from the S-H values at 0 and 30 °C, is the key to this idea. Making the PRTD generate a signal that matches it will avoid any major changes to the processing code, especially the calibration points, and it will also provide a much wider range with greater accuracy than an NTC. Because the voltage from the thermistor circuit is ratiometric, the PRTD must output a level that is a proportion of the supply.
To do that, we amplify the voltage developed across the PRTD, compensate for the CVD departure from linearity, and add an offset. The simplest circuit that can do all these is shown in Figure 2a.
 |
|
| Figure 2. | Probably the simplest circuit (2a) that can give an output from a PRTD to match a thermistor’s response, with a slightly better variant (2b). These are both flawed, and the component values are not optimized. They are to show the principle, not the practice. |
That simplicity leads to complications, because pretty much every component in Figure 2a interacts with every other one. It’s bad enough to design, even with ideal (simulated) parts, but final calibration could require hours of iterative frustration. Buffering the offset voltage, as shown in Figure 2b, helps, but that extra op-amp can be put to better use.
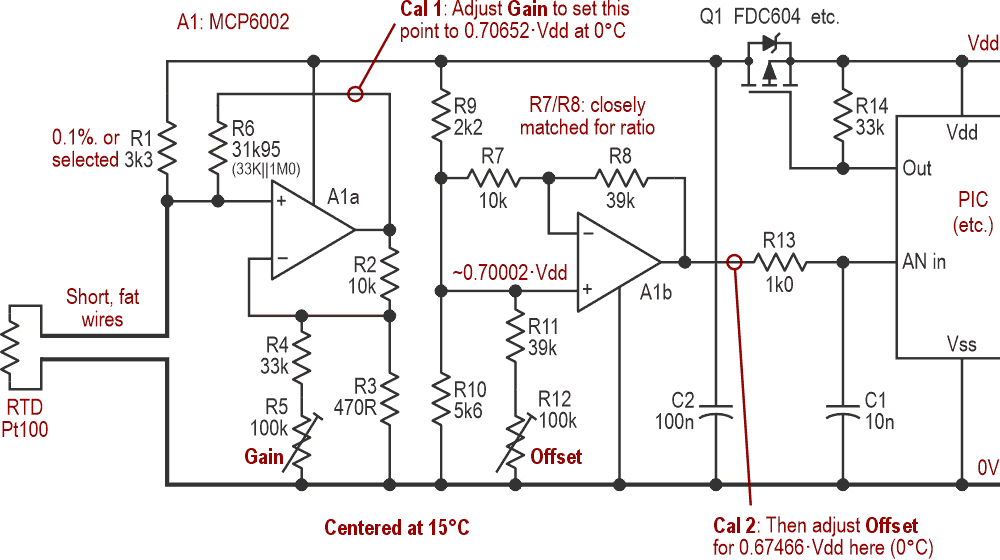
A practical circuit
If we split the circuit into two, life becomes easier. Figure 3 shows how.
 |
|
| Figure 3. | The final, workable circuit. Amplification and offsetting are now separate, making calibration much easier. |
The processor turns Q1 on to deliver power. (The previously active-high GPIO pin powering the thermistor must now be active-low to drive Q1’s gate, and that was the only code change needed.) The FDC604 has a low RDS(ON) of a few tens of milliohms, so it drops only 100 µV or so, which is insignificant, even if the measuring ADC’s reference is the Vdd rail. (Offsets within the MCU itself will probably be greater.) Because the circuit is only active for a millisecond every half minute or so, self-heating of the PRTD can be ignored. Consumption was about 3 mA at 5 V or 2 mA at 3.3 V.
R1 feeds current through the RTD, producing a voltage that is amplified by A1a, whose gain can be trimmed by R5. R6 feeds back into the RTD and R1 to compensate for both CVD and the varying drive to the RTD as its resistance changes. Its value is fairly critical: 33k works well enough for our purposes, but 31k95 – 33k||1M0 – is almost perfect, with a predicted error of way under 1 millidegree over a 100 °C span – theoretically – so we’ll use that. Obviously, this is ridiculous overkill with 8-bit output sampling, but if a single extra resistor can eliminate one source of errors, it’s worth going for.
A1b now amplifies the signal further (and inverts it) and applies a trimmable offset. Its output as a fraction of the supply voltage is now directly proportional to the PRTD’s temperature. Note that the gain of this stage is preset: R7 and R8 should be selected so that their ratio is as close as possible to 3.9, though their absolute values are not critical. The result is shown in Figure 4.
 |
|
| Figure 4. | Plotting the output against the RTD’s resistance now gives a result that is almost indistinguishable from the straight-line target, the (idealized) error corresponding to much less than 1 millidegree. This shows the performance limit for this circuit; don’t expect to match it in real life. |
Modeling and plotting
A simple program (Python plus Pygame) to plot the circuit’s operation at different scales made it easy to see the effects of changing both R6 and A1a’s gain, with the error curve tilting (gain error) and bending (compensation error). That curve needs to be as straight and flat as possible.
Modeling the first section needed iteration, starting with a (notional) unit voltage feeding R1 and ~0.7 driving R6. Calculating the voltage across the PRTD and amplifying that gave the stage’s output, ready to feed back into R6 for recalculating V_RTD. (Repeating until successive results matched to eight significant figures took no more than ten iterations.) The section representing A1b was trivial: take A1a’s output and multiply by 3.9 while subtracting the offset.
As a cross-check, I put the derived values into LTspice and got almost the same results. The slight differences are probably because even simulated op-amp gain stages have finite performance, unlike multiplication signs.
The program also generated Table 1, which may prove useful. It shows the resistance of the PRTD at various temperatures (centered on 15 °C) together with the output voltage referred to Vdd and given as a proportion of it. That output is also shown, scaled from 0–255 in both decimal and hex.
| Table 1. | The PRTD’s resistance and Figure 3’s output calculated against temperature, centered on 15 °C. The output is shown as decimals, both raw and rounded, and hex |
||||||||||||||||||||||||||||||||||||||||||||||||||||||||||||||||||||||||||||||||||||||||||||||||||||||||||||||||||||||||||||||
|
|||||||||||||||||||||||||||||||||||||||||||||||||||||||||||||||||||||||||||||||||||||||||||||||||||||||||||||||||||||||||||||||
The long numbers the program generated have been rounded to more reasonable lengths, which, deliberately, are still more accurate than most test kits can resolve. Too many digits may be useful; too few never are.
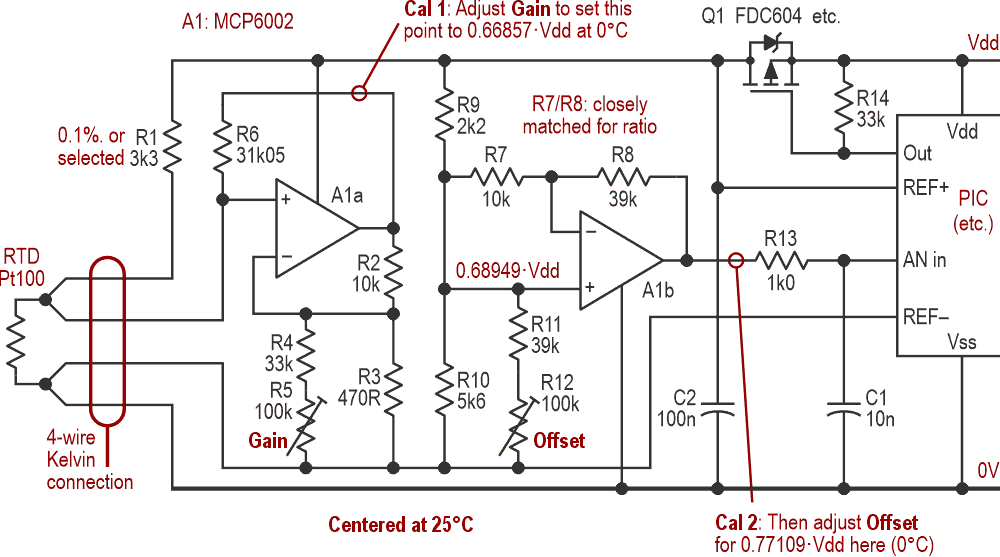
Compensating for long leads
As it stands, the circuit does not lend itself to true 3- or 4-wire compensation for the length of the leads to the RTD – unnecessary with an NTC’s multi-kΩ resistance. However, using a 4-wire Kelvin connection, where the power-feed and sensing lines are separate, should work well and reduce the cable’s effect, as shown in Figure 5. With less than a meter separating the RTD from the circuitry, I used speaker cable. (Copper’s TCR is close to that of a PRTD.)
Figure 5 also shows how accuracy could be improved by driving the ADC’s reference pins from the circuit’s power rails, though this is academic for coarse sampling. It would also compensate for any voltage drop across Q1, should that be important. Q1 could then even be omitted, the circuit being powered directly from an active-high pin. That would drop the rail voltage, which wouldn’t matter if it were fed back to REF+.
 |
|
| Figure 5. | Long leads to a PRTD can cause offset errors. Using a 4-wire Kelvin arrangement minimizes these. If the µC’s A–D has external reference-voltage pins, they can be driven from the circuit for (notionally) improved accuracy. |
This circuit is optimized for a center temperature of 25 °C, as that is the point at which most thermistors are specified, with the load resistor equaling the R(25) value. Unlike the 15°-centered version in Figure 3, I’ve not built or tried it, but believe it to be clean. Its plot – error curve included – looked very close to that in Figure 4, but shifted by 10 °C.
Errors, both theoretical and practical
The input offset voltage of op-amps changes with temperature and is a potential source of errors. The quoted figure for the MCP6002 is ±2 µV/°C (typ.), which is good but not insignificant. Heating the circuit by ~40 °C (with a 100R resistor replacing the PRTD) gave an output shift corresponding to less than 0.05°, which is acceptable, and in line with calculations. (An old hairdryer is part of my workbench kit.) Here, the circuitry and the PRTD will both be outside, and thus at about the same temperature.
So how does it perform in reality? It’s now built and calibrated exactly as in Figure 3, but not yet installed, allowing testing with a PRTD simulator kludged up from resistors, both fixed and variable, plus switches so the resistance can be connected to either the circuit or a (well-calibrated) meter for precise adjustment. Checking at simulated temperatures from –10 to +50 °C showed errors ranging from zero at –10° to –0.22° at +50° with either 3.3 V or 5 V supplies. This could be improved with extra fiddling (I suspect a slight mismatch in R7/8’s ratio; available parts had unhelpful spreads), but the errors are less than the MCU’s 8-bit resolution (~0.351 degrees/count, or ~2.85 counts/degree), so it’ll do the job it’s intended for, and do it well.
While this approach doesn’t substitute for a “proper” PRTD circuit, it does make a nice drop-in replacement for a thermistor, giving a wider measurement range with much better linearity while needing no extra processing. I hope the true experts in the field won’t find too many problems with it. BTW, “expert” derives etymologically from “stuff you’ve learned the hard way: been there, done that, worn the hair shirt”. Never trust an armchair expert unless you’re shopping for comfortable seating.