Impact of ADC resolution and its reference
Engineers always want to get all they can from their circuits; this holds for analog-to-digital converters (ADCs). To maximize performance from an ADC, resolution is perhaps the primary spec to focus on. However, the sad fact is that we have defined the maximum single-read resolution once we pick the ADC and its reference. For example, let’s say we use a 10-bit ADC with a 5-V reference. This means that our reading resolution is 5 V/1023 or 4.888 mV per digital step. But what if we had this ADC system and had to apply it to a sensor that had an output of 0 to 1 V? The ADC resolution stays at 4.888 mV, but that means there are only 1 V/4.888 mV, or ~205 usable steps, so in essence, we have lowered the sensor’s resolution to 1 part in 205.
What if we were designing a device to measure the voltage across an inductor when a DC step voltage is applied through a series resistor? You can see in the curve in Figure 1, in the first couple of seconds we probably would get decent data point readings, but after that, many of the data points would have the same value since the slope is shallow. In other words, the relative error would be high.
There are two basic ways to change this:
- Change the ADC to one with more bits (such as 12, 14, or 16 bits) or,
- Change the ADC’s reference voltage.
(There are also more exotic ways to change resolution, such as using delta-sigma converters.) Changing the number of bits would mean an external ADC or a different microcontroller. So, what if we designed a system with an adjustable reference? This resolution could change automatically as needed – let’s call this adaptive resolution.
Adaptive resolution demo
Let’s look at an easy method first. The Microchip ATmega328P has three settings for the internal ADC reference: the VCC voltage, an internal 1.1-V reference, and an external reference pin (REF). So, for demonstration, the simplest setup is to use an Arduino Nano, which uses the ATmega328P.
The demonstration uses one of the analog inputs, which can connect to a 10-bit ADC, to measure voltage or the sensor output. The trick here is to set the reference to VCC (+5 V in this design) and take an ADC reading of the analog input.
If the reading, after being converted to a voltage, is greater than 1.1 V, use that value as your measurement. If it is not greater than 1.1 V, change the reference to the internal 1.1-V band-gap voltage and retake the reading. Now, assuming your sensor or measured voltage is slow-moving relative to your sample rate, you have a higher-resolution reading than you would have had with the 5-V reference.
Referring to our inductor example, Figure 2 illustrates how this adaptive resolution will change as the voltage drops.
 |
|
| Figure 2. | Change in adaptive resolution using the Microchip ATmega328P’s internal ADC with either reference VCC voltage of 5 V or internal reference of 1.1 V. |
Adaptive resolution code
A piece of C code to demonstrate the concept of adaptive resolution is available in the Downloads section.
An aside:
As a test, I used Microsoft Copilot AI to write the basic code, and it did a surprisingly good job with good variable names, comments, and offered a clean layout. It also converted the ADC digital to the analog voltage correctly. As I was trying to get Copilot to add some logic changes, it got messier, so at that point, I hand-coded the modifications and cleanup.
This code continuously reads the ADC connected to analog pin A0. It starts by using VCC (~5 V) as the reference for the ADC. If the reading is less than 1.1 V, the ADC reference is switched to the 1.1-V internal reference. This reference is continued to be used until the ADC returns its maximum binary value of 1023, which means the A0 voltage must be 1.1 V or greater. So, in this case, the reference is switched to VCC again. After taking a valid voltage reading, the code prints the reference value used along with the reading.
The 5 V and 1.1 V references must be calibrated before use to get accurate readings. This should be done using a reasonably good voltmeter (I used a calibrated 5½ digit meter). These measured voltages can then be entered into the code.
Note that towards the top of the code, the 5-V reference voltage variable (“referenceVoltage5V”) is set to the actual voltage as measured on the REF pin of the Arduino Nano, when the input on A0 is greater than 1.1 V. The 1.1-V reference voltage variable (“referenceVoltage1p1V”) should also be set by measuring the voltage on the REF pin when the A0 voltage is less than 1.1 V. Figure 3 illustrates this concept.
 |
|
| Figure 3. | This code continuously reads the ADC connected to analog pin A0. If A0 voltage < 1.1 V, the ADC reference is switched to 1.1 V. If A0 > 1.1 V, the ADC reference is switched to VCC. |
Relative error between 1.1 V and 5 V references
A few pieces of data showing the improvement of this adaptive resolution are as follows: Around 1.1-V, the 5-V referenced reading can have a resolution error of up to 0.41% while the 1.1-V reference reading can have up to a 0.10% error. At 100 mV, a reading that references 5 V could have up to a 4.6% error, while a 1.1-V referenced reading may have up to a 1.1% error. When we reach a 10-mV input signal, the 5 V reference may err by 46% while the 1.1 V reference reading will be 10.7% or less.
Expanding reference levels
External DAC method
If needed, this concept could be expanded to add more levels of reference, although I wouldn’t go more than 3 or 4 levels on a 10-bit ADC due to diminishing returns. The following are a few examples of how this could be done.
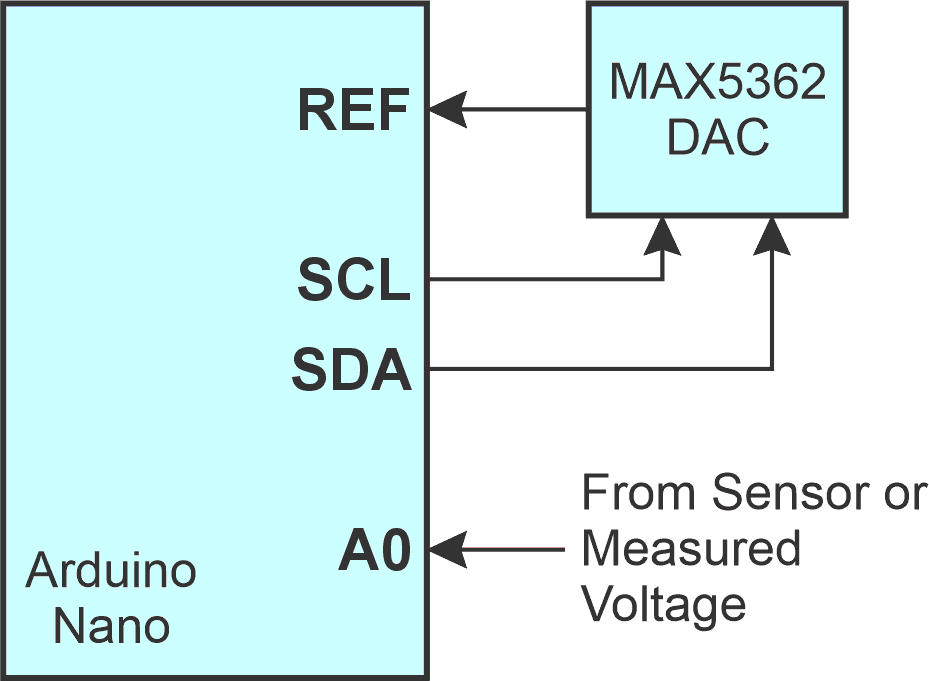
The first uses a DAC with its own reference tied to the Nano’s REF pin. The DAC controlled by the Nano could then be adjusted to give any number of reference values. An example of such a DAC is the MAX5362 DAC with I2C control (although its internal reference is 0.9×VCC, so the max reading would be roughly 4.5 V). In this design, the Nano’s REF pin would be set to “EXTERNAL.” See Figure 4 for more clarity.
 |
|
| Figure 4. | Using an external DAC (MAX5362) controlled by the Arduino Nano to provide more reference levels. |
Nano’s PWM output method
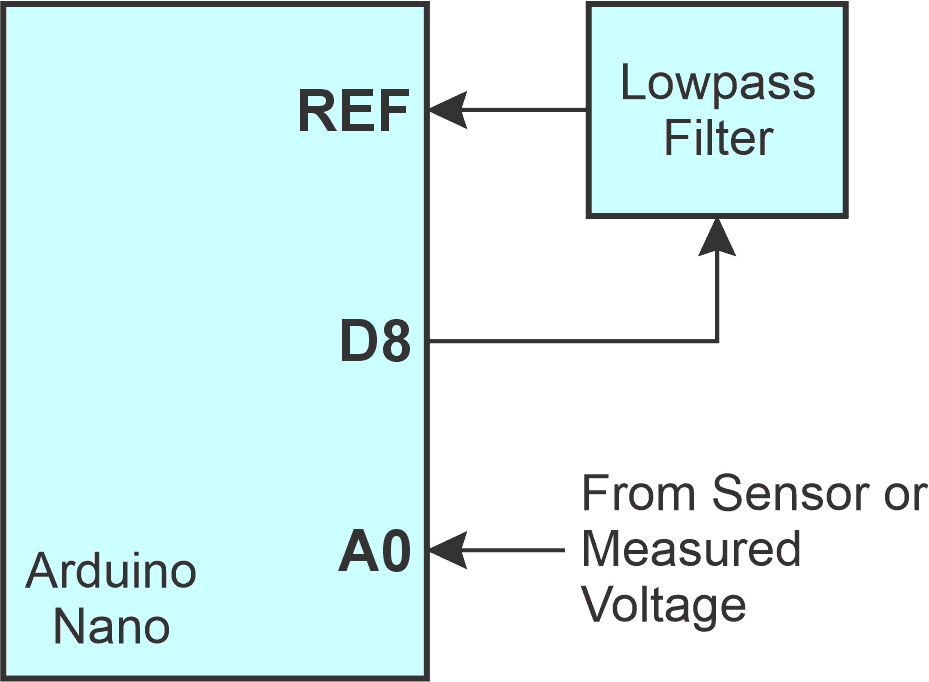
Another way to create multiple reference voltages could be by using the Arduino Nano’s PWM output. This would require using a high-frequency PWM and very good filtering to obtain a nice flat DC signal, which is proportional to the 5-V reference value. You would want a ripple voltage of about 1 mV (–74 dB down) or less to get a clean, usable output. The outputs would also need to be measured to calibrate it in the code. This technique would require minimal parts but would give you many different levels of reference voltages to use. Figure 5 shows a block diagram of this concept.
 |
|
| Figure 5. | Using the Arduino Nano’s PWM output and a lowpass filter to obtain the desired DC signal to use as a voltage reference. |
Resistor ladder method
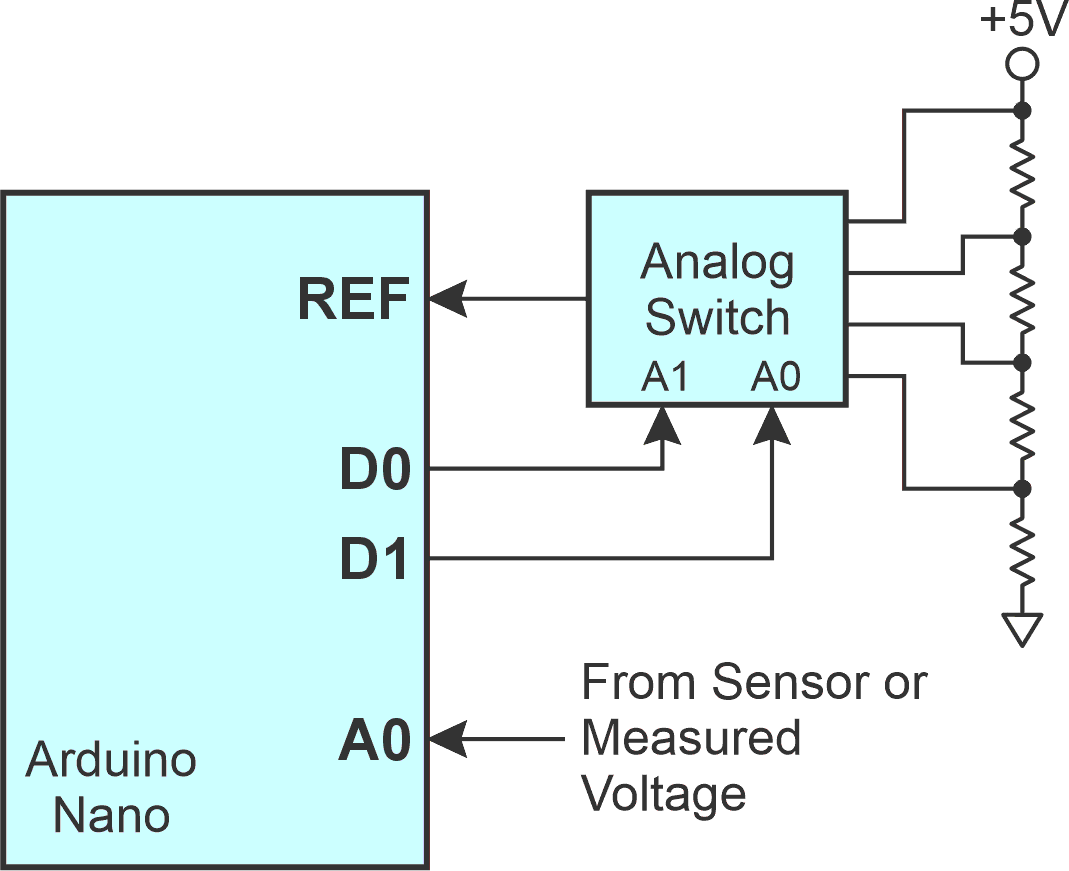
Another possibility for an adjustable reference is using a resistor ladder and an analog switch to select different nodes in the ladder. Something like the TI TMUX1204 may be appropriate for this concept. The resistor ladder values can be selected to meet your reference requirements. Figure 6 shows that two digital outputs from the Nano are also used to select the appropriate position in the resistor ladder.
 |
|
| Figure 6. | Using a resistor ladder and an analog switch, e.g., TI TMUX1204, to select different nodes on the ladder to generate tailored voltage reference values. |
You get the idea
There are other ways to construct the reference voltages, but you get the idea. The bigger picture here is using multiple references to improve the resolution of your voltage readings. This may be a solution looking for a problem, but isn’t that what engineers do – match up problems with solutions?
