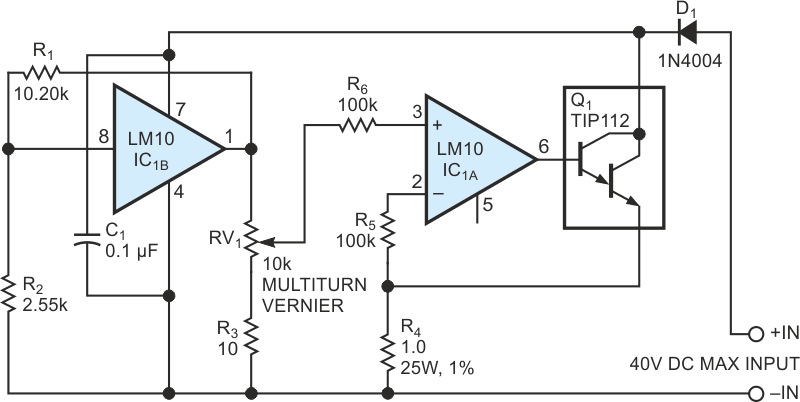
If you often need a simple active load (constant-current sink), you can benefit from the simple circuit in Figure 1. The need often arises to measure the life of a battery or other power device under constant-load conditions. The easy-to-build and inexpensive circuit in Figure 1 is a handy addition to your arsenal of test fixtures. You can build the circuit for less than $20. The most expensive parts are the vernier knob and the multiturn potentiometer. You can build the active load into a miniature enclosure with banana-jack connectors. The vernier control allows you to directly set current from 1 mA to 1 A by simply dialing the desired set current. Without the vernier and multiturn potentiometer, you could build the circuit for less than $10, but you then lose the advantage of a calibrated, stand-alone test box.
 |
|
| Figure 1. | A handful of inexpensive parts builds a precision current sink that provides 1-mA to 1 A sink current over a wide compliance-voltage range. |
The circuit is a precision current sink with typical current regulation of better than 0.5% for a 3 to 40 V compliance voltage. R4 is a sensing resistor; its voltage drop servos the input voltage to IC1A. The wiper of the vernier potentiometer sets the input voltage, discounting any amplifier offset errors. The offset could be as high as 2 mV in a run-of-the-mill LM10, translating to a 2-mA error between the set current and the current flowing in R4. The reference amplifier, IC1B, is a gain-of-5 stage that provides a 1.00 V reference on the high side of the current-setting potentiometer. The voltage-to-current transfer function is thus 1 A/1 V. You can change the transfer function to fit your needs.
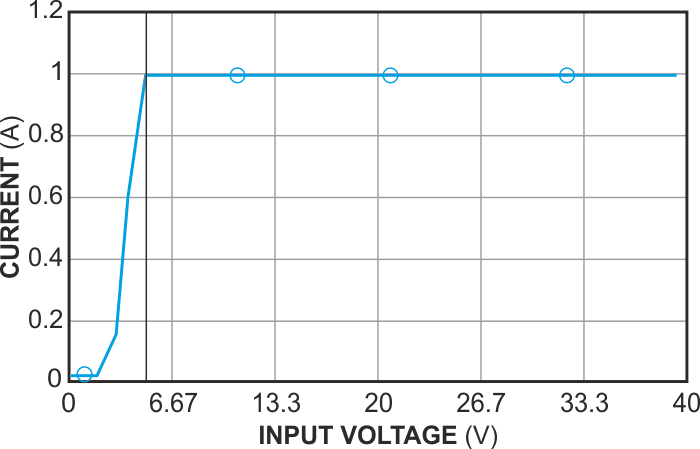
Although the current-control mechanism allows the output of the current source to approach zero, the additional currents consumed by the circuit (approximately 400 µA) establish the baseline current. Therefore, you set the bottom of the potentiometer via R3 to start at approximately 1 mA. Under normal operation, a current setting of 1 to 300 mA maintains the setpoint within 0.5% with 3 to 40 V compliance. Currents above 300 mA require 3 to 5 V for compliance. The circuit maintains a 1 A current within 300 µA from 4.9 to 40 V or within 0.03% tolerance (Figure 2). You could lower the initial regulation point by one diode junction by removing D1, whose sole purpose is to prevent destruction of the active circuitry when you connect the power supply backward.
 |
|
| Figure 2. | For compliance voltages above 4.9 V, the circuit in Figure 1 provides a rock-solid 1 A sink current, with less than 0.03% variation with voltage. |
The principal sources of error in the circuit are the amplifier offset, the tolerance of the reference voltage, the tolerance of R4, and the fact that the current includes various branch currents other than the controlled current in the sensing resistor. These branch currents add up to approximately 400 µA, or roughly five times lower than the offset-voltage error. You can consider the error negligible for settings of 10 mA and above. The most important issue for long-term stability is efficient heat removal from the current-regulating transistor, Q1. The transistor needs an appropriate heat sink; the choice of heat sink depends on the current ranges you need.
The element that encounters the largest voltage drop at a given current is the hottest. Q1 dissipates VIN – 1 W for any given input voltage when operating at 1 A. If you plan to use the load on a continuous basis, for example at 1 A, with a 30 V input, Q1 dissipates 29 W; R4 consumes 1 W. Q1 would thus need a hefty extruded heat sink.